2GR-FE Engine control system
Starter Relay Circuit High
In this manual: 2GR-FE Engine control system
17steps
~102min
4/5difficulty
Done 0 of 17
DTC P0617 Starter Relay Circuit High
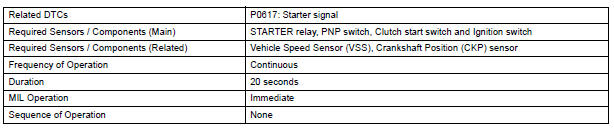
MONITOR DESCRIPTION
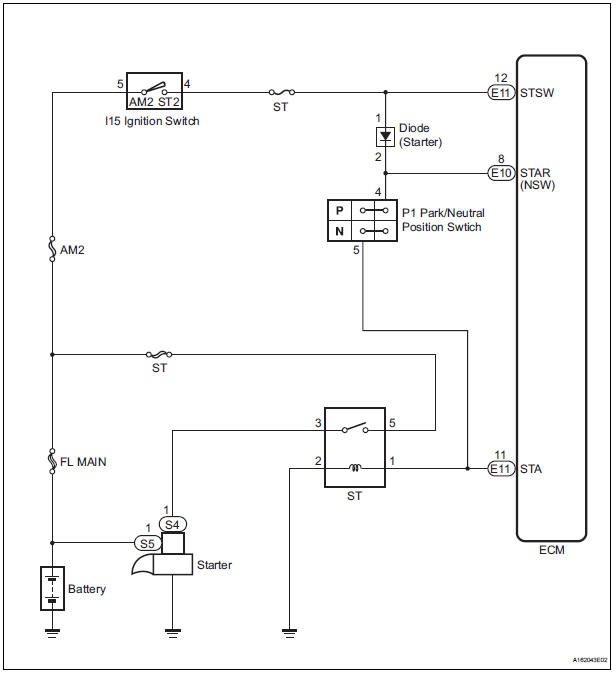
While the engine is being cranked, the positive battery voltage is applied to terminal STA of the ECM.
If the ECM detects the Starter Control (STA) signal while the vehicle is being driven, it determines that there is a malfunction in the STA circuit. The ECM then illuminates the MIL and sets the DTC.
This monitor runs when the vehicle is driven at 20 km/h for over 20 seconds.

MONITOR STRATEGY
TYPICAL ENABLING CONDITIONS

TYPICAL MALFUNCTION THRESHOLDS

WIRING DIAGRAM
INSPECTION PROCEDURE
HINT:
- The following troubleshooting flowchart is based on the premise that the engine is cranked normally. If the engine will not crank, proceed to the problem symptoms table
- Read freeze frame data using the intelligent tester. The ECM records vehicle and driving condition information as freeze frame data the moment a DTC is stored. When troubleshooting, freeze frame data can be helpful in determining whether the vehicle was running or stopped, whether the engine was warmed up or not, whether the air-fuel ratio was lean or rich, as well as other data recorded at the time of a malfunction
1 READ VALUE OF INTELLIGENT TESTER (STARTER SIGNAL)
- Connect the intelligent tester to the DLC3.
- Turn the ignition switch to the ON position and turn the tester on.
- Select the following menu items: DIAGNOSIS / ENHANCED OBD II / DATA LIST / ALL / STARTER SIG.
- Check the value displayed on the tester when the ignition switch is turned to the ON position and START position.
OK

2 INSPECT PARK/NEUTRAL POSITION SWITCH
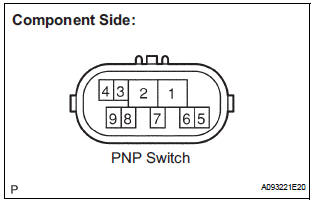
- Inspect the Park/Neutral Position (PNP) switch.
- Disconnect the P1 PNP switch connector.
- Measure the resistance according to the value(s) in the table below.
Standard resistance
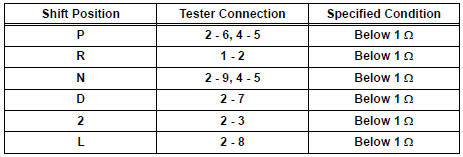
- Reconnect the PNP switch connector.
3 READ VALUE OF INTELLIGENT TESTER (STARTER SIGNAL)
- Connect the intelligent tester to the DLC3.
- Turn the ignition switch to the ON position and turn the tester on.
- Select the following menu items: DIAGNOSIS / ENHANCED OBD II / DATA LIST / ALL / STARTER SIG.
- Check the value displayed on the tester when the ignition switch is turned to the ON position and the START position.
OK
4 INSPECT IGNITION SWITCH ASSEMBLY
- Disconnect the I15 ignition switch connector.
- Measure the resistance according to the value(s) in the table below.
Standard resistance
- Reconnect the ignition switch connector.
5 READ VALUE OF INTELLIGENT TESTER (STARTER SIGNAL)
- Connect the intelligent tester to the DLC3.
- Turn the ignition switch to the ON position and turn the tester on.
- Select the following menu items: DIAGNOSIS / ENHANCED OBD II / DATA LIST / PRIMARY / STARTER SIG.
- Check the value displayed on the tester when the ignition switch is turned to the ON position and the START position
OK

REPAIR OR REPLACE HARNESS OR CONNECTOR (PNP SWITCH - STA TERMINAL OF ECM)
Test yourself
A quick Toyota Sienna quiz: every answer comes with an explanation and a link to the manual page.
Was this page helpful?