Random / Multiple Cylinder Misfire Detected/ Cylinder Misfire Detected
DTC P0300 Random / Multiple Cylinder Misfire Detected
DTC P0301 Cylinder 1 Misfire Detected
DTC P0302 Cylinder 2 Misfire Detected
DTC P0303 Cylinder 3 Misfire Detected
DTC P0304 Cylinder 4 Misfire Detected
DTC P0305 Cylinder 5 Misfire Detected
DTC P0306 Cylinder 6 Misfire Detected
DESCRIPTION
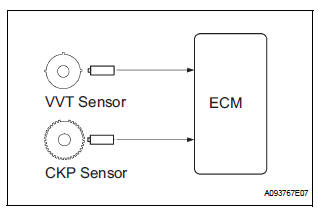
When the engine misfires, high concentrations of hydrocarbons (HC) enter the exhaust gas. High HC concentration levels can cause increase in exhaust emission levels. Extremely high concentrations of HC can also cause increases in the Three-Way Catalytic Converter (TWC) temperature, which may cause damage to the TWC. To prevent this increase in emissions and to limit the possibility of thermal damage, the ECM monitors the misfire rate. When the temperature of the TWC reaches the point of thermal degradation, the ECM blinks the MIL. To monitor misfires, the ECM uses both the VVT sensor and the Crankshaft Position (CKP) sensor. The VVT sensor is used to identify any misfiring cylinders and the CKP sensor is used to measure variations in the crankshaft rotation speed. Misfires are counted when the crankshaft rotation speed variations exceed predetermined thresholds. If the misfire count exceeds the threshold levels, the ECM illuminates the MIL and sets a DTC.
DTC No. |
DTC Detection Condition |
Trouble Area |
| P0300 | Simultaneous misfiring of several cylinders occurs and one of following conditions below is detected (2 trip detection logic):
|
|
| P0301 P0302 P0303 P0304 P0305 P0306 |
Misfiring of specific cylinder occurs and one of following conditions below is detected (2 trip detection logic):
|
When multiple DTCs for misfiring cylinders are set, but DTC P0300 is not set, it indicates that misfires have been detected in different cylinders at different times. DTC P0300 is only set when several misfiring cylinders are detected at the same time.
MONITOR DESCRIPTION
The ECM illuminates the MIL and sets a DTC when either one of the following conditions, which could cause emission deterioration, is detected (2 trip detection logic).
- Within the first 1000 crankshaft revolutions of the engine starting, an excessive misfiring rate (approximately 20 to 50 misfires per 1000 crankshaft revolutions) occurs once.
- An excessive misfiring rate (approximately 20 to 50 misfires per 1,000 crankshaft revolutions) occurs a total of 4 times.
- he ECM flashes the MIL and sets a DTC when either one of the following conditions, which could cause the Three-Way Catalytic Converter (TWC) damage, is detected (2 trip detection logic).
- At a high engine rpm, a catalyst damage misfire, which monitored every 200 crankshaft revolutions, occurs once.
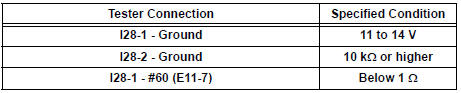
- At a normal engine rpm, a catalyst damage misfire, which monitored every 200 crankshaft revolutions, occurs 3 times.
HINT: If a catalyst damage misfire occurs, the ECM informs the driver by flashing the MIL.
MONITOR STRATEGY
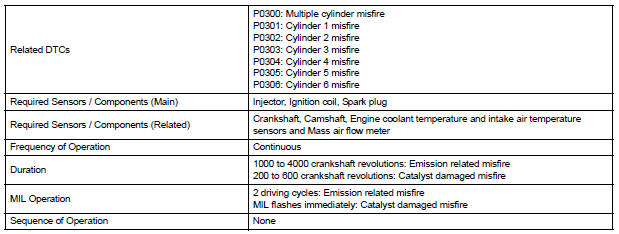
TYPICAL ENABLING CONDITIONS
Misfire:
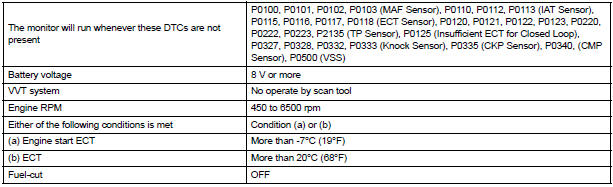
Monitor period of emission-related-misfire:


Monitor period of catalyst-damage-misfire (MIL blinks):

TYPICAL MALFUNCTION THRESHOLDS
Monitor period of emission-related-misfire:

Monitor period of catalyst-damage-misfire (MIL blinks):

MONITOR RESULT
Refer to CHECKING MONITOR STATUS.
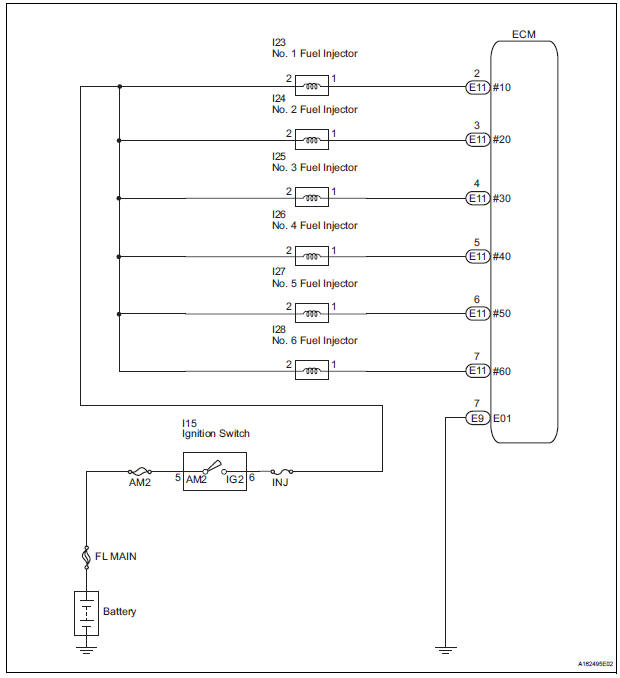
WIRING DIAGRAM
Refer to DTC P0351 for wiring diagram of the ignition system
CONFIRMATION DRIVING PATTERN
- Connect the intelligent tester to the DLC3.
- Turn the ignition switch to the ON position.
- Turn the tester on.
- Record the DTC(s) and freeze frame data.
- Using the tester, switch the ECM from normal mode to check mode.
- Read the misfire counts of each cylinder (CYL #1 to #6) with the engine in an idling condition. If any misfire count is displayed, skip the following confirmation driving pattern.
- Drive the vehicle several times with the conditions, such as engine rpm and engine load, shown in MISFIRE RPM and MISFIRE LOAD in the Data List.
HINT:
- In order to store misfire DTCs, it is necessary to operate the vehicle for the period of time shown in the table below, using the MISFIRE RPM and MISFIRE LOAD in the Data List.

- Check whether misfires have occurred by checking DTCs and freeze frame data.
HINT: Do not turn the ignition switch off until the stored DTC(s) and freeze frame data have been recorded.
When the ECM returns to normal mode (default), the stored DTC(s), freeze frame data and other data will be erased.INSPECTION PROCEDURE
HINT:
- If any DTCs other than misfire DTCs are output, troubleshoot those DTCs first.
- Read freeze frame data using the intelligent tester or Techstream. Freeze frame data records the engine condition when malfunctions are detected. When troubleshooting, freeze frame data can help determine if the vehicle was moving or stationary, if the engine was warmed up or not, if the air-fuel ratio was lean or rich, and other data from the time the malfunction occurred.
- If the misfire does not recur when the vehicle is brought to the workshop, reproduce the conditions stored in the ECM as freeze frame data.
- If the misfire still cannot be reproduced even though the conditions stored in the ECM as freeze frame data have been reproduced, one of the following factors is considered to be a possible cause of the problem:
- There was insufficient fuel volume in the tank.
- Improper fuel is used.
- The spark plugs have been contaminated.
- After finishing repairs, check the misfire counts of the cylinders (CYL #1, #2, #3, #4, #5, #6).
- Be sure to confirm that no misfiring cylinder DTCs are set again by conducting the confirmation driving pattern after finishing repairs.
- For 6 and 8 cylinder engines, the ECM intentionally does not set the specific misfiring cylinder DTCs at high engine RPM. If misfires occur only in high engine RPM areas, only DTC P0300 is set.
- Clear the DTC.
- Start the engine and conduct the confirmation driving pattern.
- Read the misfiring rates of each cylinder or DTC(s) using the tester.
- Repair the cylinder(s) that has a high misfiring rate or is indicated by the DTC.
- After finishing repairs, conduct the confirmation driving pattern again, in order to verify that DTC P0300 is not set.
- When one of SHORT FT #1, LONG FT #1, SHORT FT #2 or LONG FT #2 in the freeze frame data is outside the range of +/-20%, the air-fuel ratio may be Rich (-20% or less) or Lean (+20% or more).
- When the COOLANT TEMP in the freeze frame data is less than 75C (167F), the misfire have occurred only while warming up the engine.
1 CHECK ANY OTHER DTCS OUTPUT (IN ADDITION TO MISFIRE CODES)
- Connect the intelligent tester to the DLC3.
- Turn the ignition switch to the ON position.
- Turn the tester on.
- Select the following menu items: DIAGNOSIS / ENHANCED OBD II / DTC INFO / CURRENT CODES.
- Read the DTCs.
Result

HINT: If any DTCs other than P0300, P0301, P0302, P0303, P0304, P0305 and P0306 are output, troubleshoot those DTCs first.
HINT: If any DTCs other than P0300, P0301, P0302, P0303, P0304, P0305 and P0306 are output, troubleshoot those DTCs first.
2 READ VALUE OF INTELLIGENT TESTER (MISFIRE RPM AND MISFIRE LOAD)
- Connect the intelligent tester to the DLC3.
- Turn the ignition switch to the ON position and turn the tester on.
- Select the following menu items: DIAGNOSIS / ENHANCED OBD II / DATA LIST / MISFIRE / MISFIRE RPM and MISFIRE LOAD.
- Read and note the MISFIRE RPM and MISFIRE LOAD values.
HINT: The MISFIRE RPM and MISFIRE LOAD values indicate the vehicle conditions under which the misfire occurred.
3 CHECK PCV HOSE CONNECTIONS
OK: PCV hose is correctly connected and is not damaged.
4 READ VALUE OF INTELLIGENT TESTER
- Connect the intelligent tester to the DLC3.
- Turn the ignition switch to the ON position and turn the tester on.
- Select the following menu items: DIAGNOSIS / ENHANCED OBD II / DATA LIST / CAT OT MF F/C.
- Read the value displayed on the tester.
Result

5 PERFORM ACTIVE TEST BY INTELLIGENT TESTER
- Connect the intelligent tester to the DLC3.
- Turn the ignition switch to the ON position and turn the tester on.
- Select the following menu items: DIAGNOSIS / ENHANCED OBD II / ACTIVE TEST / PRHBH CAT OT F/C.
- Perform the Active Test.
NOTICE: When performing the Active Test, make sure the vehicle is stopped and either idling or being revved within 3000 rpm.
6 READ VALUE OF INTELLIGENT TESTER
- Enter the following menus: - Select: DIAGNOSIS / ENHANCED OBD II / DATA LIST / USER DATA / CYL #1, #2, #3, #4, #5 and #6.
- Read each value for CYL #1 to #6 displayed on the tester.
If no misfire counts occur in any cylinders, perform the following procedures:
- Start the engine and let it idle.
- Move the shift lever to the D position.
- Check the CYL #1 to #6.
- If misfire counts are still not displayed, perform steps (c) and (d).
- Drive the vehicle with the MISFIRE RPM and MISFIRE LOAD noted in the "READ VALUE USING INTELLIGENT TESTER (MISFIRE RPM and MISFIRE LOAD )" procedures above.
- Read the CYL #1 to #6 or DTCs displayed on the tester.
Result

HINT:
- If it is difficult to reproduce misfires for each cylinder, check the Data List item called MISFIRE MARGIN. Try to find vehicle driving conditions that lower the MISFIRE MARGIN value. Values above 30% are considered normal.
- If the freeze frame data's record of the ECT is below 75C (167F), the misfire may be detected only when the engine is cold.
- If the freeze frame data's record of the ENG RUN TIME is below 120 seconds, the misfire may be detected immediately after the engine is started.
7 CHECK SPARK PLUG
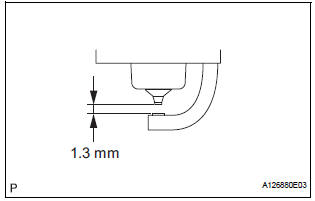
- Remove the ignition coil and the spark plug of the misfiring cylinder.
- Measure the spark plug electrode gap.
Recommended spark plug:

NOTICE: If the electrode gap is larger than standard, replace the spark plug. Do not adjust the electrode gap.
8 CHECK FOR SPARKS AND IGNITION
- Disconnect the injector connectors to prevent the engine from starting.
CAUTION: Always disconnect all injector connectors.
NOTICE: Do not crank the engine for more than 2 seconds.
- Remove the ignition coil from the cylinder head.
- Install the spark plug onto the ignition coil.
- Attach the spark plug assembly to the cylinder head.
- Crank the engine for less than 2 seconds and check the spark.
9 CHECK CYLINDER COMPRESSION PRESSURE OF MISFIRING CYLINDER
- Measure the cylinder compression pressure of the misfiring cylinder
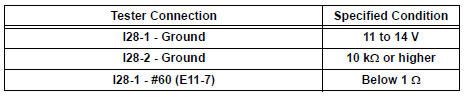
10 CHECK HARNESS AND CONNECTOR (ECM - INJECTOR)
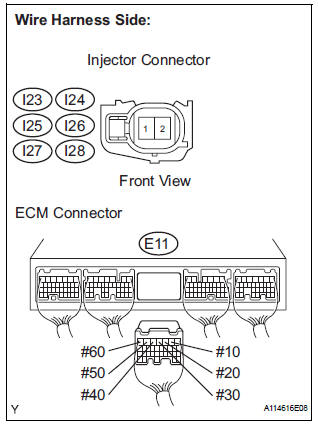
- Disconnect the injector connector (of the misfiring cylinder).
- Disconnect the E11 ECM connector.
- Turn the ignition switch to the ON position.
- Measure the voltage and resistance according to the value(s) in the table below.
- Measure the resistance and voltage according to the values in the table below.
Standard: Cylinder No. 1
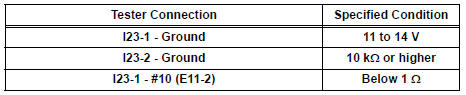
Cylinder No. 2

Cylinder No. 3

Cylinder No. 4


Cylinder No. 5
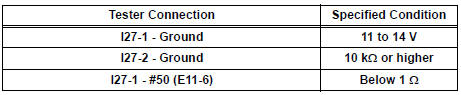
Cylinder No. 6
11 INSPECT ECM TERMINAL OF MISFIRING CYLINDER (#10, #20, #30, #40, #50 AND /OR #60 VOLTAGE)

- Turn the ignition switch to the ON position.
- Measure the voltage according to the value(s) in the table below.
Standard voltage

12 CHECK FUEL INJECTOR OF MISFIRING CYLINDER
- Check the injector injection (whether fuel volume is high or low, and whether injection pattern is poor).
13 CHECK INTAKE SYSTEM
- Check the intake system for vacuum leakage.
OK: No leakage from intake system.
14 CHECK VALVE TIMING (CHECK FOR LOOSE AND JUMPED TEETH ON TIMING CHAIN)
15 CHECK FUEL PRESSURE
- Check the fuel pressure
16 READ VALUE OF INTELLIGENT TESTER (COOLANT TEMP)
- Connect the intelligent tester to the DLC3.
- Turn the ignition switch to the ON position.
- Turn the tester on.
- Select the following menu items: DIAGNOSIS / ENHANCED OBD II / DATA LIST / PRIMARY / COOLANT TEMP.
- Read the COOLANT TEMP twice, when the engine is both cold and warmed up.
Standard:
With cold engine: Same as ambient air temperature.
With warm engine: Between 75C and 95C (167F and 203F).
17 READ VALUE OF INTELLIGENT TESTER (MASS AIR FLOW METER)
- Connect the intelligent tester to the DLC3.
- Turn the ignition switch to the ON position.
- Turn the tester on.
- Select the following menu items: DIAGNOSIS / ENHANCED OBD II / DATA LIST / PRIMARY / MAF and COOLANT TEMP.
- Allow the engine to idle until the COOLANT TEMP reaches 75C (167F) or more.
- Read the MAF with the engine in an idling condition and at an engine speed of 2500 rpm.
Standard:
MAF while engine is idling: Between 1.8 g/s and 4.7 g/s (shift position: N, A/ C: OFF).
MAF at engine speed of 2500 rpm: Between 7.4 g/s and 18.9 g/s (shift position: N, A/ C: OFF).
REPLACE ECM
18 CHECK INTAKE SYSTEM
- Check the intake system for vacuum leakage.
OK: No leakage from intake system.
19 CHECK VALVE TIMING (CHECK FOR LOOSE AND JUMPED TEETH ON TIMING CHAIN)
20 CHECK FUEL PRESSURE
- Check the fuel pressure
21 READ VALUE OF INTELLIGENT TESTER (COOLANT TEMP)
- Connect the intelligent tester to the DLC3.
- Turn the ignition switch to the ON position.
- Turn the tester on.
- Select the following menu items: DIAGNOSIS / ENHANCED OBD II / DATA LIST / PRIMARY / COOLANT TEMP.
- Read the COOLANT TEMP twice, when the engine is both cold and warmed up.
Standard:
With cold engine: Same as ambient air temperature.
With warm engine: Between 75C and 95C (167F and 203F).
22 READ VALUE OF INTELLIGENT TESTER (MASS AIR FLOW METER)
- Connect the intelligent tester to the DLC3.
- Turn the ignition switch to the ON position.
- Turn the tester on.
- Select the following menu items: DIAGNOSIS / ENHANCED OBD II / DATA LIST / PRIMARY / MAF and COOLANT TEMP.
- Allow the engine to idle until the COOLANT TEMP reaches 75C (167F) or more.
- Read the MAF with the engine in an idling condition and at an engine speed of 2500 rpm.
Standard:
MAF while engine is idling: Between 1.8 g/s and 4.7 g/s (shift position: N, A/ C: OFF).
MAF at engine speed of 2500 rpm: Between 7.4 g/s and 18.9 g/s (shift position: N, A/ C: OFF).
23 CHECK SPARK PLUG
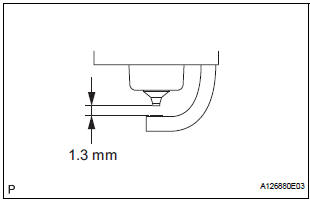
- Remove the ignition coil and the spark plug of the misfiring cylinder.
- Measure the spark plug electrode gap.
Recommended spark plug:

NOTICE: If the electrode gap is larger than standard, replace the spark plug. Do not adjust the electrode gap.
24 CHECK FOR SPARKS AND IGNITION (SPARK TEST)
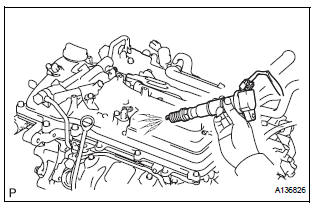
- Disconnect the injector connectors to prevent the engine from starting.
CAUTION: Always disconnect all injector connectors.
NOTICE: Do not crank the engine for more than 2 seconds.
- Remove the ignition coil from the cylinder head.
- Install the spark plug onto the ignition coil.
- Attach the spark plug assembly to the cylinder head.
- Crank the engine for less than 2 seconds and check the spark.
25 CHECK CYLINDER COMPRESSION PRESSURE OF MISFIRING CYLINDER
- Measure the cylinder compression pressure of the misfiring cylinder
26 CHECK HARNESS AND CONNECTOR (ECM - INJECTOR)
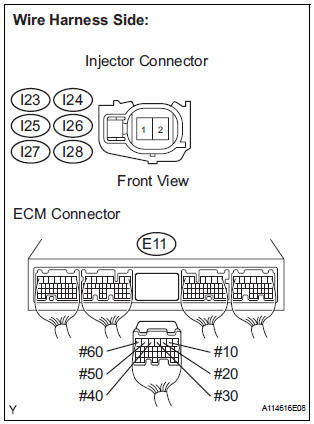
- Disconnect the injector connector (of the misfiring cylinder).
- Disconnect the E11 ECM connector.
- Turn the ignition switch to the ON position.
- Measure the voltage and resistance according to the value(s) in the table below.
- Measure the resistance and voltage according to the values in the table below.
Standard: Cylinder No. 1
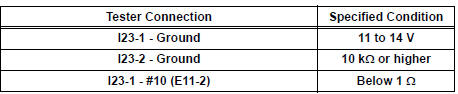
Cylinder No. 2
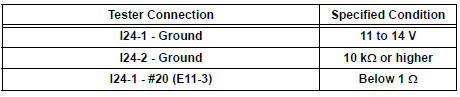
Cylinder No. 3

Cylinder No. 4
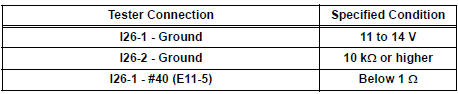
Cylinder No. 5
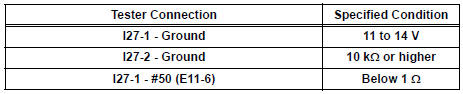
Cylinder No. 6
27 INSPECT ECM TERMINAL OF MISFIRING CYLINDER (#10, #20, #30, #40, #50 AND /OR #60 VOLTAGE)
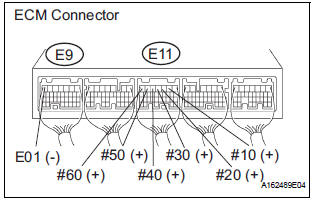
- Turn the ignition switch to the ON position.
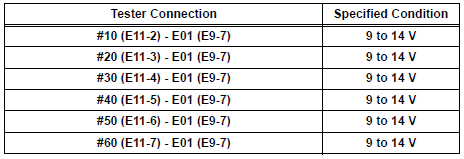
- Measure the voltage according to the value(s) in the table below.
Standard voltage
28 CHECK FUEL INJECTOR OF MISFIRING CYLINDER
- Check the injector injection (whether fuel volume is high or low, and whether injection pattern is poor).
REPLACE ECM
29 CHANGE TO NORMAL SPARK PLUG AND CHECK SPARK OF MISFIRING CYLINDER
- Change the installed spark plug to a spark plug that functions normally.
- Perform a spark test.
CAUTION: Always disconnect all injector connectors.
NOTICE: Do not crank the engine for more than 2 seconds.
- Install the spark plug to the ignition coil and connect the ignition coil connector.
- Disconnect the injector connector.
- Ground the spark plug.
- Check if sparks occur while the engine is being cranked
OK: Sparks jump across electrode gap.
REPLACE SPARK PLUG
30 CHANGE TO NORMAL IGNITION COIL AND CHECK SPARK OF MISFIRING CYLINDER
REPLACE IGNITION COIL
Test yourself
A quick Toyota Sienna quiz: every answer comes with an explanation and a link to the manual page.