Front Door Courtesy Switch

Inspection INSPECTION PROCEDURE
1. INSPECT COURTESY LIGHT SWITCH
(a) Measure the resistance according to the value(s) in the table below.
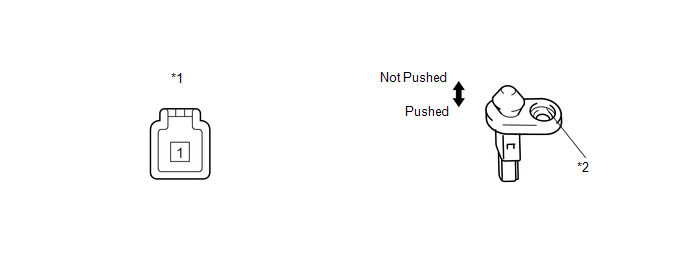
Standard Resistance:
Tester Connection | Switch Condition | Specified Condition |
|---|---|---|
1 - Switch body |
Pushed |
10 kΩ or higher |
1 - Switch body |
Not pushed |
Below 1 Ω |
*1 |
Component without harness connected (Courtesy Light Switch) |
*2 |
Switch Body |
If the result is not as specified, replace the courtesy light switch.
Removal REMOVAL PROCEDURE1. REMOVE FRONT DOOR SCUFF PLATE

2. DISCONNECT FRONT DOOR OPENING TRIM WEATHERSTRIP
3. REMOVE REAR DOOR SCUFF PLATE
4. DISCONNECT REAR DOOR OPENING TRIM WEATHERSTRIP
5. REMOVE LAP BELT OUTER ANCHOR COVER
6. DISCONNECT FRONT SEAT OUTER BELT ASSEMBLY
7. REMOVE LOWER CENTER PILLAR GARNISH
8. REMOVE FRONT DOOR COURTESY LIGHT SWITCH
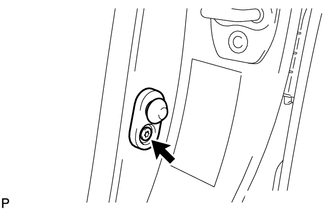
(a) Disconnect the connector.
(b) Using "TORX" socket wrench T30, remove the "TORX" bolt and front door courtesy light switch. |
 |
1. INSTALL FRONT DOOR COURTESY LIGHT SWITCH
(a) Using "TORX" socket wrench T30, install the front door courtesy light switch with the "TORX" bolt. Torque: 8 N·m {82 kgf·cm, 71 in·lbf} |
 |
(b) Connect the connector.
2. INSTALL LOWER CENTER PILLAR GARNISH

3. CONNECT FRONT SEAT OUTER BELT ASSEMBLY
4. INSTALL LAP BELT OUTER ANCHOR COVER
5. CONNECT REAR DOOR OPENING TRIM WEATHERSTRIP
6. INSTALL REAR DOOR SCUFF PLATE
7. CONNECT FRONT DOOR OPENING TRIM WEATHERSTRIP
8. INSTALL FRONT DOOR SCUFF PLATE
Test yourself
A quick Toyota Venza quiz: every answer comes with an explanation and a link to the manual page.