Removal
1. REMOVE REAR DOOR SCUFF PLATE LH

2. DISCONNECT REAR DOOR OPENING TRIM WEATHERSTRIP LH
3. REMOVE TONNEAU COVER ASSEMBLY (w/ Tonneau Cover)
4. REMOVE DECK BOARD ASSEMBLY
5. REMOVE NO. 3 DECK BOARD SUB-ASSEMBLY
6. REMOVE DECK SIDE TRIM BOX LH
7. REMOVE NO. 2 DECK BOARD SUB-ASSEMBLY
8. REMOVE DECK SIDE TRIM BOX RH
9. REMOVE NO. 1 DECK BOARD
10. REMOVE REAR SEAT SUB FLOOR PANEL ASSEMBLY
11. REMOVE REAR FLOOR FINISH PLATE
12. REMOVE REAR SEAT HEADREST ASSEMBLY LH
13. REMOVE REAR SEAT INNER TRACK BRACKET COVER LH
14. REMOVE REAR SEAT OUTER TRACK BRACKET COVER LH
15. DISCONNECT REAR SEAT NO. 2 RECLINING CONTROL CABLE SUB-ASSEMBLY
16. REMOVE REAR SEAT ASSEMBLY LH
17. REMOVE RECLINING REMOTE CONTROL BEZEL LH
18. REMOVE LUGGAGE HOLD BELT STRIKER ASSEMBLY LH
19. DISCONNECT REAR SEAT OUTER BELT ASSEMBLY LH
20. REMOVE DECK TRIM SIDE PANEL ASSEMBLY LH
21. REMOVE ROOF SIDE INNER GARNISH ASSEMBLY LH
22. REMOVE POWER BACK DOOR ROD
(a) Using a screwdriver, remove the stop ring along the groove. HINT: Tape the screwdriver tip before use. Text in Illustration
|
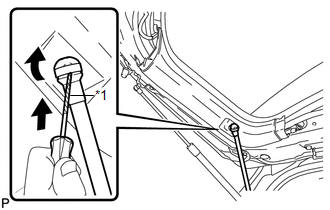 |
(b) Release the ball joint and disengage the power back door rod.
(c) Using a screwdriver, remove the stop ring along the groove. HINT: Tape the screwdriver tip before use. Text in Illustration
|
 |
(d) Release the ball joint and remove the power back door rod.
23. REMOVE POWER BACK DOOR UNIT ASSEMBLY
(a) Disconnect the connector. |
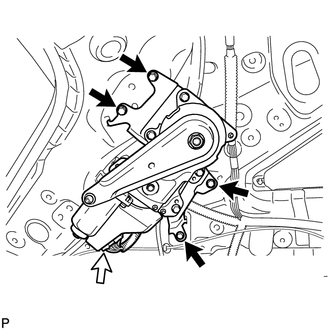 |
(b) Remove the 4 bolts and power back door unit assembly.
Test yourself
A quick Toyota Venza quiz: every answer comes with an explanation and a link to the manual page.