Heating / Air Conditioning
Removal
In this manual: Heating / Air Conditioning
~1min read
REMOVAL PROCEDURE

1. REMOVE AIR CONDITIONING UNIT ASSEMBLY
(See page )
2. REMOVE NO. 1 FINISH PANEL MOUNTING BRACKET
3. REMOVE NO. 2 FINISH PANEL MOUNTING BRACKET
4. REMOVE NO. 3 AIR DUCT SUB-ASSEMBLY
5. REMOVE NO. 2 AIR DUCT SUB-ASSEMBLY
6. REMOVE AIR CONDITIONING HARNESS ASSEMBLY
7. REMOVE COOLER EXPANSION VALVE
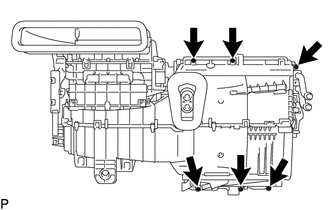
8. REMOVE BLOWER ASSEMBLY WITH COOLER EVAPORATOR SUB-ASSEMBLY
(a) Remove the 6 screws. |
 |
(b) Disengage the guide and disconnect the wire harness. |
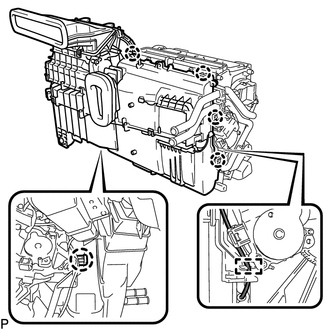 |
(c) Disengage the 5 claws and remove the blower assembly with cooler evaporator sub-assembly from the air conditioning radiator assembly.
9. REMOVE COOLER EVAPORATOR SUB-ASSEMBLY
10. REMOVE NO. 1 COOLER THERMISTOR
Test yourself
A quick Toyota Venza quiz: every answer comes with an explanation and a link to the manual page.
Was this page helpful?