Removal
1. DISCONNECT CABLE FROM NEGATIVE BATTERY TERMINAL
NOTICE:
When disconnecting the cable, some systems need to be initialized after the cable is reconnected (See page  ).
2. RECOVER REFRIGERANT FROM REFRIGERATION SYSTEM
3. REMOVE COOL AIR INTAKE DUCT SEAL
4. REMOVE RADIATOR GRILLE
5. REMOVE INLET NO. 2 AIR CLEANER
6. REMOVE AIR CLEANER CAP WITH HOSE
7. REMOVE AIR CLEANER CASE
8. REMOVE BATTERY
9. REMOVE INLET NO. 1 AIR CLEANER
10. REMOVE LOW PITCHED HORN ASSEMBLY
11. REMOVE HIGH PITCHED HORN ASSEMBLY
12. REMOVE HOOD LOCK ASSEMBLY (w/o Engine Hood Courtesy Switch)
13. REMOVE HOOD LOCK ASSEMBLY (w/ Engine Hood Courtesy Switch)
14. REMOVE HOOD LOCK SUPPORT SUB-ASSEMBLY
(a) Disengage each clamp. |
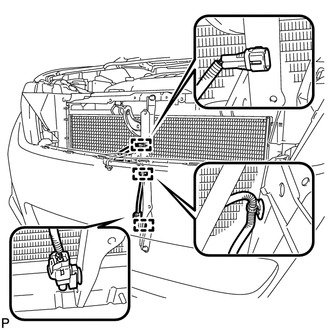 |
(b) Remove the 2 bolts and hood lock support support sub-assembly. |
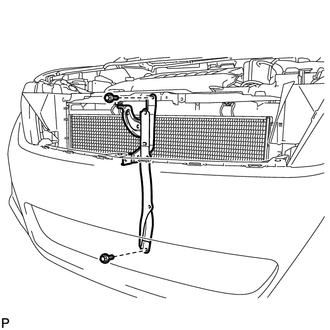 |
15. REMOVE UPPER RADIATOR SUPPORT
16. DISCONNECT COOLER REFRIGERANT DISCHARGE HOSE
(a) Remove the bolt and disconnect the cooler refrigerant discharge hose from the condenser. |
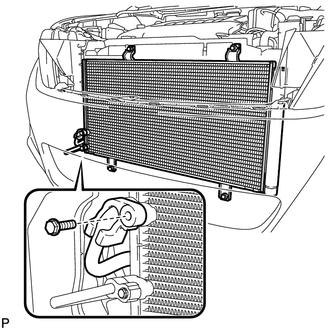 |
(b) Remove the O-ring from the cooler refrigerant discharge hose.
NOTICE:
Seal the openings of the disconnected parts using vinyl tape to prevent entry of moisture and foreign matter.
17. DISCONNECT AIR CONDITIONING TUBE AND ACCESSORY ASSEMBLY
(a) Remove the bolt and disconnect the air conditioning tube and accessory assembly. |
 |
(b) Remove the O-ring from the air conditioning tube and accessory assembly.
NOTICE:
Seal the openings of the disconnected parts using vinyl tape to prevent entry of moisture and foreign matter.
18. REMOVE COOLER CONDENSER ASSEMBLY
(a) Remove the 4 bolts and cooler condenser assembly as shown in the illustration. |
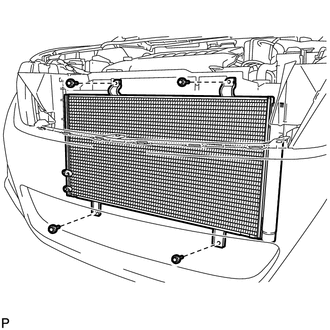 |
Test yourself
A quick Toyota Venza quiz: every answer comes with an explanation and a link to the manual page.