Preparing and Performing a Jump-start

In this manual: Preparing and Performing a Jump-start
View from the front — 1Rear view — 1Driver door — 1Driver side — 1Center console — 1Passenger's side — 1Symbols in the instrument cluster — 1Warning and information texts — 1Introduction to the instrument cluster — 1Operating the Volkswagen Digital Cockpit — 1Volkswagen Digital Cockpit information displays — 1Charge status and range in the digital instrument cluster — 1Power display — 1Head-up display (HUD) — 1ID. Light — 1Service menu — 1Service display — 1Vehicle settings menu — 1Limits of the Driver Alert System — 1Operating the Driver Alert System — 1Limits of the Dynamic Road Sign Display — 1Operating the Dynamic Road Sign Display — 1Correct seating position — 1Fasten seat belts reminder — 1Fastening and unfastening the safety belts — 1Safety belt positioning — 1Safety belt height adjuster — 1Automatic safety belt retractor, safety belt pretensioner, safety belt load limiter — 1Safety belt pretensioner servicing and disposal — 1Functions of the proactive passenger protection system — 1Limitations of the proactive passenger protection system — 1Indicator light — 1Installation Locations and Deployment Zones — 1Front airbags — 1How to Recognize that the Front Passenger's Front Airbag is Switched Off — 1Side airbags — 1Types of child restraints — 1Installing and using child restraints — 1Securing systems — 1Attaching a child restraint with ISOFIX or i-Size — 1Securing the child restraint with the upper strap (top tether) — 1Securing a child restraint with a safety belt — 1Securing yourself and the vehicle — 1What to do in the event of an accident or fire — 1Emergency equipment — 1Information Call, Roadside Assistance Call and Emergency Call Service — 1Legally required eCall Emergency System — 1Vehicle key functions — 1Replacing the button cell battery — 1Synchronizing a vehicle key — 1Setting up primary users for the vehicle — 1Using a mobile key — 1Unlocking or locking using Keyless Access — 1Opening the doors — 1Control for central locking — 1Opening and closing the driver's door in an emergency — 1Locking the front passenger door and rear doors in an emergency — 1Electrical childproof lock — 1SAFELOCK — 1Anti-theft alarm system — 1Interior monitoring and towing protection — 1Opening and closing the trunk lid — 1Power opening and closing the trunk lid — 1Trunk lid with Easy Open motion sensor — 1Automatic trunk lid closing Easy Close — 1Opening and closing the windows — 1Power window pinch protection — 1Adjusting the steering wheel position — 1Manually adjusting front seats — 1Adjusting power front seats — 1Folding the rear bench seat backrest forward or backward — 1Adjusting the head restraints — 1Removing and installing the head restraints — 1Center armrest — 1Memory function — 1Massage feature — 1Switching the turn signals on and off — 1Switching the lights on and off — 1Switching the high beam headlights on and off — 1High Beam Control (Light Assist) — 1Advanced high beam control (Dynamic Light Assist) — 1Switching the poor weather lights on and off — 1Parking lights — 1Entry and exit lighting (orientation lighting) — 1Headlight range control — 1Adjusting headlights (travel mode) — 1Interior/reading lights, ambient lighting — 1Operating the windshield wiper lever — 1Rain/light sensor — 1General safety precautions — 1Interior rearview mirror — 1Outside mirrors — 1Sun visors — 1Sunshade in the sunroof — 1Overview of the Climatronic — 1Air conditioner menu in the Infotainment system — 1Temperature regulation — 1Air distribution and blower speed — 1Air recirculation — 1Seat heating — 1Steering wheel heating — 1Windshield defroster — 1Operating the stationary air conditioning — 1Programming the stationary air conditioning — 1Functions of the electric drivetrain — 1Steering information — 1Information on the pedals — 1Information on the brakes — 1Switching the ignition on and off — 1Activating the vehicle's drive system — 1Exiting a vehicle while the vehicle's drive system is active — 1Deactivating the vehicle's drive system — 1Driving mode selector — 1Brake energy recuperation — 1General driver information — 1Eco tips — 1Driving a loaded vehicle — 1Driving with an open trunk lid — 1Driving through water on roads — 1Operating the vehicle in different countries and continents — 1Selecting the driving mode — 1Standard behavior of the driving mode and the vehicle systems — 1Limits of the sensor system — 1Operating the cruise control system — 1Operating the speed limiter — 1System Limitations of the Predictive Control — 1Driving with predictive control — 1Eco assist — 1Special driving situations — 1System Limitations of ACC — 1Switching ACC on and off — 1Adjusting the ACC settings — 1System Limitations of Predictive Cruise Control — 1Driving with predictive cruise control — 1Warning levels and braking support — 1System Limitations of Front Assist — 1Using Front Assist — 1Lane Assist system limitations — 1Driving with Lane Assist — 1Operating Travel Assist — 1Using assisted lane changing — 1Driving with Emergency Assist — 1Side Assist system limitations — 1Driving with Side Assist — 1Parking — 1Electronic parking brake — 1Auto Hold — 1Automatic braking intervention — 1Switching Park Distance Control (PDC) on and off — 1Parking (Rear View Camera system with parking mode selection) — 1Changing the camera perspective — 1Searching for parking spaces — 1Driving into parking spaces — 1Exiting a parking space — 1Calibrating the parking process — 1Displaying and editing parking spaces — 1Driving into or out of a parking space — 1Rear Traffic Alert — 1Information about braking assistance systems — 1Switching ASR Sport and ESC Sport on and off — 1Sockets in the vehicle — 1Charging Options for Mobile Devices — 1Cyber security — 1Download and software installation — 1V2X limitations — 1Traffic hazard alert — 1USB port — 1Bluetooth interface — 1Establishing a data connection — 1Setting up and deactivating a Wi-Fi hotspot — 1Setting up a Wi-Fi client — 1Quick connection — 1Apps — 1Apple CarPlay — 1Android Auto — 1MirrorLink — 1Introduction to online services — 1Data processing — 1Prerequisites for Using Services — 1Situations that can affect system functions — 1Services That Do Not Require Activation — 1Ordering Services and Activation in the Vehicle — 1Setting, Changing and Resetting the S-PIN — 1Carrying Out Volkswagen Ident — 1Manage services — 1Managing Users — 1Changing and Deleting User Data — 1Status display — 1Impact on online vehicle functions — 1Customizable vehicle settings — 1Viewing and enabling functions — 1Safety instructions — 1User information — 1Overview and controls of the 12" version — 1Overview and controls of the 10" version — 1Operating the Infotainment system — 1Personalizing the Infotainment system — 1System and sound settings — 1Cleaning the screen — 1Brands, licenses, copyright — 1Functions and radio symbols — 1Special functions in radio mode — 1Online functions in radio mode — 1Functions and media symbols — 1Selecting and playing a media source — 1Entertainment playback via the Infotainment system — 1Function descriptions — 1Functions and symbols of the navigation system — 1Inputting destinations and starting route guidance — 1Setting a 360º range display and Electric Vehicle Route Planner — 1Navigation data — 1Traffic information — 1Functions and symbols of the phone interface — 1Coupling, connecting and managing — 1Calling and sending text messages — 1Phone directory, favorites and speed dial keys — 1Introduction to using voice control — 1Starting and ending voice control — 1Activation word — 1Stowing luggage and cargo — 1Luggage compartment cover — 1Second luggage compartment floor - functions — 1Fitting and removing the screen separator behind the rear bench seat — 1Fitting and removing the screen separator behind the front seats — 1Tie-downs — 1Luggage net — 1Shopping bag hooks — 1Load-through hatch — 1Hitching a trailer — 1Loading a trailer — 1Driving with a trailer — 1Trailer stabilization — 1Swiveling out the ball mount — 1Dimensions and mounting points for retrofitting a trailer hitch — 1Attaching a rear carrier system or bicycle rack to the ball mount — 1Mounting a roof rack — 1Loading the roof rack — 1Warning signs for the high-voltage system — 1Handling the high-voltage battery — 1Charging — 1Charging process indicator — 1Emergency release for the charging connector — 1Overview of the charging settings — 1Battery charge limits — 1Charging locations — 1Departure Times (time-delayed charging) — 1Charging with solar power — 1Bidirectional charging — 1Instructions for the charging cable — 1Charging cable for charging stations with alternating current (AC) — 1Charging cable for mains sockets — 1Vehicle tool kit components — 1Putting the windshield wipers in the service position — 1Cleaning and changing wiper blades — 1Information on bulb replacement — 1Replacing bulbs in LED headlights — 1Fuses in the hood space — 1Fuse table for fuses in the hood space — 1Fuses in the instrument panel — 1Fuse table for fuses in the instrument panel — 1Replacing blown fuses — 1Ground jump-start point — 1Preparing and Performing a Jump-start — 1Instructions for towing — 1Towing — 1Installing the front towing eye — 1Installing the rear towing eye — 1Safety precautions for working in the hood space — 1Preparing the vehicle for work in the hood space — 1Display — 1Operating fluids and operating equipment — 1Washer fluid — 1Engine coolant specifications — 1Checking and filling engine coolant — 1Brake fluid specifications — 1Checking the Brake Fluid — 1Checking the 12 V vehicle battery acid level — 1Handling tires — 1Handling rims — 1Checking the tire pressure — 1Monitoring the tightening torque — 1Replacing tires — 1Monitoring the tread depth — 1Winter tires — 1Snow chains — 1How the Tire Pressure Monitoring System Works — 1Limitations of the Tire Pressure Monitoring System — 1Calibrating the Tire Pressure Monitoring System — 1Troubleshooting the Tire Pressure Monitoring System — 1Preparing Your Vehicle — 1Removing and Fitting Hubcaps — 1Removing and Fitting Wheel Hub Covers — 1Removing and Fitting the Wheel Bolt Caps — 1Loosening wheel bolts — 1Raising the vehicle with the vehicle jack — 1Changing a wheel — 1Preparing Your Vehicle — 1Sealing and pumping up tires — 1Tire labeling and tire classifications — 1Maintenance procedures and digital maintenance schedule — 1Information about operating conditions — 1Scope of service — 1Vehicle care information — 1Washing the vehicle — 1Exterior care and cleaning — 1Care and cleaning of the vehicle interior — 1Accessories and replacement parts — 1Sensors and Cameras — 1Repairs and technical modifications — 1Airbag system repairs and situations that can affect the system function — 1Mobile phone usage in the vehicle — 1Volkswagen dealer warranty — 1Data Storage and Data Protection Information — 1Event data recorder (crash data recorder) — 1Labels and signs — 1Fluids in the air conditioning system — 1Component protection — 1Disposal of old batteries and electronic devices — 1Declaration of conformity — 1Third Party Copyright Information — 1Useful information on vehicles with N1 type approval (light commercial vehicle) — 1Radar Sensors — 1Mapping tables — 1Dimensions — 1
4steps
~24min
2/5difficulty
Done 0 of 4
  • Preparations
  • Jump-starting
  • Removing the jumper cables

Preparations

When performing a jump-start procedure on the Volkswagen ID.4, always follow these preparation guidelines carefully to ensure safety and prevent damage to the vehicle’s electrical system:

  • Wear appropriate protective equipment such as safety gloves and eye protection → Volkswagen ID.4 safety gloves and eye protection for jump starting procedure.
  • Always follow the instructions provided by the manufacturer of the jumper cables being used.
  • Open the hood of the Volkswagen ID.4 and ensure adequate access to the jump-start points.
  • Use only high-quality jumper cables with fully insulated clamps and no visible damage or insulation defects → Volkswagen ID.4 insulated jumper cable clamps for safe connection.
  • Ensure sufficient distance between the Volkswagen ID.4 and the assisting vehicle to avoid unintended electrical flow during connection.
  • Confirm that all terminal clamps make solid contact with clean metal surfaces for optimal conductivity.

Jumper cable

To safely jump-start the Volkswagen ID.4, it is essential to use a properly rated jumper cable suitable for modern electric vehicle systems.

The cable used must meet the following minimum requirements:

  • For vehicles with an electric drivetrain like the Volkswagen ID.4, the jumper cable must have a minimum cross-section of 25 mm2 (0.038 in2) to handle the required current safely.

Vehicle Receiving the Jump-start

1. Verify that the discharged 12 V battery in the Volkswagen ID.4 is correctly connected to the vehicle’s electrical system.

2. If the battery includes a visual indicator window, check its condition. If the indicator shows light yellow or no color, do not attempt a jump-start and contact an authorized Volkswagen dealer or service facility.

Vehicle Providing the Jump-start

1. Follow the operating instructions of the assisting vehicle.

2. Ensure the donor vehicle battery matches the Volkswagen ID.4 requirements: 12 V and similar capacity. Always check the specifications printed on the battery.

Jump-starting
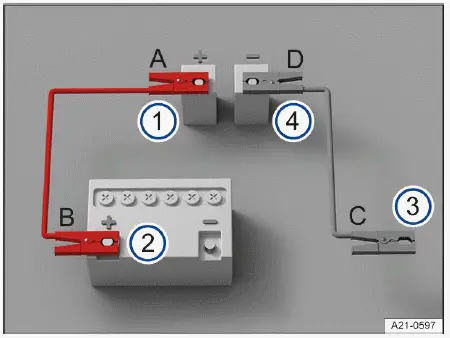
Volkswagen ID.4 jumper cable connection diagram with labeled terminals A B C D
Fig. 1 Diagram for connecting the jumper cables.

  1. Positive jump-start point of the Volkswagen ID.4 receiving the jump-start.
  2. Positive terminal of the assisting vehicle’s battery.
  3. Negative terminal of the assisting vehicle, preferably a designated ground point or engine block.
  4. Negative jump-start point of the Volkswagen ID.4.

Always connect the jumper cables in the exact sequence A - B - C - D → fig. 1 to avoid sparks or system damage.

1. Switch off the ignition in both vehicles.

2. Open the protective cover over the positive jump-start terminal (+) in the Volkswagen ID.4 hood space.

3. Connect one end of the red jumper cable to the positive jump-start point (+) of the Volkswagen ID.4 → fig. 1 -1- → Volkswagen ID.4 connecting red jumper cable to positive terminal.

4. Connect the other end of the red cable to the positive terminal (+) of the assisting vehicle → fig. 1 -2-.

5. Connect one end of the black jumper cable to the negative terminal (-) or a suitable grounding point on the assisting vehicle → fig. 1 -3-.

Alternatively, if no dedicated ground point is available, connect to a solid metal part fixed to the engine block.

6. Connect the remaining end of the black jumper cable to the negative jump-start point of the Volkswagen ID.4 → fig. 1 -4- → Volkswagen ID.4 connecting black jumper cable to negative terminal.

7. Carefully route all cables to ensure they cannot come into contact with moving components in the engine compartment.

Activating the vehicle's drive system

1. Start the engine of the vehicle supplying the current and allow it to idle steadily.

2. Activate the drive system of the Volkswagen ID.4. If the system does not engage, stop after approximately 10 seconds and retry after about one minute.

If the Volkswagen ID.4 still cannot be started, contact an authorized Volkswagen dealer or qualified service center for further diagnosis.

Removing the jumper cables

When disconnecting jumper cables from your Volkswagen ID.4 after a successful jump-start, it is essential to follow the correct procedure to avoid voltage spikes and protect sensitive electrical components.

1. Before disconnecting the jumper cables, switch off the low beam headlights in the Volkswagen ID.4 if they are on.

2. In the vehicle with the discharged 12 V battery, activate electrical consumers such as the air conditioning blower and rear window defroster. This helps stabilize the electrical system and reduce voltage surges during disconnection.

3. Once the Volkswagen ID.4 has been successfully jump-started, disconnect the jumper cables strictly in reverse order: D - C - B - A → fig. 1.

4. Close the protective cover over the positive jump-start terminal (+) in the hood space, if equipped.

After jump-starting the Volkswagen ID.4, it is strongly recommended to have the 12 V battery inspected by an authorized Volkswagen dealer or qualified service facility to ensure long-term reliability.

WARNING

Incorrect jump-start procedures on the Volkswagen ID.4 can cause the 12 V battery to explode, leading to serious injuries.

  • Always wear protective gloves and safety goggles.
  • Never lean directly over the 12 V battery while working.
  • Always connect the positive cable first, followed by the negative cable.
  • Never attach the negative cable to brake lines or other unsuitable components.
  • Ensure that exposed metal parts of the clamps do not touch each other.
  • Only use jumper cables with intact insulation.
  • Ensure the positive cable does not come into contact with conductive vehicle parts.

NOTICE

A discharged 12 V battery in the Volkswagen ID.4 may freeze at temperatures around 0 ºC (32 ºF), which can cause irreversible damage.

  • Always replace a battery that has frozen or thawed.

Introduction

Towing a Volkswagen ID.4 requires experience and careful handling, especially when using a tow rope. Both drivers involved should be familiar with towing procedures. Inexperienced drivers should avoid towing operations whenever possible.

Always comply with local laws and regulations when towing a vehicle.

Ensure that towing forces remain within permissible limits and avoid sudden jerks or shock loads, particularly when driving on uneven terrain.

When off-road, there is an increased risk of excessive stress on towing connections.

WARNING

Towing a Volkswagen ID.4 significantly affects vehicle handling and braking performance. This can lead to loss of control and result in serious or fatal injuries.

  • Be aware that increased effort is required for steering and braking during towing.

WARNING

If a Volkswagen ID.4 without electrical power is towed, the electronic steering lock may engage unexpectedly, preventing steering and causing dangerous situations.

  • Never switch off the ignition using the start button while the vehicle is being towed.
  • If power is lost during towing, stop immediately and seek assistance from an authorized Volkswagen service center.

NOTICE

Improper pushing of the Volkswagen ID.4 by hand can damage exterior components such as taillights, body panels, and the rear spoiler.

  • Do not apply force to taillights, spoilers, or large body panels when moving the vehicle manually.

Towing

Towing refers to using another vehicle to move a Volkswagen ID.4 that is no longer drivable.

The Volkswagen ID.4 can be towed using either a tow bar or a tow rope under the following conditions:

  • Maximum permissible speed: 50 km/h.
  • Maximum permissible towing distance: 50 km (30 miles).

The safest and most stable method for towing a Volkswagen ID.4 is with a tow bar. A tow rope should only be used if a tow bar is not available.

If using a tow rope, it should be elastic to absorb shock loads and protect both vehicles. Synthetic rubber or similar flexible materials are recommended.

Towing with a tow truck

For maximum safety, the Volkswagen ID.4 should be transported with all four wheels off the ground using a tow truck platform.

WARNING

Incorrect attachment of tow ropes or tow bars can cause severe damage to the Volkswagen ID.4 and increase the risk of accidents.

  • Always attach towing equipment only to designated mounting points.
  • Never attach towing equipment to axle or suspension components.
  • If necessary, contact an authorized Volkswagen dealer or service facility to arrange professional towing.