Check battery

WARNING!
Risk of injury! Observe the warnings and safety regulations!

Caution!
To avoid damage to the battery or vehicle, observe the information on battery types.

Note
Observe the Battery chapter for the respective vehicle.
Testing the different battery types
Testing a battery with color indicator

WARNING!
Risk of injury! Observe the warnings and safety regulations!
Carry out the tests in the following order:
1. Visual inspection
2. Check the color indicator "3-color" or "2-color",

WARNING!
Batteries whose color indicator shows light yellow must not be tested or charged. No jump start may be given!
Risk of explosion when testing, charging or jump starting.
These batteries must be replaced.
3. Battery test with the battery tester with printer -VAS 6161-.
4. Depending on the result of the battery test, "perform current consumption test".
Testing an AGM battery (fleece battery)
Carry out the tests in the following order:
1. Visual inspection
2. Battery test with the battery tester with printer -VAS 6161-
3. Depending on the result of the battery test, "perform current consumption test".
Visual inspection

WARNING!
Risk of injury! Observe the warnings and safety regulations!
Before carrying out extensive measurements, always check the external condition, the connections and the secure fit of the battery by visual inspection.

Note
Observe the Battery chapter for the respective vehicle.

Caution!
- Improper battery mounting can cause damage.
- Vibration damage shortens service life, creates a risk of explosion, can damage the grid plates, and the mounting bracket can damage the battery case.
- Check that the battery is securely fitted; if necessary, tighten the mounting bolt to the specified tightening torque.
The visual inspection must establish the following:
- Whether the battery case is damaged. Damage to the case can cause acid to leak. Leaked battery acid can cause severe damage to the vehicle. Treat components affected by leaked acid immediately with acid neutralizer or soapy water.
- Whether the battery posts (battery cable connections) are damaged. Damaged battery posts mean the required contact of the battery terminal clamps cannot be guaranteed. When connecting the battery terminal clamps, also observe that the tightening torque from the "Electrical System" repair manual for the respective vehicle applies. If the battery terminal clamps are not correctly fitted and tightened, a cable fire can occur. This results in significant malfunctions of the electrical system. Safe operation of the vehicle is no longer guaranteed.
Checking the color indicator in the battery cover
Checking the color indicator, "3-color"

WARNING!
Risk of injury! Observe the warnings and safety regulations!
General information on the color indicator:
Valid for all batteries with index "1J0", "7N0" and "3B0" in original equipment and for all replacement batteries 191 915 105 AB and from index "000 915 105 AX"
The color indicator provides information on the electrolyte level and the state of charge of the battery.
Before carrying out a visual inspection, gently tap the handle of a screwdriver lightly on the sight glass. This causes air bubbles that could affect the indicator to rise. This makes the color indicator more accurate.

Note
- Especially when a battery has been recharged, i.e. even if the battery was charged while the vehicle was being driven, air bubbles can form under the sight glass. These distort the color indicator.
- Because the color indicator is located in only one battery cell, the indication is only valid for that cell. An exact assessment of the battery condition is only possible through a battery test.
- The color indicator can be located in different positions on the battery.
Three different color indicators are possible:
- "Green", the battery is sufficiently charged.
- "Black", battery partially discharged, state of charge < 65 % or discharged.
- "Colorless or light yellow", the battery must be replaced.

WARNING!
Batteries whose color indicator shows light yellow must not be tested or charged. No jump start may be given!
Risk of explosion when testing, charging or jump starting.
These batteries must be replaced.
Checking the color indicator, "2-color"

WARNING!
Risk of injury! Observe the warnings and safety regulations!
General information on the color indicator:
The general introduction of the "2-color" indicator took place gradually in 2009. With the "2-color" indicator, the "Green" color display for the state of charge is omitted.
The color indicator provides information about the electrolyte level of the battery.
The state of charge of the battery can no longer be read from the color indicator. Use the battery test for this,
Before performing a visual check, lightly and carefully tap the handle of a screwdriver against the magic eye. This causes air bubbles that could impair the indicator to rise. The color display of the magic eye becomes more accurate as a result.

Note
- Especially when a battery has been recharged, i.e. even if the battery was charged while the vehicle was being driven, air bubbles can form under the sight glass. These distort the color indicator.
- Since the color indicator is only located in one battery cell, the indication is only valid for that battery cell. An exact assessment of the battery condition is only possible through a battery test.
- The color indicator can be located in different positions on the battery.
Two different color indications are possible:
- "Black", electrolyte level OK.
- "Light yellow", electrolyte level too low. The battery must be replaced.

WARNING!
Batteries whose color indicator shows light yellow must not be tested or charged. No jump start may be given!
Risk of explosion when testing, charging or jump starting.
These batteries must be replaced.
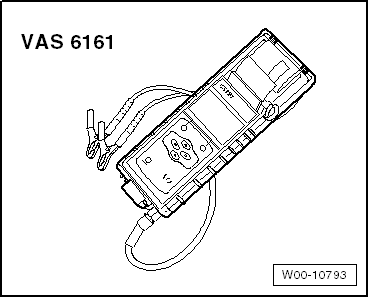
Battery tester with printer -VAS 6161-
General description:

WARNING!
Risk of injury! Observe the warnings and safety regulations!
When using the battery tester with printer -VAS 6161-, it is not necessary to disconnect or remove the battery.
The battery tester with printer -VAS 6161- no longer places a load on the battery. It works on the principle of dynamic conductance measurement.
All battery types are stored in the tester.
Data can be saved to an SD card.
Via an interface or the SD card, the battery tester with printer -VAS 6161- can be updated, so that all Volkswagen battery data is always up to date.
The integrated temperature sensor improves the quality of the measurements.
An optional 2D scanner is available to transfer the data from the 2D code of the battery directly.

Note
Observe the → Operating instructions of the battery tester with printer -VAS 6161-.
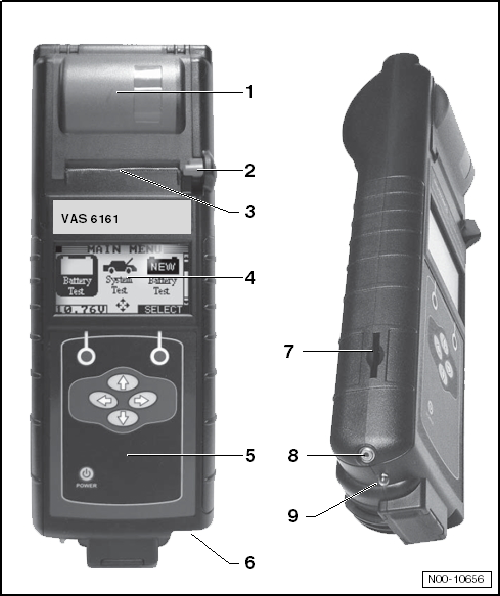
Device description battery tester with printer -VAS 6161-
- Integrated printer
- Lever for paper tray
- Paper slot
- LCD screen with main menu
- Control panel with on/off switch
- Connection for battery test cable
- Card slot for memory card
- Infrared sensor for temperature
- Data transmitter for PC
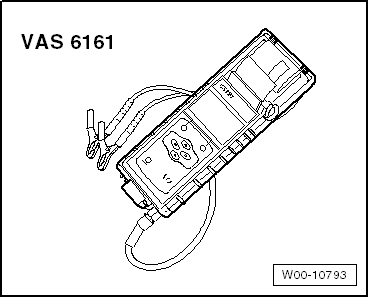
Perform battery test with the battery tester with printer -VAS 6161-

WARNING!
Risk of injury! Observe the warnings and safety regulations!
Required Special Tools, Test and Measuring Equipment and Auxiliary Items
- Battery tester with printer -VAS 6161-
Performing battery test:

WARNING!
Batteries whose color indicator shows light yellow must not be tested or charged. No jump start may be given!
Risk of explosion when testing, charging or jump starting.
These batteries must be replaced.
- Switch off the ignition and all electrical consumers.
- For batteries with a sight glass, check the color indicator.
- Switch on the device.
- Connect the red "+" clamp of the test device to the positive terminal.
- Connect the black "-" clamp of the test device to the negative terminal.

Note
Make sure the test clamps make good contact!
- Select one of the following functions.
- Original batteries must be tested in warranty mode.
- Non-original batteries must be tested in service mode.

Note
- The test is finished after approx. 10 seconds.
- The test results are output via the printer.
- The tester does not need a cooling phase to be ready for the next measurement.
Perform warranty test

WARNING!
Batteries whose color indicator shows light yellow must not be tested or charged. No jump start may be given!
Risk of explosion when testing, charging or jump starting.
These batteries must be replaced.
- Select "Warranty test" in the menu.
- Select "In vehicle" or "Outside vehicle".
- Select "At battery terminal" or "At jump-start point".
- Scan the 2D code of the battery or manually select battery type and current rating.
- Determine the temperature. Hold the temperature sensor approx. 5 cm above a battery terminal until the temperature is stable.
- Start test.
- If necessary, print the test log.
Perform maintenance test

WARNING!
Batteries whose color indicator shows light yellow must not be tested or charged. No jump start may be given!
Risk of explosion when testing, charging or jump starting.
These batteries must be replaced.
- Select "Maintenance test" in the menu.
- Connect scanner.

Note
If no scanner is available, write the vehicle identification number on the test printout by hand.
- Scan vehicle identification number.
- Select "At battery terminal" or "At jump-start point".
- Scan the 2D code of the battery or manually select type and manufacturer in the menu.
- Determine the temperature. Hold the temperature sensor approx. 5 cm above the terminal connection until the temperature is stable.
- Start test.
- If necessary, print the test log.
Perform service test

Note
- The test printout may vary depending on the software version.
- Observe the → Operating instructions of the battery tester with printer -VAS 6161-.

WARNING!
Batteries whose color indicator shows light yellow must not be tested or charged. No jump start may be given!
Risk of explosion when testing, charging or jump starting.
These batteries must be replaced.
- Select "Service test" in the menu.
- Select "At battery terminal" or "At jump-start point".
- Select battery type "Normal", "AGM", "2*6V" or "Gel".
- Select standard "CCA", "JIS", "DIN", "SAE", "IEC" or "EN".
- Select battery value.
- Determine the temperature. Hold the temperature sensor approx. 5 cm above a battery terminal until the temperature is stable.
- Start test.
- If necessary, print the test report.
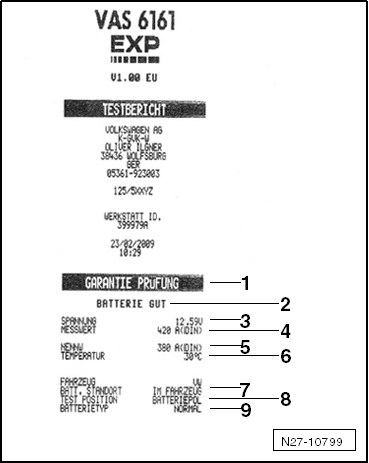
Explanation of the test printout
- Test type.
- Battery test result.
- Measured voltage.
- Measured cold-start value of the battery.
- Cold-start rated value of the battery set on the tester.
- Measured battery temperature.
- Battery installation location.
- Battery terminal position set on the tester.
- Battery technology set.

Note
The test printout is required for warranty processing.
Assessment of the test result
Evaluation of the battery test results for warranty and service test.

Evaluation of the battery tester result for the maintenance test.
Battery tester Midtronics -MCR340V- for USA/Canada vehicles only
General description

WARNING!
Risk of injury.
Before working on the battery, read and observe the warning and safety regulations carefully.
Dispose of electrolyte (sulfuric acid/water mixture) safely! Electrolyte waste may only be handed in at designated collection points. Observe local disposal regulations.
Batteries that are gassing must not be tested. Otherwise there is a risk of explosion.

WARNING!
Batteries where the magic eye shows light yellow must not be tested or charged. Do not give jump-start!
Risk of explosion when testing, charging or jump starting.
These batteries must be replaced.

Note
To prevent damage to the battery or vehicle, observe the battery types and notes.
Batteries in VW vehicles may only be tested with battery testers approved by VW. For USA/Canada, the battery tester Midtronics -MCR340V- may be used.
Read all safety notes, setup and operating instructions in the operating manual of the battery tester Midtronics -MCR340V- and follow them exactly.
For more information, see → No..
The following charging and analysis procedures apply to all batteries, all battery installation locations (engine compartment or luggage compartment) and all battery applications (starter or auxiliary/comfort battery).
Always observe the safety regulations, the setup regulations of the battery tester, the display menu/display buttons, LEDs and the operating procedures described in the → Operating manual MCR340V.

Note
Observe and follow all subsections, notes and references regarding the vehicle to be tested, battery type, etc.
Perform battery test with battery tester Midtronics -MCR340V-
Prerequisites:

WARNING!
Before working on the battery, read and observe the warning and safety regulations carefully.
Batteries where the magic eye shows light yellow must not be tested or charged. Do not give jump-start!
Risk of explosion when testing, charging or jump starting.
These batteries must be replaced.
- Read general description.
- Carry out visual inspection.
- Open bonnet or open cover for other battery installation location.
- Determine battery type "Standard" or "AGM".
- Remove the covers from the battery positive and negative terminals.
- Use fender covers or other protective covers before using equipment in the engine compartment or passenger compartment.
- Close all doors.

Note
- Battery temperature must be at least 10 °C.
- For additional information, see → Operating manual INC 940.
Perform test:

WARNING!
Batteries where the magic eye shows light yellow must not be tested or charged. Do not give jump-start!
Risk of explosion when testing, charging or jump starting.
These batteries must be replaced.
- Switch off the ignition and all electrical consumers.
- For batteries with magic eye, check the magic eye.
- Switch on the device.
- Connect the red "+" clamp of the test device to the positive terminal.
- Connect the black "-" clamp of the test device to the negative terminal.

Note
Make sure the test clamps make good contact!
- Select "In vehicle" or "Out of vehicle".
- Select the "Warranty test".

Note
Use the print function of the Midtronics -MCR340- if the test results are required for processing warranty claims.
- Select battery type "Standard" or "AGM".
- Note the DIN value from the battery label. If there is no DIN value on the label, note the SAE value.
- Enter the DIN value into the tester and perform the battery test → Operating manual MCR340V.
- If using the SAE value, go to menu item "Other" and change "DIN" to "SAE" → Operating manual MCR340V.

Note
Always use the DIN value from the battery label! Otherwise the test result will be falsified.
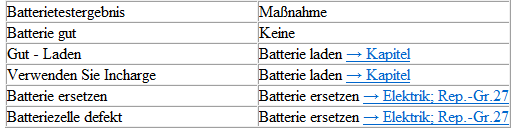
Assessment of the test result
Battery test results:
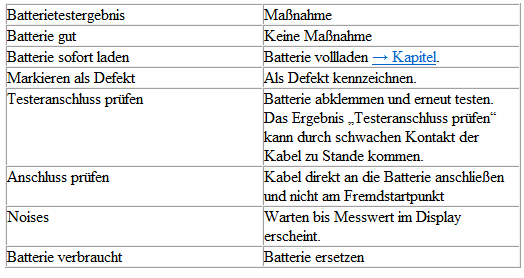
Troubleshooting battery tester Midtronics -MCR340V-
The display may show errors or state-dependent messages.
The most common display messages are listed below together with suggested solutions.

Note
For messages not listed, refer to the → Operating manual MCR340V.

Wait a few minutes and test again.

Note
If you performed the test at the remote jump-start point and the message does not disappear, perform the test directly at the battery.
Current draw test

WARNING!
Batteries where the magic eye shows light yellow must not be tested or charged. Do not give jump-start!
Risk of explosion when testing, charging or jump starting.
These batteries must be replaced.

Note
- Make sure the correct charging mode is set on the charger so that the current draw test is not falsified.
- VAS 5095 A,
- VAS 5900,
- VAS 5903,
To quickly determine the battery condition of discharged batteries, the current draw of the battery during charging can indicate whether the battery must be replaced or fully charged.

Note
With battery tester with printer -VAS 6161-, the current draw test must always be performed when the test result "Perform current draw test" appears on the display.
The current draw test must always be performed when
- the test result with battery tester with printer -VAS 5097A- has shown the following results:
- Starting performance sufficient
- Starting performance poor
- Starting performance very poor
- not testable - charge battery and test again
- and in cases where the device does not switch on (no LED, no printout)
or
- the test result with battery tester with printer -VAS 6161- has shown the following result:
- Perform current draw test
By testing the current draw capacity of a battery during charging, it can be quickly assessed whether a partially or deeply discharged battery will become serviceable again by recharging.
Test prerequisites:
- When charging the battery, the battery temperature must be at least ≥ +10 °C.
- The charger must be able to deliver at least 30 A charging current, such as the VAS 5095A, VAS 5900, VAS 5903.
- When charging with battery charger -VAS 5095A-, the current draw of the battery must be measured with a current clamp, e.g. VAS 5051B/7. Battery charger -VAS 5900- and battery charger -VAS 5903- show the current draw on the device. Battery charger -VAS 5900- performs the current draw test automatically with guided menu.
- Connect the battery to the battery charger and start charging.
- After five minutes, measure the charging current of the battery.
Test result:
If current draw A is greater than 10 % of nominal capacity Ah (e.g. >6.1 A for a 61 Ah battery), fully charge the battery and test again.

Note
On the Eos with two 6 V AGM batteries, the charging current only needs to be higher than 5 % of the battery's rated capacity in amperes. Example for the Eos: the 50 Ah battery must have a charging current higher than 2.5 A after five minutes of charging.
- Fully charge the battery if the charging current is higher than 10 % of the rated capacity (note the exception for the Eos in the note above).
- After a rest period of two hours, perform a battery test.
If the charging current is lower than 10 % of the rated capacity in amperes five minutes after charging starts (5 % for the Eos with two 6 V batteries), i.e. < 5 A for a 50 Ah battery, replace the battery. For warranty and goodwill cases, complete the battery test sheet.