Radiator/Radiator Fan
Assembly overview - radiator/radiator fan
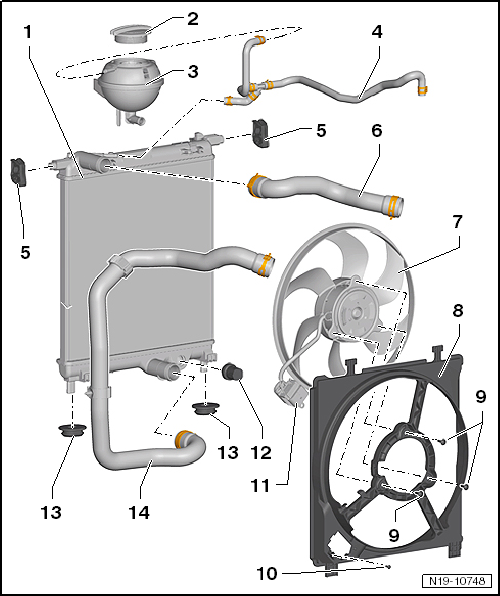
- Radiator
- Removing and installing "Removing and installing radiator"
- Connection diagram for coolant hoses "Connection diagram - coolant hoses"
- After replacing, renew all coolant "Draining and filling coolant"
- Filler Cap
- Check "Checking cooling system for leaks"
- Check with cooling system tester -V.A.G 1274 B- and adapter for cooling system tester -V.A.G 1274/9-
- Test pressure: 1.4 ... 1.6 bar overpressure
- Coolant expansion tank
- Check for leaks "Checking cooling system for leaks"
- Carry out leak test of cooling system with cooling system tester -V.A.G 1274 B- and adapter for cooling system tester -V.A.G 1274/8-
- Connection diagram for coolant hoses "Connection diagram - coolant hoses"
- Coolant hose
- Connection diagram for coolant hoses "Connection diagram - coolant hoses"
- Check for secure fit
- Radiator mount
- for radiator
- Observe installation position.
- Note locking mechanism
- Coolant hose, upper
- Connection diagram for coolant hoses "Connection diagram - coolant hoses"
- Check for secure fit
- Radiator fan
- Removing and installing radiator fan -V7-
- Air guide shroud
- Removing and installing fan shroud with radiator fan
- Bolt
- Radiator fan mounting to air guide shroud
- 10 N·m
- Bolt
- Connector, interface
- 3 N·m
- Connector
- Thermal switch for radiator fan -F18-
- for radiator fan
- Only installed on vehicles without air conditioning
Switching temperatures
Stage 1 on 92 ... 97 ºC, off 84 ... 91 ºC; stage 2 on 99 ... 105 ºC, off 91 ... 98 ºC 50 N·m- Radiator mount
- Check that it is seated correctly.
- Coolant hose, lower
- Connection diagram for coolant hoses "Connection diagram - coolant hoses"
- Check for secure fit
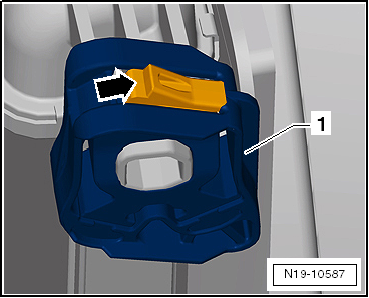
Radiator mount locking
- To unlock radiator mount -1- from the front end carrier, lift the locking tab -arrow-.
Removing and installing radiator
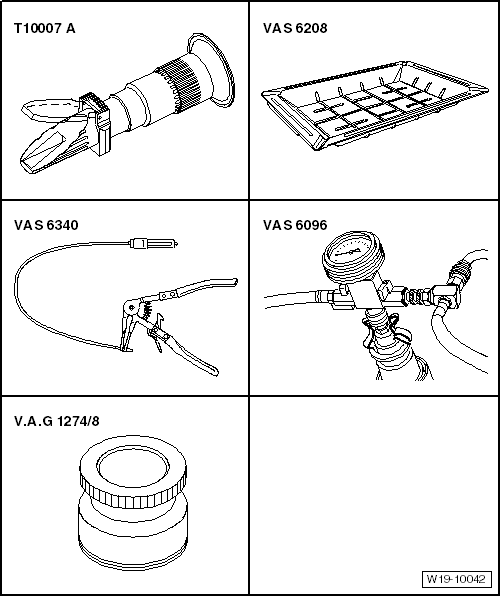
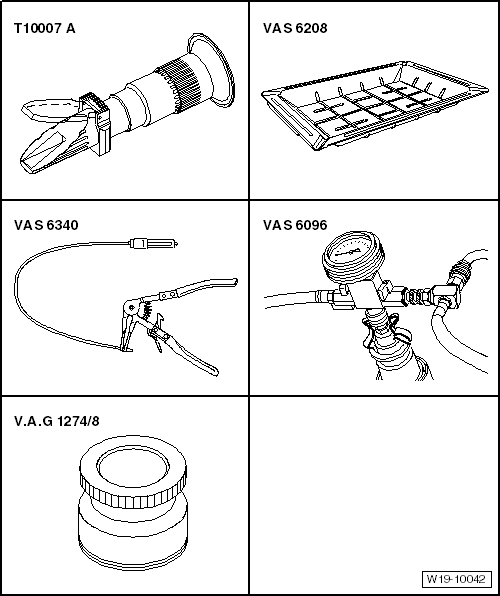
Required Special Tools, Test and Measuring Equipment and Auxiliary Items
- Refractometer -T10007 A-
- Drip pan for workshop crane -VAS 6208-
- Hose clamp pliers -VAS 6340-
- Cooling system filling unit -VAS 6096-
- Adapter for cooling system tester -V.A.G 1274/8-
Removing
- Removing and installing front bumper → Body assembly work, exterior.
- Drain coolant “Draining and refilling coolant”.
Risk of injury from radiator fans starting automatically. Disconnect electrical connectors before working on the fan shroud.
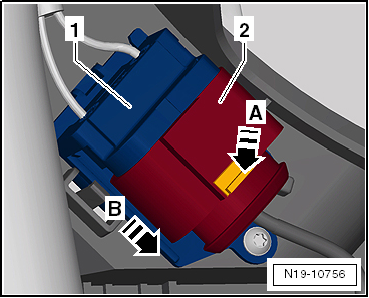
- Disconnect connector -2- from the electrical wiring harness -1- of radiator fan -2-.
- To do so, unlock the locking tab -arrow A-.
- Pull off connector -2- in -arrow direction B-.
Vehicles with thermal switch for radiator fan -F18-
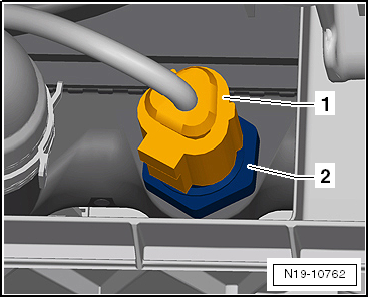
- Unlock and disconnect connector -1- on thermal switch for radiator fan -F18-.
Continuation for all vehicles
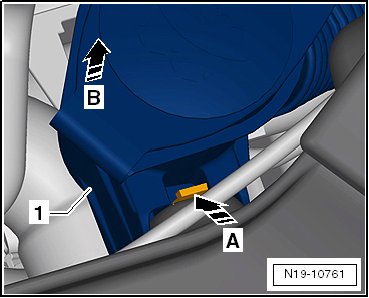
- Unlock locking tab on filler neck -1- for washer fluid reservoir in -arrow direction A-.
- Pull filler neck -1- for washer fluid reservoir off the front end carrier in -arrow direction B-.
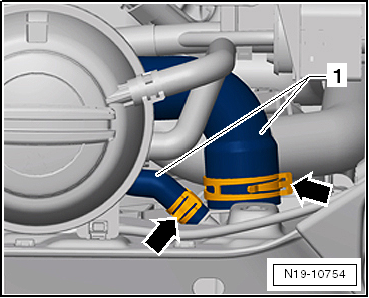
- Disconnect coolant hoses -1- at the top of the radiator by opening the clamps -arrows-.
- Disconnect connectors from thermal switch and radiator fan.
- Removing front left headlight → Electrical system.
Vehicles with air conditioning

Note
To avoid damage to the condenser and refrigerant lines/hoses, make sure the lines and hoses are not overstretched, kinked or bent.
- Removing condenser → Heating, Air Conditioning.
Continuation for all vehicles
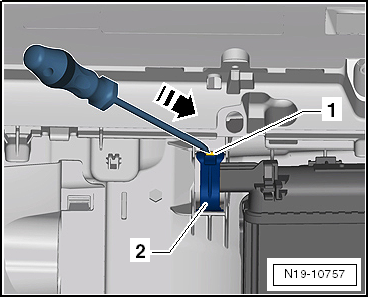
- Unlock holders -2- on the right and left using a screwdriver by pressing locking tab -1- in the -arrow direction-.
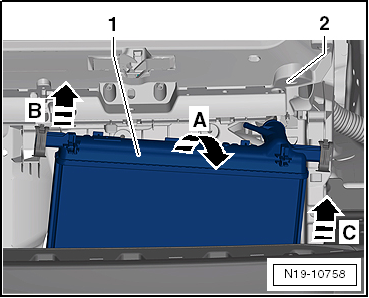
- Tilt radiator -1- forward in -arrow direction A-.
- Pull radiator -1- upward on the right side in -arrow direction B-.
- Tilt radiator -1- further forward in -arrow direction A- out of the front end carrier.
- Pull radiator -1- out of the lower mounts and remove it in -arrow direction C-.
If the radiator is to be replaced:
- Removing fan shroud with radiator fan "Removing and installing fan shroud with radiator fan".
- Removing thermal switch for radiator fan -F18-.
Installing
Installation is carried out in the reverse order. Observe the following:
Vehicles with air conditioning

Note
To avoid damage to the condenser and refrigerant lines/hoses, make sure the lines and hoses are not overstretched, kinked or bent.
- Installing condenser → Heating, Air Conditioning.
- Top up coolant "Draining and topping up coolant".
- Observe electrical connections and routing → Current flow diagrams, electrical fault finding and installation locations.
- Installing front bumper → Body assembly work, exterior.
Removing and installing fan shroud with radiator fan
Required Special Tools, Test and Measuring Equipment and Auxiliary Items
- Refractometer -T10007 A-
- Drip pan for workshop crane -VAS 6208-
- Hose clamp pliers -VAS 6340-
- Cooling system filling unit -VAS 6096-
- Adapter for cooling system tester -V.A.G 1274/8-
Risk of injury from radiator fans starting automatically. Disconnect electrical connectors before working on the fan shroud.
Removing
- Drain coolant “Draining and refilling coolant”.
- Removing and installing front bumper → Body assembly work, exterior.
- Remove radiator "Removing and installing radiator".
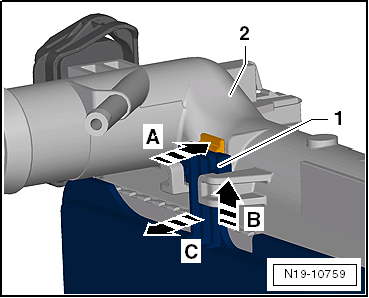
- Unlock fan shroud -1- by pressing the locking tab in -arrow direction A-.
- Pull fan cowl -1- out of the bracket on the radiator -2- in direction of arrow B.
- Swivel fan cowl -1- in direction of arrow C and pull it out of the bottom mount.
- Remove fan cowl -1-.
If the fan cowl is to be replaced:
- Remove radiator fan. See "Removing and Installing Fan Cowl with Radiator Fan".
Installing
Installation is carried out in the reverse order. Observe the following:
- Top up coolant "Draining and topping up coolant".
- Observe electrical connections and routing → Current flow diagrams, electrical fault finding and installation locations.
- Installing front bumper → Body assembly work, exterior.
Removing and Installing Radiator Fan -V7-
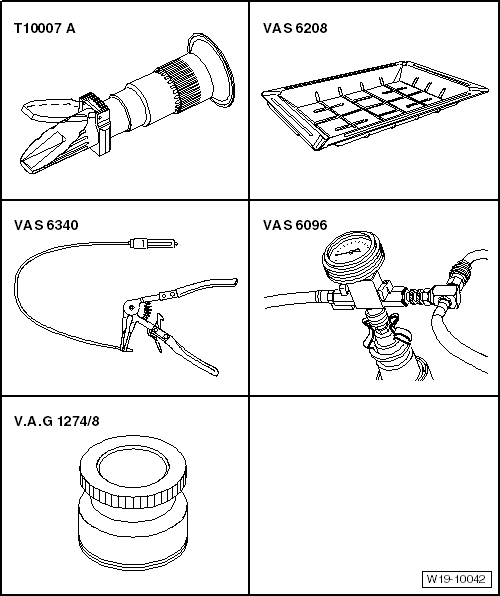
Required Special Tools, Test and Measuring Equipment and Auxiliary Items
- Refractometer -T10007 A-
- Drip pan for workshop crane -VAS 6208-
- Hose clamp pliers -VAS 6340-
- Cooling system filling unit -VAS 6096-
- Adapter for cooling system tester -V.A.G 1274/8-
Risk of injury from radiator fans starting automatically. Disconnect electrical connectors before working on the fan shroud.
Removing
- Drain coolant “Draining and refilling coolant”.
- Removing and installing front bumper → Body assembly work, exterior.
- Remove radiator "Removing and installing radiator".
- Removing fan shroud with radiator fan "Removing and installing fan shroud with radiator fan".
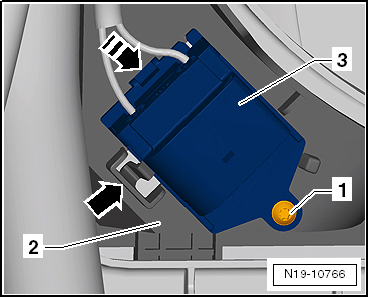
- Unscrew bolt -1- from fan cowl -2-.
- Unlock wiring harness -3- at the locking tab -arrow-.
- Slide wiring harness -3- in direction of arrow -- and remove.
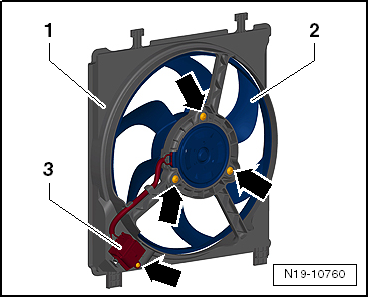
- Unscrew bolts -arrows-.
- Route wiring harness -3- out of fan cowl -2-.
- Remove radiator fan -2-.
Installing
Installation is carried out in the reverse order. Observe the following:
- Top up coolant "Draining and topping up coolant".
- Observe electrical connections and routing → Current flow diagrams, electrical fault finding and installation locations.
- Installing front bumper → Body assembly work, exterior.
Tightening torques
