Coolant pump/coolant regulation
Assembly overview - coolant pump
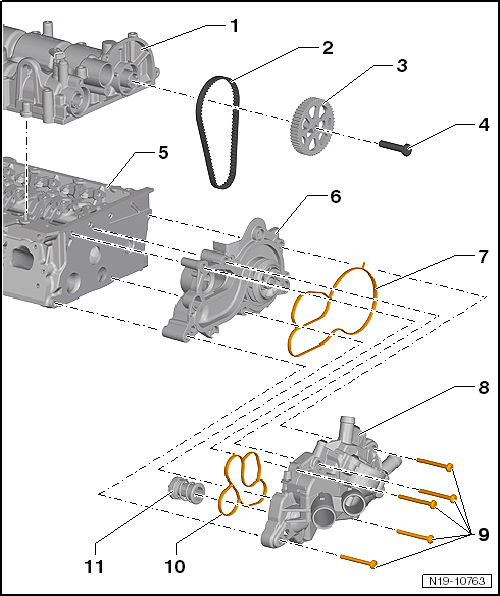
- Camshaft housing
- Removing and installing "Removing and installing camshaft housing"
- Timing belt
- replace after removal
- for drive of coolant pump
- Removing and installing "Toothed belt for coolant pump"
- Camshaft sprocket
- for drive of coolant pump

Note
- Before removal, set cylinder 1 to TDC.
- Mark the position of the camshaft sprocket relative to the camshaft housing before removal. "Removing and installing camshaft seal"
- Bolt
- replace after removal
- 20 N·m +90º
- Cylinder head
- Removing and installing "Removing and installing cylinder head"
- Coolant pump
- remove and install "Removing and installing coolant pump"
- Seal, coolant pump housing/thermostat housing
- replace after removal
- Make sure the seal is seated correctly.
- Lightly wet with coolant before installation.
- Thermostat housing
- Removing and installing "Thermostat, removing and installing, small circuit"
- Observe the tightening sequence to the coolant pump.
- Bolts
- Observe the tightening sequence. "Removing and installing coolant pump"
- 12 N·m
- Seal, thermostat housing to coolant pump housing
- replace after removal
- Make sure the seal is seated correctly.
- Lightly wet with coolant before installation.
- Thermostat
- Removing and installing "Thermostat, removing and installing, small circuit"
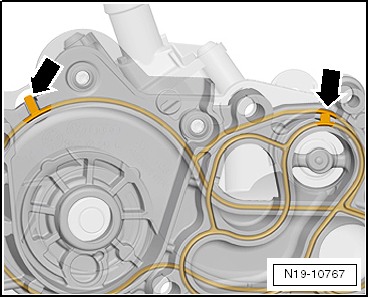
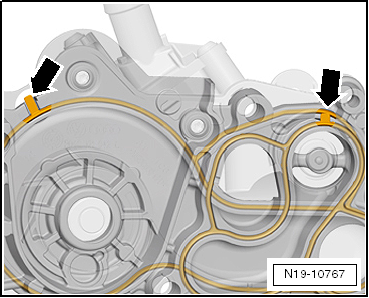
Installation position of seals
- Make sure the seal is seated correctly -arrows-.
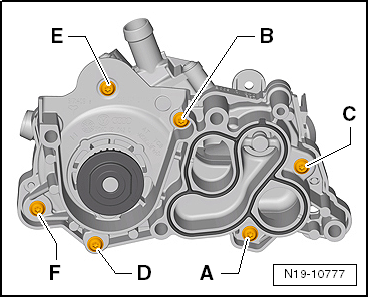
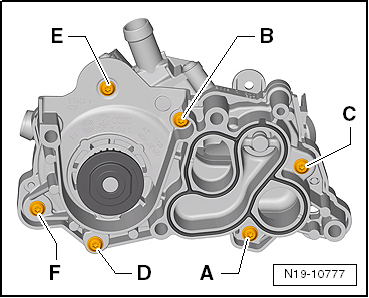
Tightening sequence from thermostat housing to coolant pump
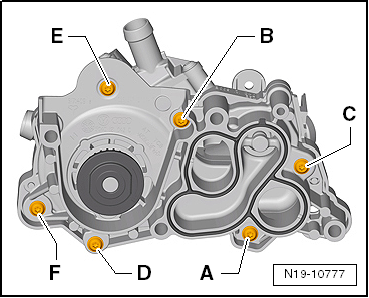
- Tighten the mounting bolts in the specified sequence -A- to -F-.
Assembly overview - thermostat
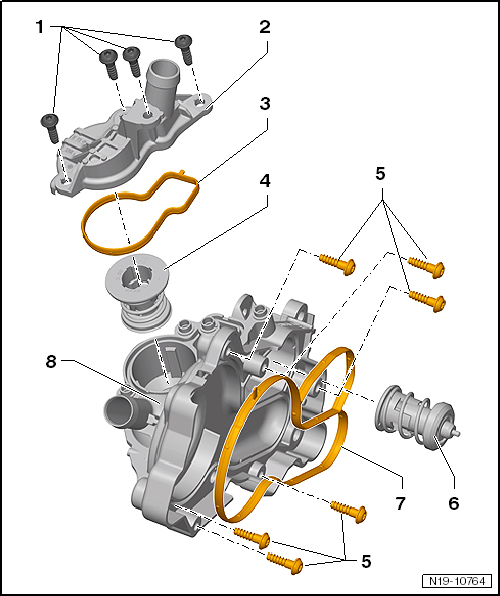
- Bolt
- Observe the tightening sequence.
- 7 N·m
- Thermostat cover
- Gasket
- Check that it is seated correctly.
- replace after removal
- Thermostat
- Opening temperature: approx. 80 ºC
- Removing and installing "Thermostat, removing and installing, main circuit"
- Observe installation position.
- Bolt
- for bolting the thermostat housing to the coolant pump
- Observe the tightening sequence.
- 8 N·m
- Thermostat
- Opening temperature: approx. 105 ºC
- Removing and installing "Thermostat, removing and installing, small circuit"
- Observe installation position.
- Gasket
- replace after removal
- Check that it is seated correctly.
- Thoroughly clean the sealing surface.
- Thermostat housing
- Removing and installing "Thermostat, removing and installing, small circuit"
Tightening sequence from thermostat housing to coolant pump
- Tighten in the sequence -A- to -F-.
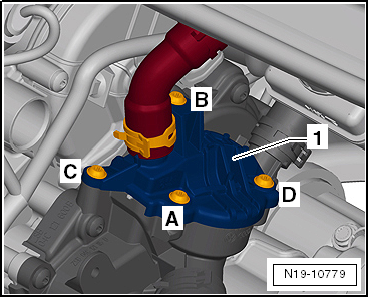
Tightening sequence from thermostat cover to thermostat housing
- Tighten in the sequence -A- to -D-.
Installation position of seals
- Make sure the seal is seated correctly -arrows-.
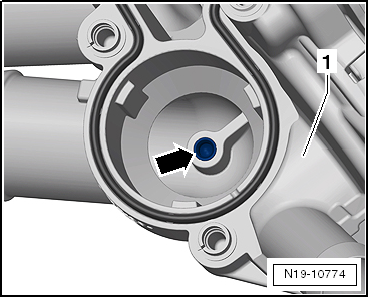
Installation position of thermostats
- Thermostats must seat with the centering pin in the guide -arrow-.
Removing and installing coolant pump
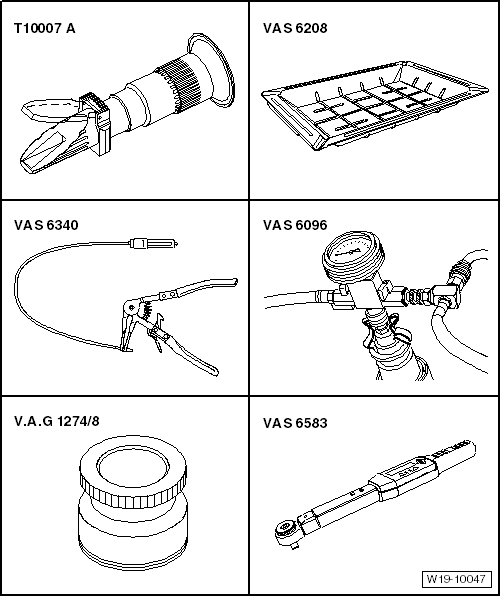
Required Special Tools, Test and Measuring Equipment and Auxiliary Items
- Refractometer -T10007 A-
- Drip pan for workshop crane -VAS 6208-
- Hose clamp pliers -VAS 6340-
- Cooling system filling unit -VAS 6096-
- Adapter for cooling system tester -V.A.G 1274/8-
- Torque wrench -VAS 6583-
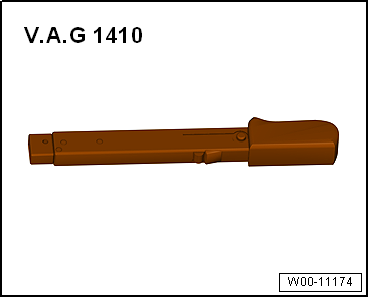
- Torque wrench -V.A.G 1410-
Removing
- Drain coolant “Draining and refilling coolant”.
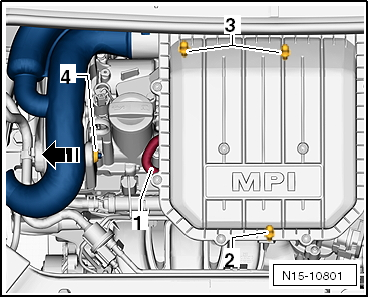
- Disconnect hose -1- from air filter housing.
- Pull air filter housing upward off the bolts at points -2- and -3-.
- Push the air filter housing with the intake connector out of mount -4- in the -arrow direction-.
- Remove the air filter housing from the engine compartment.
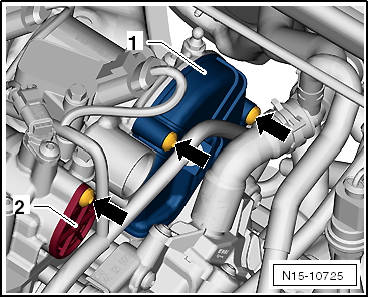
- Unscrew the mounting bolts -arrows- of the cover -1-.
- Unclip line routing from cover.
- Remove cover -1-.
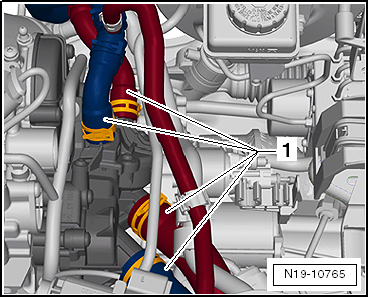
- Disconnect all coolant hoses -1- from the coolant pump.
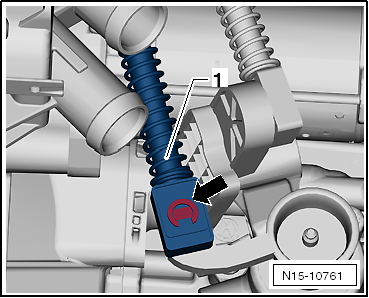
- Remove retaining clip -arrow- of the shift cable.
- Pull cable -1- off the shift lever and set it aside.
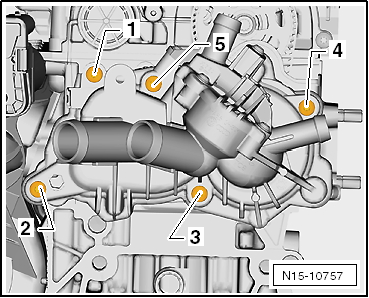
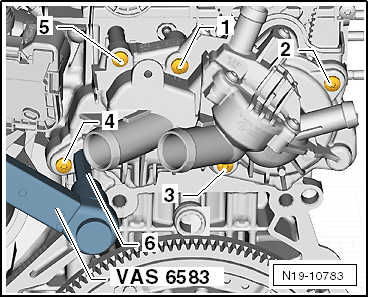
- Unscrew coolant pump fastening bolts in the specified sequence -1- to -5-.
- Remove coolant pump with thermostat housing.
If the coolant pump is to be replaced:
- Remove thermostat housing. "Thermostat, removing and installing, small circuit".
Installing
Installation is carried out in the reverse order. Observe the following:
- The housing seal -arrows- must be replaced in every case.
- If the coolant pump has been replaced, install the thermostat housing. "Thermostat, removing and installing, small circuit".
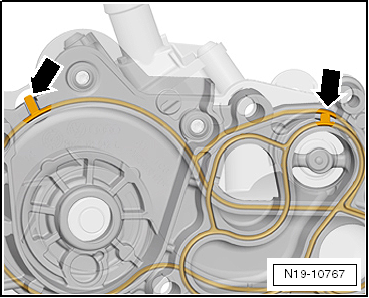
- Make sure the seals -arrows- are seated correctly.
- Lightly wet the seal with coolant.
Risk of premature wear of the toothed belt or the coolant pump. The following steps for installing the coolant pump must be carried out strictly in the specified sequence. This ensures correct tensioning of the toothed belt. The following steps must be carried out with a second mechanic.
- Used toothed belts must always be replaced when the coolant pump is replaced.
- Set cylinder 1 to "TDC". "Checking valve timing"
- Place toothed belt centrally on the camshaft and coolant pump toothed belt pulleys.
- Position the coolant pump on the cylinder head with the mounting bolts.
- Tighten the mounting bolts in the specified sequence -1- to -5- first to 10 N·m.
- Then loosen all bolts by 360º.
- Preload the coolant pump at the hex socket with a 10 mm socket Pos. -6-, extension and torque wrench -VAS 6583- to 30 N·m clockwise.

- For easier handling, position the torque wrench -VAS 6583- vertically.
- Hold the torque wrench -VAS 6583- pressed constantly at this torque. The torque wrench must not be supported with the other hand during this.
- To avoid excessive belt tension, do not "overpress" the torque wrench -VAS 6583-.
- Tightening of the mounting bolts -2-, -1- and -5- must be carried out by a second mechanic, while the first mechanic holds the torque on torque wrench -VAS 6583-.
- Tighten the mounting bolts -2-, -1- and -5- to 10 N·m.
- Tighten the mounting bolts in the specified sequence -3-, -4-, -5-, -1- and -2- to 12 N·m.
- Install shift linkage on transmission.
- Top up coolant "Draining and topping up coolant".
- Install air filter housing "Removing and installing air filter housing".
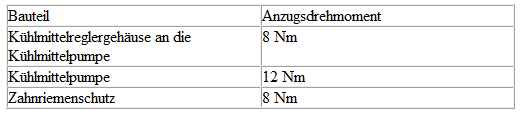
Tightening torques
Removing and installing thermostat
Removing and installing thermostat, small circuit
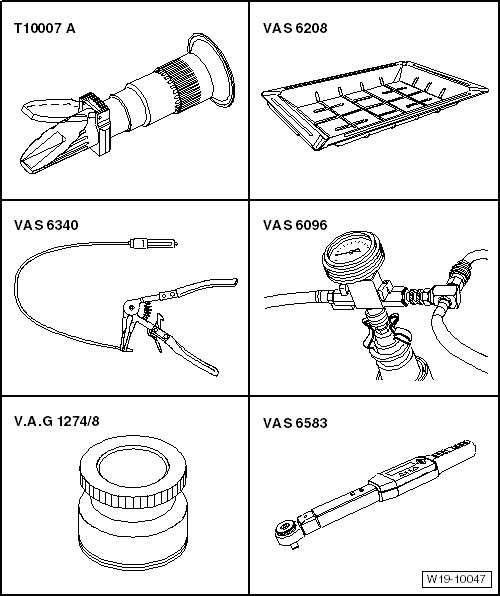
Required Special Tools, Test and Measuring Equipment and Auxiliary Items
- Refractometer -T10007 A-
- Drip pan for workshop crane -VAS 6208-
- Hose clamp pliers -VAS 6340-
- Cooling system filling unit -VAS 6096-
- Adapter for cooling system tester -V.A.G 1274/8-
- Torque wrench -VAS 6583-
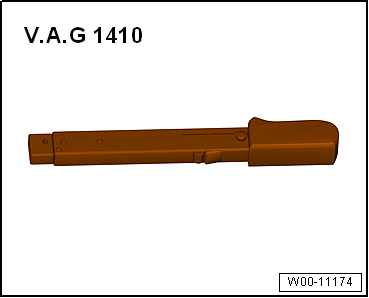
- Torque wrench -V.A.G 1410-
Removing
- Drain coolant. "Draining coolant".
- Remove coolant pump -1-. "Removing and installing coolant pump".
- Unscrew bolts -arrows-.
- Remove coolant pump -1- from thermostat housing -2-.
- Remove thermostat -3-.
Installing
Installation is in reverse order, observing the following:
- Position the thermostat on the coolant pump.
- The thermostat must seat with the centering pin in the guide of the coolant pump.
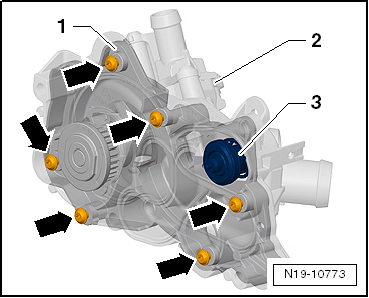
- Make sure the seals -arrows- are seated correctly.
- Lightly wet the seal with coolant.
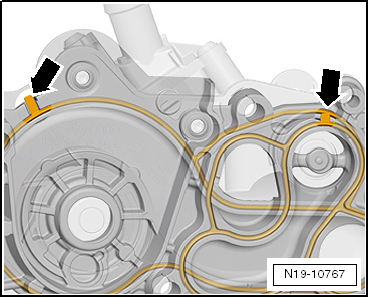
- Position the thermostat housing on the coolant pump.
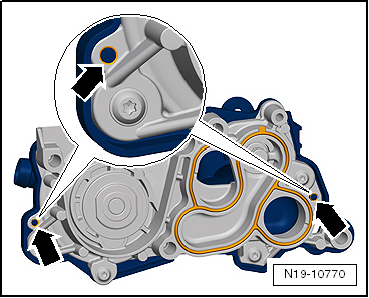
- Make sure the bolts of the thermostat seat correctly in the guides -arrows- of the coolant pump.

Note
If the guide pins are broken off, the coolant pump must be replaced.
- Thread in and tighten the bolts in the specified sequence -A- to -F-.
- Install coolant pump -1-. "Removing and installing coolant pump".
- Install shift linkage on transmission.
- Top up coolant "Draining and topping up coolant".
- Install air filter housing "Removing and installing air filter housing".
Tightening torques
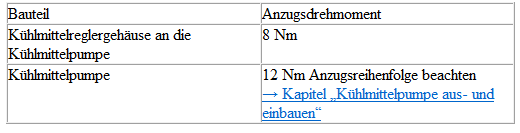
Removing and installing thermostat, main circuit
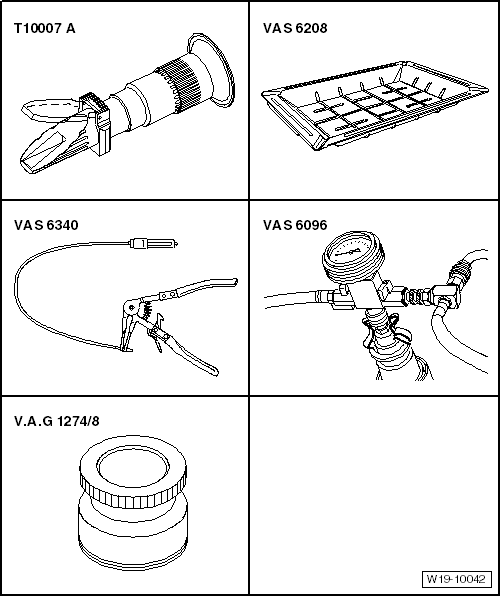
Required Special Tools, Test and Measuring Equipment and Auxiliary Items
- Refractometer -T10007 A-
- Drip pan for workshop crane -VAS 6208-
- Hose clamp pliers -VAS 6340-
- Cooling system filling unit -VAS 6096-
- Adapter for cooling system tester -V.A.G 1274/8-
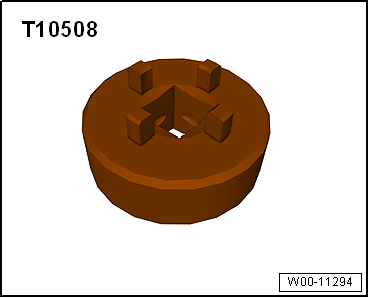
- Tool -T10508-
Removing
- Drain coolant “Draining and refilling coolant”.
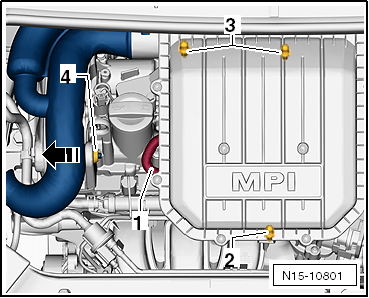
- Disconnect hose -1- from air filter housing.
- Pull air filter housing upward off the bolts at points -2- and -3-.
- Push the air filter housing with the intake connector out of mount -4- in the -arrow direction-.
- Remove the air filter housing from the engine compartment.
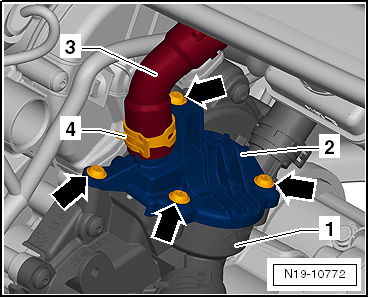
- Loosen clamp -4- and pull off hose -3-.
- Unscrew bolts -arrows-.
- Remove cover -2-.
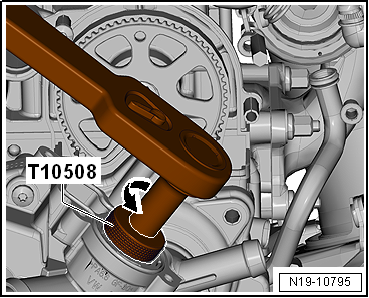
- Remove thermostat using tool -T10508-.
- Press tool -T10508- down slightly while turning it in the direction of the -arrow-.
Installing
Installation is in reverse order, observing the following:
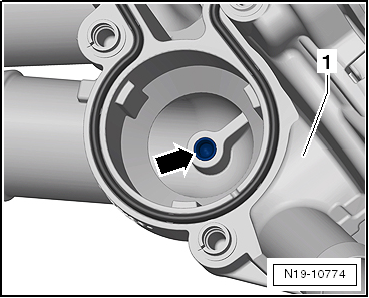
- Thermostat must seat exactly with the centering pin in the guide -arrow- of the thermostat housing -1-.
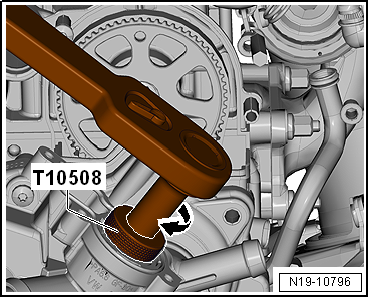
- Install coolant regulator with key -T10508-.
- Press down key -T10508- slightly and turn it in the -arrow- direction as far as it will go.
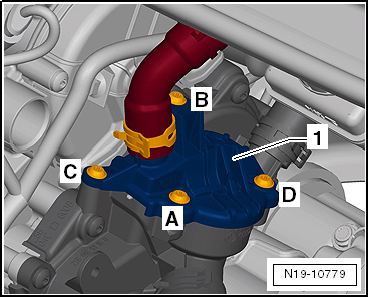
- Make sure the seal is seated correctly.
- Lightly wet the seal with coolant.
- Place cover -1- onto the coolant regulator housing.
- Thread in the bolts in the sequence shown, -A- to -D-, and tighten them.
- Top up coolant "Draining and topping up coolant".
- Install air filter housing "Removing and installing air filter housing".
Tightening torques

Removing and installing timing belt for coolant pump
Required Special Tools, Test and Measuring Equipment and Auxiliary Items
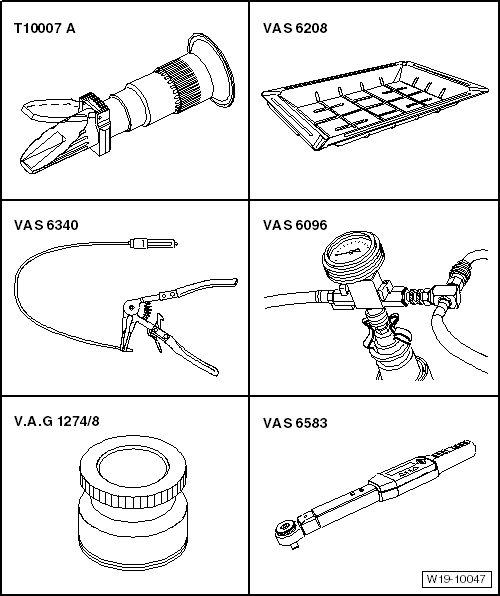
- Refractometer -T10007 A-
- Drip pan for workshop crane -VAS 6208-
- Hose clamp pliers -VAS 6340-
- Cooling system filling unit -VAS 6096-
- Adapter for cooling system tester -V.A.G 1274/8-
- Torque wrench -VAS 6583-
- Torque wrench -V.A.G 1410-

Note
The timing belt must always be replaced after removal!
Removing
- Drain coolant. "Draining coolant".
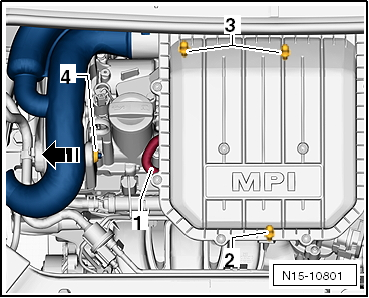
- Disconnect hose -1- from air filter housing.
- Pull air filter housing upward off the bolts at points -2- and -3-.
- Push the air filter housing with the intake connector out of mount -4- in the -arrow direction-.
- Remove the air filter housing from the engine compartment.
- Remove coolant pump -1- and timing belt guard -2- "Removing and installing coolant pump".
- Remove toothed belt -1- from the coolant pump toothed belt pulley.
Installing
Installation is in reverse order, observing the following:
- Place timing belt centrally on the camshaft sprocket and the coolant pump timing belt pulley.

Note
The installation procedure for the coolant pump must be strictly followed.
- Install coolant pump -1-. "Removing and installing coolant pump".
- Refill coolant "Draining coolant".
- Install air filter housing "Removing and installing air filter housing".
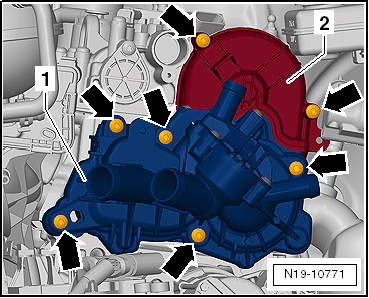
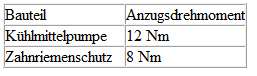
Tightening torques
Removing and installing coolant temperature sender -G62-
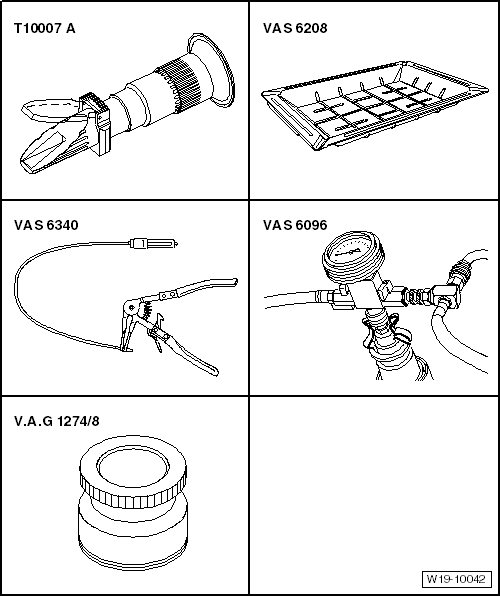
Required Special Tools, Test and Measuring Equipment and Auxiliary Items
- Refractometer -T10007 A-
- Drip pan for workshop crane -VAS 6208-
- Hose clamp pliers -VAS 6340-
- Cooling system filling unit -VAS 6096-
- Adapter for cooling system tester -V.A.G 1274/8-
Removing
Installation location:
- Engine cold.
Risk of scalding from hot steam and hot coolant. With a warm engine, the cooling system is under excess pressure. To release the excess pressure, cover the coolant expansion tank cap with a rag and open it carefully.
- Briefly open filler cap for coolant expansion tank -1- to release residual pressure in the cooling system.
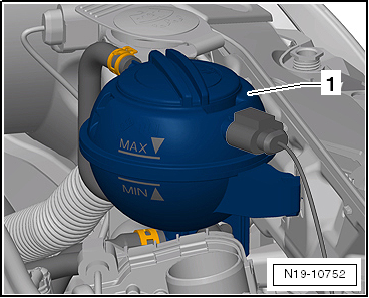
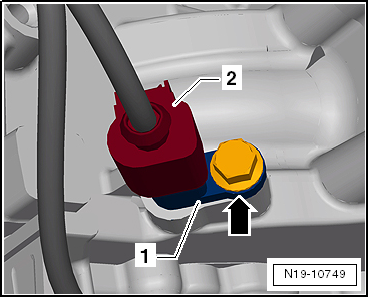
- Unlock and disconnect connector -2- on coolant temperature sender -G62- -1-.
- To catch escaping coolant, place a rag under the connection stub.

Note
To prevent coolant loss, immediately install the new coolant temperature sender -G62- into the cylinder head.
- Unscrew bolt -arrow-.
Installing
Installation is carried out in the reverse order. Observe the following:
- Check coolant level "Draining and filling coolant".
Tightening torques
