A/C compressor
Assembly overview - A/C compressor drive unit
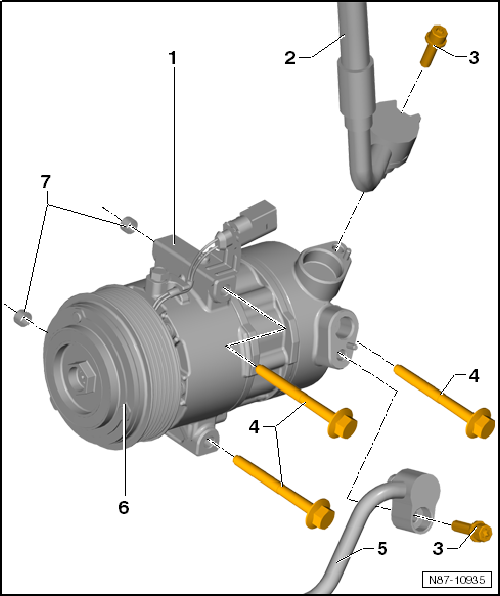
- A/C compressor
- Refrigerant line, low pressure side
- Bolt M8x28
- 25 N·m
- Bolt M8x95
- 23 N·m
- Refrigerant line, high pressure side
- Magnetic clutch for air conditioning -N25- with plug connection
- Centering sleeves
Assembly overview - Pulley
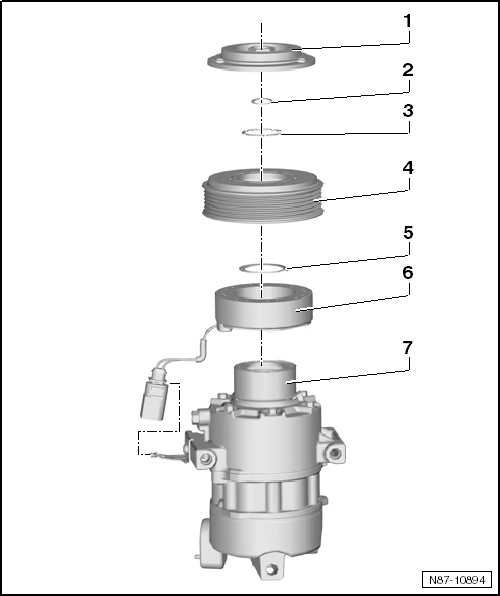
- Cap with shaft nut
- 20 - 2 N·m
- Spacer washer
- Circlip
- V-ribbed belt pulley
- Circlip
- Magnetic Clutch for Air Conditioning Compressor -N25-
- A/C compressor
Removing and installing A/C compressor from bracket
Required Special Tools, Test and Measuring Equipment and Auxiliary Items
- Torque Wrench -V.A.G 1331-
Removing
- Remove front bumper → Body Assembly Work, Exterior.
- Remove V-ribbed belt.

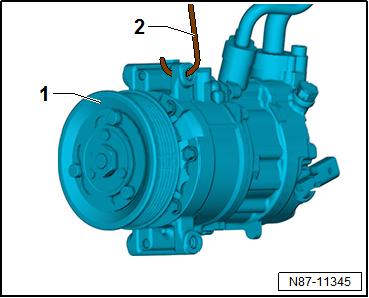
- Disconnect plug connection -2- from A/C compressor -1-.
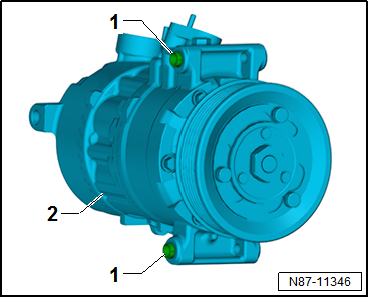
- Unscrew hex bolts -5- and remove A/C compressor -1-.

Note
If only the bracket for auxiliary units is to be removed, the refrigerant lines on the A/C compressor must not be disconnected.

- Secure A/C compressor -1- to the body with a suitable aid, e.g. welding wire -2-.
Installing
Installation is performed in reverse order. Observe the following:
- Thoroughly clean contact surfaces on A/C compressor and bracket.
- Insert dowel sleeves -1- into A/C compressor.

Note
Make sure dowel sleeves are seated correctly and contact surfaces are clean. Incorrectly installed dowel sleeves, or dirty or damaged contact surfaces, can cause misalignment between A/C compressor and engine. Misalignment causes damage to the A/C compressor over operating time.
Risk of damage to A/C compressor. Refrigerant oil can collect in the compression chamber of a removed A/C compressor during storage. After installing a new A/C compressor or filling with fresh refrigerant oil, turn the A/C compressor 10 revolutions by hand before fitting the poly-V belt.
Tightening torques
- "Assembly overview - A/C compressor drive unit"
When starting the engine for the first time after filling the refrigerant circuit, observe the following:
- Observe notes on commissioning the air conditioning after installing the A/C compressor → Air Conditioning - with Refrigerant R134a.
Removing and installing A/C compressor
Required Special Tools, Test and Measuring Equipment and Auxiliary Items
- Torque Wrench -V.A.G 1331-
- Air Conditioning Service Station

Note
- If a new A/C compressor is installed, perform the function "Initial run-in A/C compressor" in Guided Fault Finding.
- If only the bracket for auxiliary units is to be removed, the refrigerant lines on the A/C compressor must not be disconnected.
Removing
- Extract refrigerant with the air conditioning service station, only then open refrigerant circuit. Observe notes "Working on Refrigerant Circuit".
- Observe safety precautions "Safety Precautions When Working on Air Conditioning Systems".
- Remove front bumper → Body Assembly Work, Exterior.
- Remove V-ribbed belt.

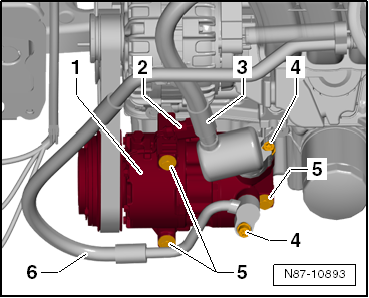
- Disconnect plug connection -2- from A/C compressor -1-.
Risk of frostbite from refrigerant escaping under pressure. Frostbite of skin and other body parts possible. Wear protective gloves. Wear safety goggles. Extract refrigerant and open refrigerant circuit immediately. If more than 10 min have passed since extraction and the refrigerant circuit has not been opened, extract refrigerant again. Post-evaporation has built up pressure in the refrigerant circuit.
- Unscrew bolts -4- (23 N·m).
- Disconnect refrigerant lines -3- and -6- from A/C compressor -1-.

Note
The upper bolt -4- of refrigerant lines -3- is accessible through the service opening in the lock carrier.
- Unscrew hex bolts -5- and remove A/C compressor.
Installing
Installation is performed in reverse order. Observe the following:

Note
- Make sure centering sleeves -6- seat correctly.
- Installation is performed in reverse order. Observe the following:
- Observe notes on installing the A/C compressor.
- If a new A/C compressor is installed, an "Initial run-in A/C compressor" must be performed.
Notes on installing the A/C compressor
- Start engine only after the refrigerant circuit has been reassembled.
- After installing a new A/C compressor or filling with fresh refrigerant oil (e.g. after flushing the refrigerant circuit), turn the cap of the A/C compressor 10 revolutions by hand before starting the engine. This prevents damage to the A/C compressor.
- Start engine only when the refrigerant circuit is filled.

Note
- The A/C compressor is driven by magnetic clutch for air conditioning -N25-.
- To prevent damage to the A/C compressor when the refrigerant circuit is empty, magnetic clutch for air conditioning -N25- only engages when a signal from high pressure sender -G65- is present.

Note
When starting the engine for the first time after filling the refrigerant circuit, observe the following:
- Start engine with A/C compressor switched off (indicator lamp in A/C button is off) and wait until idle speed has stabilised.
- Open dash panel outlet.
- Set blower -V2- to at least level 3.
- Select temperature preset "cold" on air conditioning operating and display unit.
- Switch on A/C compressor (indicator lamp in A/C button lights up) and let engine run at idle for at least 5 minutes.
A/C compressor initial run-in

Note
If a new A/C compressor is installed, an "Initial run-in A/C compressor" must be performed.
The following conditions must be met:
- Refrigerant filled on pressure side
- Engine off
- Outlet set to "OPEN".
- Blower set to "level 3"
- A/C off
- Start the engine.
- Wait approx. 5 seconds for the idle speed to stabilise.
- Switch on the air conditioning (A/C on).
- Let the engine idle for 2 minutes.
- Switch off engine.

Removing and installing magnetic clutch for air conditioning compressor -N25-
Removing

Note
The air conditioning compressor does not need to be removed.
- Remove right wheel housing liner → Body assembly work, exterior.
- Remove V-ribbed belt.
- Hold the shaft of the air conditioning compressor -7- and unscrew cap -1- (20 - 2 N·m).
- Disconnect the electrical connector.
- Remove spacer washer -2-.
- Remove circlip -3- with suitable pliers.
- Remove V-ribbed belt pulley -4-.
- Remove retaining ring -5- with suitable pliers.
- Remove magnetic clutch for air conditioning compressor -N25- -6- from the air conditioning compressor -7-.
Installing
- Before installing the magnetic clutch, observe the locking device -arrows- on the air conditioning compressor.

- Torque of cap (20 - 2 N·m).
Installation is carried out in reverse order.
