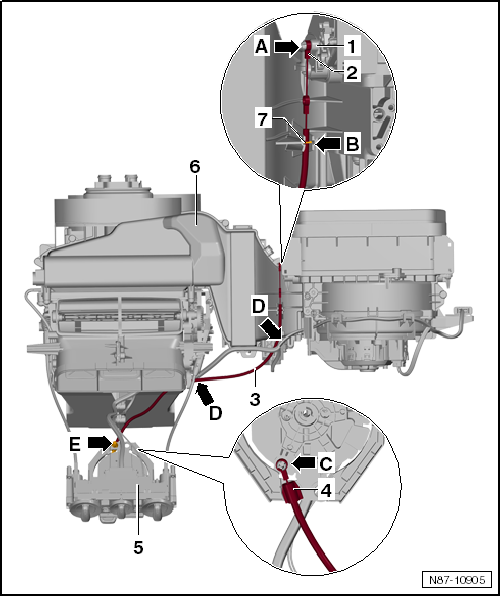
Actuators
Removing and installing actuator for temperature flap
Removing and installing actuator for temperature flap, left-hand drive
Required Special Tools, Test and Measuring Equipment and Auxiliary Items
- Angle screwdriver -VAS 6800-
Removing
- Remove the driver side dashboard cover → Body assembly work interior.
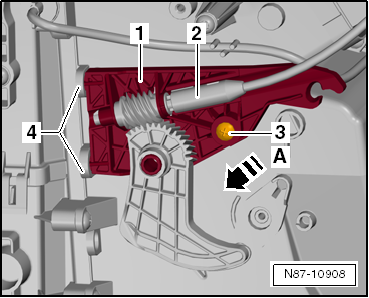
- Detach flexible shaft -2- from actuator -1-.
- Unscrew screw -3- (1.5 N·m).
- Swivel actuator -1- in direction of arrow A and remove it from brackets -4-.
Installing

Note
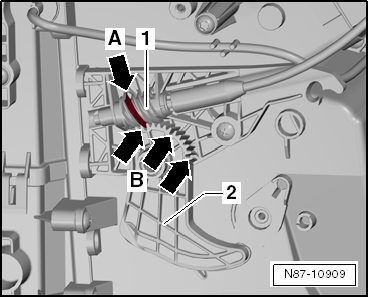
- Before installing, check that the position of worm wheel -1- and toothed segment -2- match.
- The raised turn (marked dark) -arrow A- must engage in the deeper tooth gaps -arrows B-.
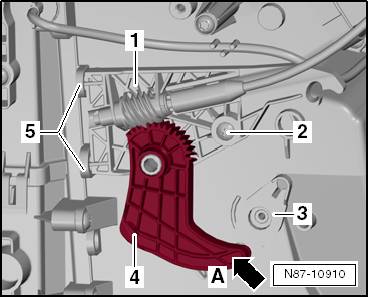
- Insert actuator -1- into brackets -5-.
- Hook toothed segment -4- into the holder -arrow A- of temperature flap -3-.
- Check function of the actuator.

Note
The temperature flap must move smoothly and without jerking to its end positions.
Adjustment of temperature flap not OK:
- Remove actuator and repeat installation as described.
Adjustment of temperature flap OK:
- Install in reverse order.
Removing and installing actuator for temperature flap, right-hand drive
Required Special Tools, Test and Measuring Equipment and Auxiliary Items
- Angle screwdriver -VAS 6800-
Removing
- Remove the driver side dashboard cover → Body assembly work interior.
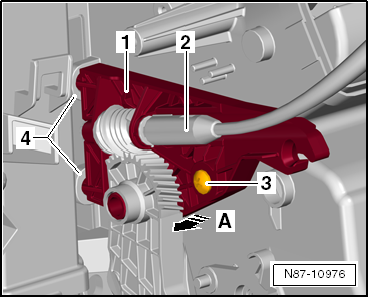
- Detach flexible shaft -2- from actuator -1-.
- Unscrew screw -3- (1.5 N·m).
- Swivel actuator -1- in direction of arrow A and remove it from brackets -4-.
Installing

Note
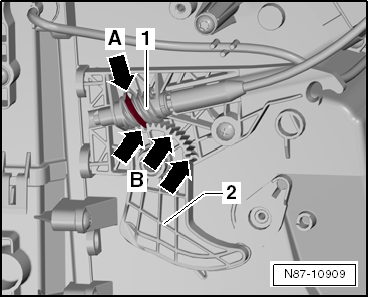
- Before installing, check that the position of worm wheel -1- and toothed segment -2- match.
- The raised turn (marked dark) -arrow A- must engage in the deeper tooth gaps -arrows B-.
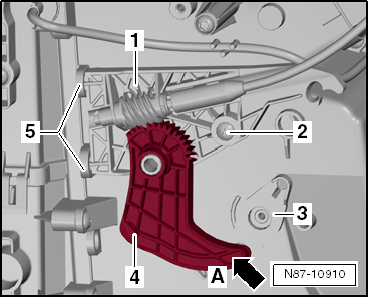
- Insert actuator -1- into brackets -5-.
- Hook toothed segment -4- into the holder -arrow A- of temperature flap -3-.
- Check function of the actuator.

Note
The temperature flap must move smoothly and without jerking to its end positions.
Adjustment of temperature flap not OK:
- Remove actuator and repeat installation as described.
Adjustment of temperature flap OK:
- Install in reverse order.
Removing and installing actuator for defrost and air distribution flap
Removing and installing actuator for defrost and air distribution flap, left-hand drive
Required Special Tools, Test and Measuring Equipment and Auxiliary Items
- Angle screwdriver -VAS 6800-
Removing
- Remove heating and A/C unit.
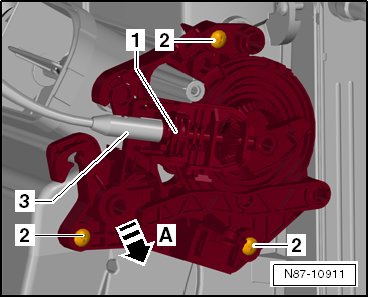
- Remove flexible shaft -3- from actuator -1-.
- Unscrew screws -2- (1.5 N·m).

Note
Unscrew screws -2- with a commercially available angle screwdriver for Phillips screws (blade width max. 20 mm).
- Swivel actuator -1- in direction of arrow -A- and remove it.
Installing
- Installation is carried out in the reverse order.

Note
Before installing, check that the position -arrow A- matches the flap mounts.
- Check function of the actuator.

Note
- The actuator for defrost and air distribution flap must move smoothly and without jerking to its end positions.
- Run the fresh air blower at maximum speed. If, in the "Defrost" position, air flows from the defrost vent and not from the footwell outlet, the flexible shaft is installed correctly. Otherwise, detach the flexible shaft from the heating and A/C control, turn the rotary knob 1/2 turn (180º) and reattach the flexible shaft. Repeat the check.
Adjustment of actuator for defrost and air distribution flap not OK:
- Remove actuator and repeat installation as described.
Adjustment of actuator for defrost and air distribution flap OK:
- Install in reverse order.
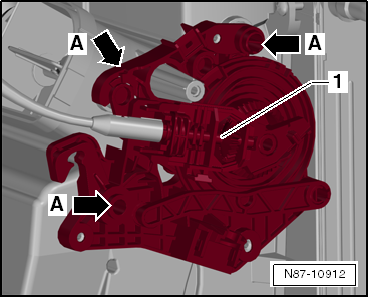
Removing and installing actuator for defrost and air distribution flap, right-hand drive
Required Special Tools, Test and Measuring Equipment and Auxiliary Items
- Angle screwdriver -VAS 6800-
Removing
- Remove instrument panel → Body assembly work, interior.
- Remove instrument panel centre console → Body assembly work, interior.
- Remove flexible shaft -3- from actuator -1-.

Note
The illustration shows a left-hand drive vehicle.
- Unscrew screws -2- (1.5 N·m).
- Swivel actuator -1- in direction of arrow -A- and remove it.
Installing
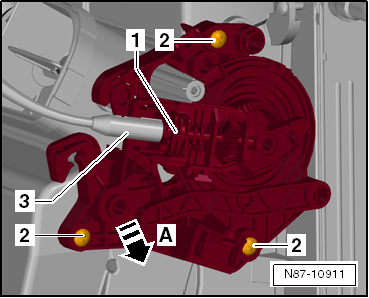
- Installation is carried out in the reverse order.

Note
- The illustration shows a left-hand drive vehicle.
- Before installing, check that the position -arrow A- matches the flap mounts.
- Check function of the actuator.

Note
- The actuator for defrost and air distribution flap must move smoothly and without jerking to its end positions.
- Run the fresh air blower at maximum speed. If, in the "Defrost" position, air flows from the defrost vent and not from the footwell outlet, the flexible shaft is installed correctly. Otherwise, detach the flexible shaft from the heating and A/C control, turn the rotary knob 1/2 turn (180º) and reattach the flexible shaft. Repeat the check.
Adjustment of actuator for defrost and air distribution flap not OK:
- Remove actuator and repeat installation as described.
Adjustment of actuator for defrost and air distribution flap OK:
- Install in reverse order.
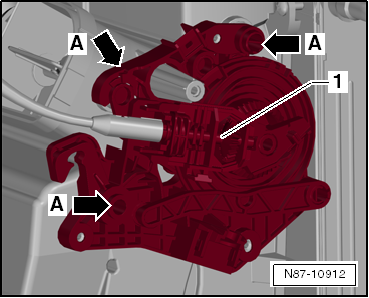
Removing and installing actuator for fresh air/recirculation flap
Removing and installing actuator for fresh air/recirculation flap, left-hand drive
Removing
- Remove instrument panel → Body assembly work, interior.
- Disconnect Bowden cable for fresh air/recirculation flap -5- from the fresh air/recirculation flap.
- Pull actuators -1- and -4- off the housing.
Installing
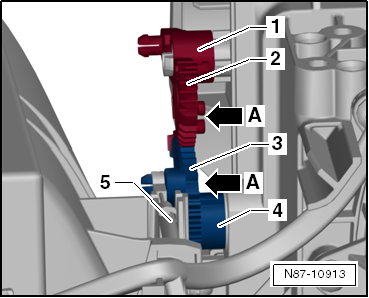
- When installing, make sure that actuators -2- and -3- align with the notches -arrow A-.
- Check function of the actuator.

Note
The actuator for fresh air/recirculation flap must move smoothly and without jerking to its end positions.
Adjustment of actuator for fresh air/recirculation flap not OK:
- Remove actuator and repeat installation as described.
Adjustment of actuator for fresh air/recirculation flap OK:
- Install in reverse order.
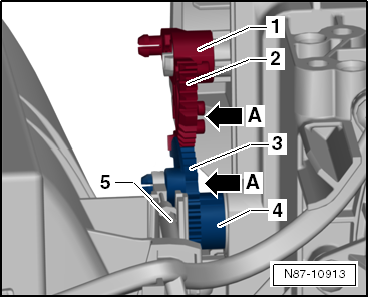
Removing and installing actuator for fresh air/recirculation flap, right-hand drive
Removing
- Remove instrument panel → Body assembly work, interior.
- Disconnect Bowden cable for fresh air/recirculation flap -5- from the fresh air/recirculation flap.
- Pull actuators -1- and -4- off the housing.
Installing
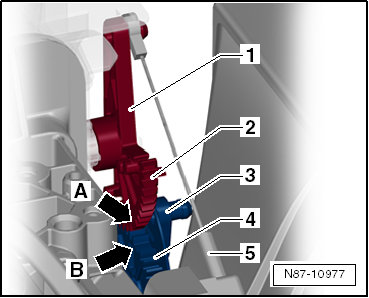
- When installing, make sure that actuators -2- and -3- align with the notches -arrow A- and -arrow B-.
- Check function of the actuator.

Note
The actuator for fresh air/recirculation flap must move smoothly and without jerking to its end positions.
Adjustment of actuator for fresh air/recirculation flap not OK:
- Remove actuator and repeat installation as described.
Adjustment of actuator for fresh air/recirculation flap OK:
- Install in reverse order.
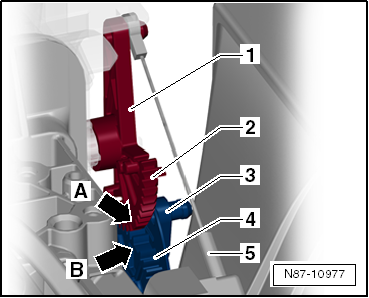
Removing and installing flexible shaft for air distribution
The following information applies to left-hand drive vehicles. It applies accordingly to right-hand drive vehicles.
Removing
- Remove glove box → Body assembly work, interior.
- Remove operating and display unit.
Set the flexible shaft to the following position:
- Turn the air distribution rotary knob -1- until the latching -arrow B- of flexible shaft -3- is visible in the transmission gear -4-.
- Release the latching -arrow B- of flexible shaft -3- with a small screwdriver and pull the shaft out of transmission gear -4-.
- Release the latching -arrow A- of flexible shaft -3- and remove the shaft from operating and display unit -2-.
Installing
- Installation is carried out in the reverse order.
Check function
Flexible shaft for air distribution actuator:
- Run the fresh air blower at maximum speed. If, in the "Defrost" position, air flows from the defrost vent and not from the footwell outlet, the flexible shaft is installed correctly. Otherwise, detach the flexible shaft from the heater and fresh air control, turn the rotary knob 1/2 turn (180º) and reattach the flexible shaft. Repeat the check.
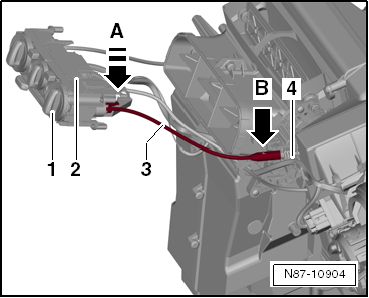
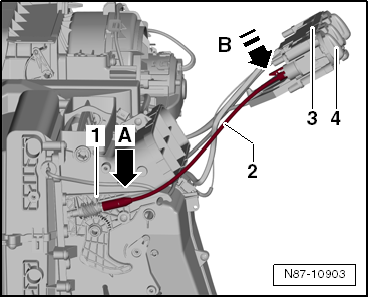
Removing and installing flexible shaft for temperature flap
The following information applies to left-hand drive vehicles. It applies accordingly to right-hand drive vehicles.
Removing
- Remove the driver side dashboard cover → Body assembly work interior.
- Remove operating and display unit.
Set the flexible shaft to the following position:
- Turn the temperature setting rotary knob -4- until the latching -arrow A- of flexible shaft -2- is visible at the actuator for temperature flap -1-.
- Release the latching -arrow A- of flexible shaft -2- with a small screwdriver and pull the shaft out of the actuator for temperature flap -1-.
- Release the latching -arrow B- of flexible shaft -2- and remove the shaft from operating and display unit -3-.
Installing
- Installation is carried out in the reverse order.
Check function
- Check that the temperature knob turns smoothly from "cold" to "warm".
Removing and installing Bowden cable for fresh air/recirculation flap
The following information applies to left-hand drive vehicles. It applies accordingly to right-hand drive vehicles.
Removing
- Remove glove box → Body assembly work, interior.
- Remove operating and display unit.
- Unhook the Bowden cable from the operating and display unit -arrow C- and disconnect clip -4- from the operating and display unit.
- Unhook the Bowden cable from the brackets -arrow D- and -arrow B-.
- Unhook Bowden cable -2- from actuator -1- -arrow A- and remove it.
Installing
- Installation is carried out in the reverse order.
Check function
- Check that the slide control for fresh air/recirculation operation moves smoothly.