GENERAL INFORMATION
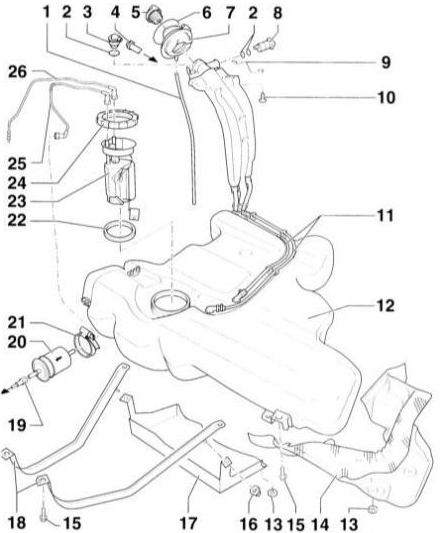 Fuel Tank, Fuel Pump and Fuel Filter 1 - Fuel overflow hose 2 - O-ring. Always replace. 3 - Gravity valve. For valve removal 4 - Vent tube* To charcoal canister. 5 - Fuel tank cap. Replace damaged O-ring. 6 - O-ring 7 - Rubber cup 8 - Vent valve 9 - Ground connection 10 - Screw, 10 N·m 11 - Vent pipes 12 - Fuel tank 13 - Clamp, 2 N·m 14 - Heat shield 15 - Bolt, 25 N·m 16 - Clamp nut, 2 N·m 17 - Cover 18 - Tank mounting strap Note
CAUTION
due to differences in length. 19 - Fuel line, black. To engine. To disconnect, press the locking tabs on the quick-release coupling. 20 - Fuel filter* The arrow on the filter housing indicates the direction of flow. Note: the filter is not replaced during maintenance. 21 - Clamp* For fuel filter. 22 - O-ring. Replace if damaged. Lubricate with fuel before installation. 23 - Fuel level sensor / fuel pump module* 24 - Union nut, 60 N·m 25 - Fuel line, black. To engine. To disconnect, press the locking tabs on the quick-release coupling. 26 - Return fuel line, blue. From engine. Connect to the shut-off flange, marked "R". To disconnect, press the locking tabs on the quick-release coupling. *) Gasoline engine only.The fuel system consists of the fuel tank, fuel lines, filter, fuel pump and fuel injection system (separate section).
The plastic fuel tank is located under the vehicle floor in front of the rear suspension. The fuel level is shown to the driver on the instrument panel. The fuel tank is vented through a closed evaporative emission system. On gasoline engines, fuel vapors are collected in the charcoal canister and fed into the engine combustion chambers.
Driving style has a significant effect on fuel consumption. Below are some tips on sensible use of the accelerator pedal.
PROCEDURE
1. Drive off immediately after starting the engine, even in freezing weather.
2. If the vehicle will be stopped for more than 40 seconds, switch off the engine.
3. Always drive in the highest possible gear.
4. On long trips, maintain a steady speed whenever possible. Avoid driving at high speeds. Drive carefully. Do not brake unnecessarily.
5. Do not carry unnecessary load in the vehicle. If the roof rack is not in use, remove it from the roof.
6. Check tire air pressure. Do not allow the pressure to drop excessively.
CAUTION
When working on the fuel system, observe the following safety and cleanliness precautions: Do not use open flames, smoke, or hold any highly heated objects near the work area. Risk of accident! Keep a fire extinguisher ready. Ensure proper ventilation of the work area. Fuel vapors are toxic.7. The fuel system is under pressure. Fuel may spray out under pressure when the system is opened. Collect fuel with a rag. Wear safety glasses.
8. Hose connections are secured with band clamps or spring clamps. Spring clamps must always be replaced with band clamps or the latest-design clamps. A special tool is available for installing band clamps, e.g. HAZET 796-5 or AUDI-
1921.
9. Thoroughly clean the connections and surrounding areas before opening.
10. Place removed parts on a clean surface and cover them. Use polyethylene or paper for this. Do not use lint-producing cloth!
11. Thoroughly cover open components or install plugs if repair work will take some time.
12. Install only clean parts. Remove replacement parts from their packaging only immediately before installation. Do not use parts that have been stored unpacked (for example, parts kept in a tool box).
13. Where possible, do not use compressed air when the fuel system is open. Where possible, do not move the vehicle during this time.
14. Do not use silicone-containing sealants. Silicone particles that enter the engine do not burn off and will damage the oxygen sensor.
CAUTION
Before removing the tank, drain the fuel or pump it out using the pump provided for this purpose. The fuel tank is removed from the underside of the vehicle. Before disconnecting the tank mounting straps, place a jack and supports under the tank. An empty tank is explosive and cannot be disposed of in this condition. Before disposal, the tank must be cut into pieces. Make sure no sparks are generated during this process. To do this, hand over the fuel tank to a specialized facility. After installing the tank, start the engine and check all connections for leaks.Test yourself
A quick Audi A3 quiz: every answer comes with an explanation and a link to the manual page.