Coolant Pump Removal and Installation
REMOVAL
PROCEDURE
1. Drain the coolant.
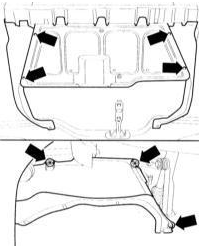
2. Remove the mounting screws and remove the lower and right side engine compartment covers (arrow in illustration). The illustration shows the gasoline engine version. For removal of the lower cover on diesel engines, refer to the subsection Removal and Installation of Engine Compartment Lower Cover.
3. Remove the coolant pump drive V-belt. Refer to the subsection Removal and Installation of Ribbed V-Belt.
4. Remove the 3 Allen-head mounting screws and detach the tensioner from the bracket.
5. Set the No. 1 piston to TDC. Loosen the timing belt tension and remove it only from the upper camshaft pulley. Refer to the subsection Removal, Installation and Tensioning of Timing Belt.
CAUTION
The crankshaft torsional damper and lower belt cover do not need to be removed.6. To protect the timing belt from leaking coolant, cover the belt with a cloth. Gasoline engine
7. Engine 150 L hp: Remove the mounting bolts and the expansion tank. Move it aside with the hoses still attached. Remove the charge air pipe near the coolant pump by loosening the clamps.
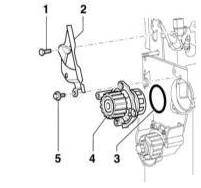
8. Engines 1.6 L: Remove bolts –1– and –5– and remove the rear timing belt guard –2–.
9. All engines: Remove the 3 coolant pump mounting bolts –4– and remove the pump by carefully guiding it along the engine mount. Remove O-ring –3–.
10. Remove the timing belt covers. INSTALLATION
11. Thoroughly clean the O-ring sealing surfaces.
12. Wet the new O-ring with coolant and insert it.
13. Install the coolant pump. Installation position on all engines: The plug in the housing points downward.
14. Engine 1.6 L: Install the rear timing belt guard. Tighten bolt –1– to 20 N·m. Refer to the illustration.
15. Secure the coolant pump with three bolts, tightened to 15 N·m.
16. Install the timing belt. Refer to the subsection Removal, Installation and Tensioning of Timing Belt.
17. Secure the V-belt tensioner with three Allen-head screws, tightened to 25 N·m.
18. Install the drive belt. Refer to Removing and Installing Ribbed V-Belt.
19. Fill the cooling system with coolant. Refer to the appropriate subsection.
20. Engine 150 L hp: Install the expansion tank. Insert the charge air pipe near the coolant pump and secure the clamps. Diesel engine
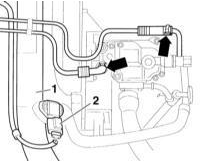
21. Disconnect the fuel hoses (arrows in accompanying illustration) at the fuel injection pump. To do this, open the clamps and slide them back. Cover the fuel hoses, for example with polyethylene and rubber rings, to prevent dirt from entering the system.
22. Disconnect connector –2– of the intake manifold temperature/pressure sensor.
23. Remove air intake pipe –1– by loosening the clamps.
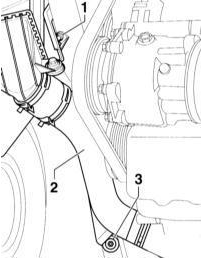
24. Remove lower air intake pipe –2– by loosening bolts –1– and –3–.
25. Remove the timing belt from the camshaft and injection pump sprockets. Refer to Setting No. 1 Piston to TDC.
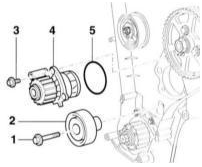
26. Disconnect idler roller –2–.
27. Remove idler roller mounting bolt –1– and push the roller down approximately 30 mm.
28. Unscrew the 3 mounting bolts –3– of coolant pump –4– and carefully remove it. Remove O-ring –5–. INSTALLATION
29. Thoroughly clean the O-ring seating surface.
30. Lubricate new O-ring with coolant and install it in place.
31. Install coolant pump. Pump position: the plug in the housing must face down.
32. Secure the pump with three bolts. Torque: 15 N·m.
33. Secure the idler roller with new bolt –1–. Tighten the bolt first to 40 N·m, then turn the bolt an additional 90° (1/4 turn) using a rigid wrench.
34. Install the timing belt. Refer to Setting No. 1 Piston to TDC.
35. Tighten the 3 tensioner mounting bolts to 25 N·m.
36. Secure the charge air pipe to the bracket and tighten the clamps.
37. Install the V-ribbed belt. Refer to Serpentine Belt Removal and Installation.
38. Fill the cooling system with coolant. Refer to Coolant Replacement.
Test yourself
A quick Audi A3 quiz: every answer comes with an explanation and a link to the manual page.