Parking heater and ventilation
Description
The parking heater warms and the parking ventilation cools the interior, independently of the engine.
The parking heater works together with the air conditioner, independently of the engine. It operates by burning fuel. Its main purpose is to heat the interior and help defrost the windows.
The parking heater only operates when the engine is switched off.
Parking ventilation also works independently of the engine. By activating the blower motor, it can effectively help lower the interior temperature if the vehicle is parked in full sun.
Parking heating and ventilation are operated via the instrument cluster display. The start time and running time can be programmed via menus. The running time of parking heating and ventilation can be set between 15 and 60 minutes. The system can also be switched on and off using the remote control*.
When you have programmed the timer and switch on the parking heater or parking ventilation via the remote control, the temperature you have selected on the heating/ventilation or air conditioner control and display unit, together with the actual interior temperature measured, determines which operating mode is activated (parking heater or parking ventilation).
CAUTION!
Do not use the parking heater in an enclosed space - risk of poisoning.
The parking heater must not be running when refuelling - risk of fire!
Due to the high temperatures generated when the parking heater is running, park the vehicle so that hot exhaust gases can escape freely at the engine underbody panel and do not come into direct contact with easily flammable materials.

- You can no longer activate the parking heater when the fuel level reaches the reserve range of the tank.
- When the parking heater or parking ventilation is activated, the vehicle battery discharges. The parking heater or parking ventilation will not switch on or will switch off when the battery charge level is low. The operating time of the parking heater or parking ventilation depends on the battery charge level.
- No specific air conditioner setting is required to operate the parking heater and parking ventilation. However, we recommend opening the air vents beforehand.
- After the parking heater is switched off, the circulation pump and combustion air blower continue to run for a short time to cool the heating unit.
- When the temperature is low, steam may form in the engine compartment. This is normal and nothing to be concerned about.
- The parking heater cannot be switched on while the engine is running.
- The parking heater is switched off automatically when you start the engine.
Menu selection
The  button and the rocker switch
on the wiper lever are used to select menus, then to query and adjust these menus.
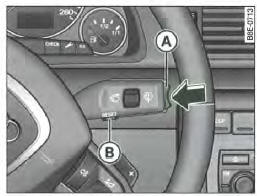
Fig. 131 Wiper lever: reset button and rocker switch
Functions of the button => fig.
131 and rocker switch (A):
Selecting a menu
- Press the button
 (B) until
the menu, fig. 26 is displayed.
Selection and adjustment
- Press the rocker switch (A) to select a menu. The up/down control works in the same way as on the display.
Entry and confirmation
- Press the button

The toggle control lets you select a menu or change certain settings. The selected values are then shown on a red background.
Press the [Reset] button to activate the corresponding selection or confirm a setting. Selected functions are ticked.
Programming
The  button and the rocker switch
on the windshield wiper lever are used to switch the auxiliary heating and ventilation on/off.
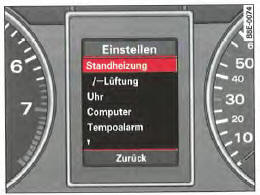
Fig. 132 Driver's position: driver information system display, Einstellen (Settings) menu, Standheizung (Auxiliary heater) selected

Fig. 133 Driver's position: driver information system display, Chauffage/Ventilation (Heating/Ventilation) menu, Timer 3 selected
Programming is carried out via the settings in the instrument cluster.
- Press the button
 , fig. 131.
The home menu is displayed =>, fig. 26. - Press the rocker switch (A) until Einstellen (Settings) is activated (red background).
- Press the (Reset) button. The menus that can be selected are displayed.
- In this menu, select the Standheizung/-Lüftung (Auxiliary heating/ventilation) menu in the same way => fig. 132.
- Activate the desired function by pressing the (Reset) button (
 tick
- yes, box - no) and, if necessary, make
the remaining settings.
The following settings are possible:
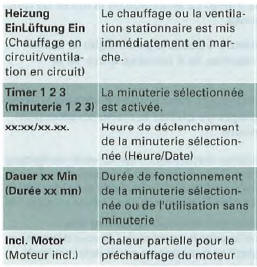
When Incl. Motor (Incl. engine) is selected (not available on all model versions), part of the heat from the auxiliary heater is used to preheat the engine.
Timer, setting the start time and operating duration
The auxiliary heating and ventilation are adjusted via the driver information system.
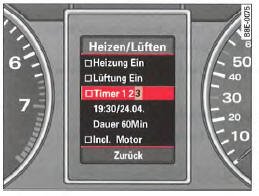
Fig. 134 Driver's position: driver information system display, Chauffage/Ventilation (Heating/Ventilation) menu, Timer 3 selected
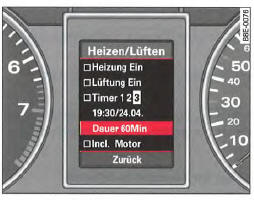
Fig. 135 Driver's position: driver information system display, Chauffage/Ventilation (Heating/Ventilation) menu, operating duration of Timer 3 selected
Selecting the timer
- Select the Heizen/Lüften (Heating/Ventilation) menu.
- Press the rocker switch until Timer 1 2 3 is activated.
- Press the (Reset) button until one of the timer digits flashes.
- Press the rocker switch to select the desired timer, fig. 134.
- Press the [Reset] button and the selected timer is set.
Setting the start time
- Press the rocker switch until xx:xx/xx.xx. is activated.
- Press the (Reset) button. The hour display flashes.
- Press the rocker switch to set the hours.
- Press the (Reset) button again; the minute display flashes.
- Set the minutes, day and month in the same way.
- Press the (Reset) button. You can now make further settings or exit the menu by selecting Zurück (Back).
Setting the operating time
- Press the rocker switch until Dauer xx Min (Duration xx min) is activated, fig. 135.
- Press the (Reset) button. The operating duration display flashes.
- Press the rocker switch to set the desired duration (in 5-minute steps between 15 and 60 minutes).
- Press the (Reset) button. You can now make further settings or exit the menu by selecting Zurück (Back).
If the auxiliary heating/ventilation was activated via Heizung Ein or Lüftung Ein (Heating On or Ventilation On) or using the remote control, the operating duration stored in the timer is used.
The auxiliary heating and ventilation can be programmed up to 30 days in advance (maximum). If you exceed this period, the setting marker will move to the maximum permitted date after the incorrect date is entered.
If you enter an expired date, the setting marker will move to today's date. If the programmed time is earlier than the current time, the system switches to the next day's date.
Activating the timer
The timer must first be activated for the auxiliary heating and ventilation to start at a later time.
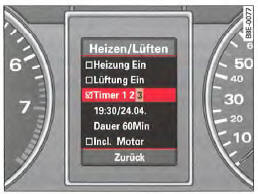
Fig. 136 Driver's position: driver information system display, Chauffage/Ventilation (Heating/Ventilation) menu, Timer 3 selected
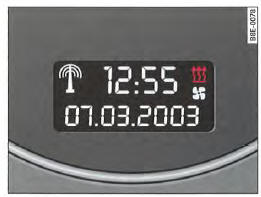
Fig. 137 Driver's position: digital clock display, timer activated
After setting the timer, start time and operating duration, activate the timer as follows:
- Press the rocker switch until Timer 1 2 3 is activated.
- Enter a tick by briefly pressing the (Reset) button => fig. 136.
- You can now make further settings or exit the menu by selecting Zurück (Back).
Active timers are shown on the digital clock display as follows:

Once the timer has been set, both symbols appear simultaneously on the clock display.
These symbols flash when the auxiliary heating or ventilation is running.
Immediate activation
The auxiliary heating and ventilation can be switched on immediately.
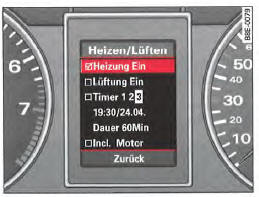
Fig. 138 Driver's position: driver information system display, Heizen/Lüften (Heating/Ventilation) menu, Heizung Ein (Heating On) selected
- Select the Heizung Ein (Heating On) or Lüftung Ein (Ventilation On) line in the Heizen/Lüften (Heating/Ventilation) menu.
- Enter a tick by pressing the (Reset) button => fig. 138. The auxiliary heating or ventilation is thus switched on. This is only possible when the engine is switched off.
- You can now make further settings or exit the menu by selecting Zurück (Back).
The operating duration depends on the setting of Timer 1.
Immediate deactivation
The auxiliary heating or ventilation can be switched off manually.
- Select the Heizung Ein (Heating On) or Lüftung Ein (Ventilation On) line in the Heizen/Lüften (Heating/Ventilation) menu, fig. 138.
- Remove the tick by pressing the button
 .
The auxiliary heating or ventilation is thus switched off. - You can now make further settings or exit the menu by selecting Zurück (Back).
Remote control
- The parked heating and ventilation can be switched on or off using the remote control.
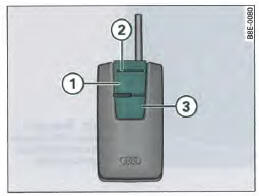
Fig. 139 Remote control for parked heating and ventilation
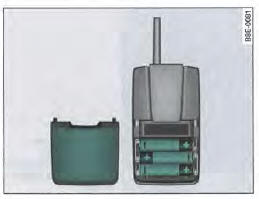
Fig. 140 Remote control for parked heating and ventilation, replacing the batteries
Switching on
- Press the on button => , fig. 139 (1) until the indicator light (2) comes on. The Heizung Ein (heating on) or Lüftung Ein (ventilation on) function is then activated.
Switching off
- Press the off button (3) until the indicator light (2) comes on. The Heizung Ein (heating on) or Lüftung Ein (ventilation on) function is then deactivated.
Replacing the batteries
- Pull the battery cover of the remote control towards the rear => fig. 140 and remove the cover.
- Replace the batteries. The correct installation position is shown in the battery compartment. Replacement batteries must have the same specifications as the original batteries (1.5 V).
- Close the battery cover.
The temperature you select on the heater/ventilation or air conditioning control and display unit, together with the actual temperature measured in the passenger compartment, determines which operating mode (heating or parked ventilation) is activated.
The operating duration of the parked heating and parked ventilation depends on the setting of Timer 1.
If you want to switch the parked heating or parked ventilation back on after the operating time has elapsed, first press the off button (3), then press the on button (1).
When switching off with the off button (3), the transmission indicator light (2) comes on for approximately 3 seconds.
Approval of the remote control
The remote control meets all approval requirements and has been approved by the Federal Approvals Office for Telecommunications of the Federal Republic of Germany.
All components are marked in accordance with the currently applicable directives.
The approval granted serves as the basis for approval in other countries.
 Environment
Empty batteries must be disposed of in accordance with the applicable environmental regulations and must never be disposed of with household waste.
Test yourself
A quick Audi A4 quiz: every answer comes with an explanation and a link to the manual page.