HomeLink®
Universal transceiver
Description
The HomeLink® universal transceiver can be programmed with the hand-held transmitters of existing devices.
With the HomeLink® universal transceiver, you can conveniently operate devices from inside the vehicle, such as garage or entrance doors, security systems, home lighting, etc.
The HomeLink® universal transceiver allows you to replace three hand-held transmitters of existing devices on your property with a single universal transceiver.
Very often these are transmitters for operating garage doors and gates. The handheld transmitters of your remote control are programmed at the front bumper, on the left side, where the control unit is located.
The transmitter must be programmed once before you can use the systems that work with the HomeLink® universal remote control. If the systems cannot be activated after the first programming, check whether these systems work with a rolling code.
CAUTION!
When programming the HomeLink® universal remote control, make sure that no person or object is nearby. If a door is activated accidentally during programming, people may be trapped and injured, and property damage may also occur.
Note
- For more information about HomeLink® and/or HomeLink®-compatible products, call the HomeLink® toll-free line at (0) 08000466 35465 or +49 (0) 6838 907 277, or visit the HomeLink® website at www.homelink.com.
- HomeLink® is a registered trademark of Johnson Controls.
Programming the transmitter
The HomeLink® universal remote control is programmed at the control unit in the driver-side sun visor and at the front bumper.
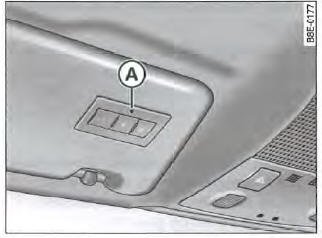
Fig. 162 Driver-side sun visor

Fig. 163 Front bumper, left side
At the sun visor
- Switch the ignition on (do not start the engine!).
- Press and hold the two outer buttons of the HomeLink® universal remote control => , fig. 162 until indicator (A) => , fig. 162 starts flashing (after approximately 20 seconds).
All stored data is then erased.
- Press the HomeLink® button you want to program.
- Keep the button pressed until the indicator light (B) => , fig. 162 flashes. The HomeLink® learning mode now lasts 5 minutes. After you release the button, a slow flashing indicates that learning mode is active.
- Then go in front of your vehicle with the original handheld transmitter of the garage door or the device for which you want to program the HomeLink® button => fig. 163.
At the front bumper
- Hold the original handheld transmitter of the device to be programmed under the left headlight at the front bumper of your vehicle => fig. 163.
Press the handheld transmitter activation button.
- Watch the turn signals of your vehicle when the handheld transmitter is activated. Programming of your HomeLink® is confirmed when the hazard warning lights flash three times.
- Repeat the procedure at a different distance from the bumper if the hazard warning lights do not flash three times.
The required distance between the handheld transmitter and the HomeLink® module in the bumper depends on the system you want to program. Several attempts may be necessary at different distances.
Hold each position for at least 15 seconds before trying another position.
If learning mode exceeds 5 minutes, the hazard warning lights flash once. In this case, the learning must be repeated. Repeat the procedure at the sun visor, starting from step three.
For programming the other two buttons, also follow the previous instructions. If programming takes place after programming the first button, also start from step three at the sun visor.
If you cannot open the garage door or other devices using the HomeLink® buttons even though programming was completed successfully, the system may not work with a fixed code but with a rolling code. In this case, you must also perform rolling code programming.
Rolling code programming
For some devices, rolling code programming of the HomeLink® universal remote control is also required.
Identifying the rolling code
- Press and hold the HomeLink® button that has already been programmed again.
- Observe the HomeLink® indicator light (B) => , fig. 162. If the indicator light first flashes rapidly and then stays on after two seconds, the device concerned, such as the garage door opener, uses a rolling code.
- Program the rolling code as follows:
Activating the garage door opener motor
- Locate the learn button on the garage door opener motor. The exact location and colour of the button may vary depending on the make of the garage door opener.
- Press the learn button on the garage door opener motor (normally a learn indicator on the motor lights up). You now have approximately 30 seconds to program the HomeLink® button on the sun visor.
Programming at the sun visor
- Briefly press the HomeLink® button that has already been programmed.
- Press the HomeLink® button again to complete the rolling code programming.
After programming at the sun visor, the garage door opener must detect the HomeLink® signal and start when you press the HomeLink® button.
You can now program the other buttons if required.
Note
- Having a second person assist can simplify and speed up rolling code programming. For some garage door opener systems, it may be necessary to press the HomeLink® button a third time to complete the learning procedure.
- If you have difficulty programming the rolling code, refer to the operating instructions for the garage door opener or the device concerned.
Using HomeLink®
The HomeLink® buttons on the driver's side sun visor are used to activate the programmed devices.
- Switch the ignition on (do not start the engine!).
- Press the programmed HomeLink® button => , fig. 162. The device programmed to this button (e.g. garage door) is activated.
The HomeLink® indicator light comes on when you press the control buttons => , fig. 162.
Erasing the HomeLink® button assignments
The two outer buttons on the control unit are used to erase all HomeLink® programming.
- Switch the ignition on (do not start the engine!).
- Press and hold both outer buttons until the indicator light flashes => , fig. 162.
- Release the buttons.
After you have erased the programming of the HomeLink® universal remote control buttons, the remote control is back in learning mode and can be reprogrammed at any time.
Note
- It is not possible to erase the programming of each button separately.
- For safety reasons, we recommend erasing the HomeLink® button programming before you sell your vehicle.
Reprogramming a HomeLink® button
It is possible to reprogram a single HomeLink® button without changing the assignment of the other buttons.
At the sun visor
Press and hold the desired HomeLink® button until the indicator light => , fig. 162 flashes slowly.
At the front bumper
- Hold the original hand-held transmitter of the garage door or other device just below the left headlight at the level of the front bumper of your vehicle => fig. 163. The required distance depends on the system you want to program.
- Now press and hold the original hand-held transmitter of the garage door or other device.
- Watch the turn signals of your vehicle while you activate the hand-held transmitter. Programming of your HomeLink® is confirmed when the hazard warning lights flash three times.
- Repeat the procedure at a different distance from the bumper if the hazard warning lights do not flash three times.
After the hazard warning lights have flashed three times, the device previously stored in HomeLink® is erased and the new system is programmed. Press the HomeLink® button that was just programmed to use the new system.
Note
Several programming attempts may be required.
Hold each setting position for at least 15 seconds before trying another position. While doing so, always watch the turn signals.
Certificate of conformity
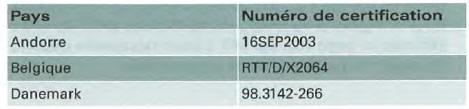
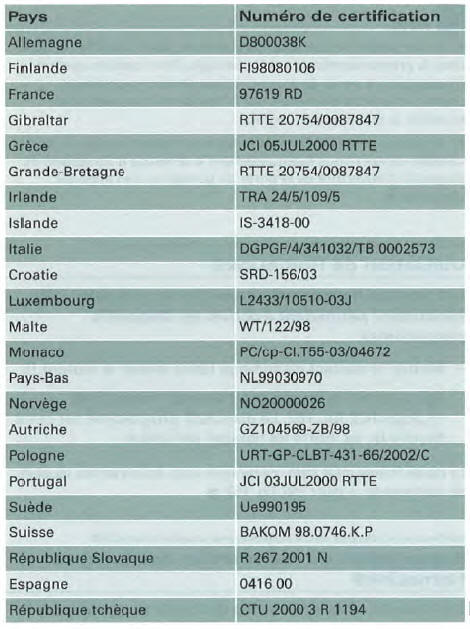
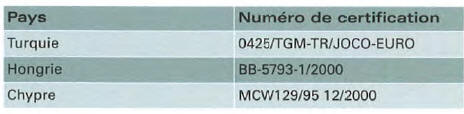
The HomeLink® universal remote control is approved in the following countries under the certification number indicated:
Test yourself
A quick Audi A4 quiz: every answer comes with an explanation and a link to the manual page.