Cabin Air Filter (for some vehicle versions)
The cabin air filter (dust filter) prevents plant pollen and road dust from entering the vehicle cabin while the climate control system operates.
The dust filter element must be replaced at the intervals specified in the vehicle maintenance schedule. For vehicles supplied to European countries, Australia, and New Zealand, the maintenance schedule is included in the Service Booklet provided with the vehicle. For all other markets, refer to the maintenance schedule contained in this Manual.
The filter element replacement interval must be shortened if the vehicle is mainly used in the city, where the air contains a lot of soot emitted by industrial plants and diesel trucks. Replace the filter element early if the airflow into the cabin from the climate control system has decreased.
Replacement
The dust filter is located behind the control panel, at its lower part to the right of the front center console.
To replace:
1. To access the filter, open the front passenger door.
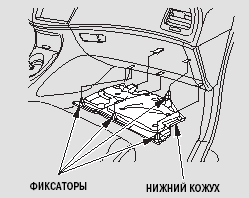
2. Carefully remove the lower cover from the bottom of the instrument panel.
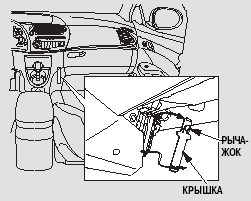
3. Remove the cover from the hinges by pulling it toward you by the protrusion (remove its upper part first).
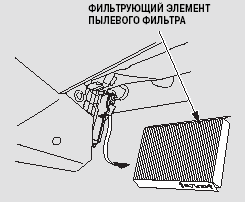
4. Insert your fingers into the slots on both sides of the housing, grip the filter, and pull it out.
5. Install a new filter element into the housing. The arrows shown near the AIR FLOW label must point in the direction of the air flow through the filter (i.e., toward the passenger compartment).
Install the cover in place (install the lower part first).
6. Install the lower cover in place and secure it firmly with four clips.
If you have difficulty performing the above cabin air filter replacement procedure yourself, contact a Honda dealer service center.
Test yourself
A quick Honda Civic quiz: every answer comes with an explanation and a link to the manual page.