If the Battery Is Dead
Jump Starting Procedure
When jump starting your 2023-2024 Honda Pilot, follow these steps carefully to ensure safety and effectiveness.
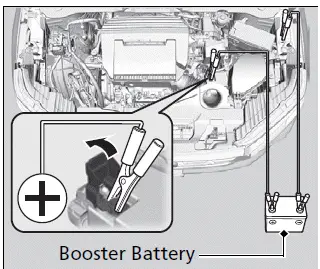
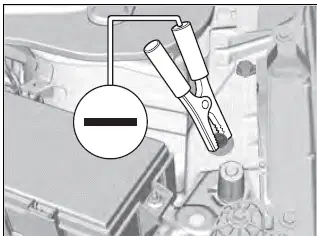
- Preparation:
- Turn off the power to all electric devices, such as the audio system and lights.
- Turn off the engine and open the hood.
- Connecting the Jumper Cables:
- First Jumper Cable:
- Connect one end of the first jumper cable to your vehicle's battery (+) terminal.
- Connect the other end of the first jumper cable to the booster battery's (+) terminal.
- Use only a 12-volt booster battery.
- If using an automotive battery charger, select a charging voltage lower than 15 volts. Refer to the charger's manual for the proper setting.
- Second Jumper Cable:
- Connect one end of the second jumper cable to the booster battery's (-) terminal.
- Connect the other end of the second jumper cable to the ground bolt (as shown in your vehicle's manual). Do not connect this cable to any other part.
- First Jumper Cable:
- Starting the Assisting Vehicle:
- If your vehicle is connected to another vehicle, start the assisting vehicle's engine and slightly increase its RPM.
- Attempting to Start Your Vehicle:
- Attempt to start your vehicle's engine.
- If the engine turns over slowly, check that the jumper cables have good metal-to-metal contact.
By following these steps, you can safely jump start your Honda Pilot and get back on the road. If the engine still does not start, consult your vehicle's manual or contact a professional for further assistance.
WARNING
A battery can explode if you do not follow the correct procedure, seriously injuring anyone nearby.
Securely attach the jumper cables clips so that they do not come off when the engine vibrates. Be careful not to tangle the jumper cables or allow the cable ends to touch each other while attaching or detaching the jumper cables.
Battery performance degrades in cold conditions and may prevent the engine from starting.
■ What to Do After the Engine Starts
Once your vehicle's engine has started, remove the jumper cables in the following order:
1. Disconnect the jumper cable from your vehicle's ground bolt.
2. Disconnect the other end of the jumper cable from the booster battery (-) terminal.
3. Disconnect the jumper cable from your vehicle's battery (+) terminal.
4. Disconnect the other end of the jumper cable from the booster battery (+) terminal.
Have your vehicle inspected by a nearby service station or a dealer.
The Vehicle Stability AssistTM (VSA) system, Adaptive Cruise Control (ACC) with Low Speed Follow, brake system (amber), and safety support indicators may come on in amber along with a message in the driver information interface when you set the power mode to ON after reconnecting the battery.
Drive a short distance at more than 20 km/h.
Each indicator should go off. If any do not, have your vehicle checked by a dealer.