Automatic Transmission
Inhibitor Switch Repair Procedures
In this manual: Automatic Transmission
29steps
~179min
5/5difficulty
1special tools
Done 0 of 29
Inspection
Inhibitor Switch Inspection Procedure
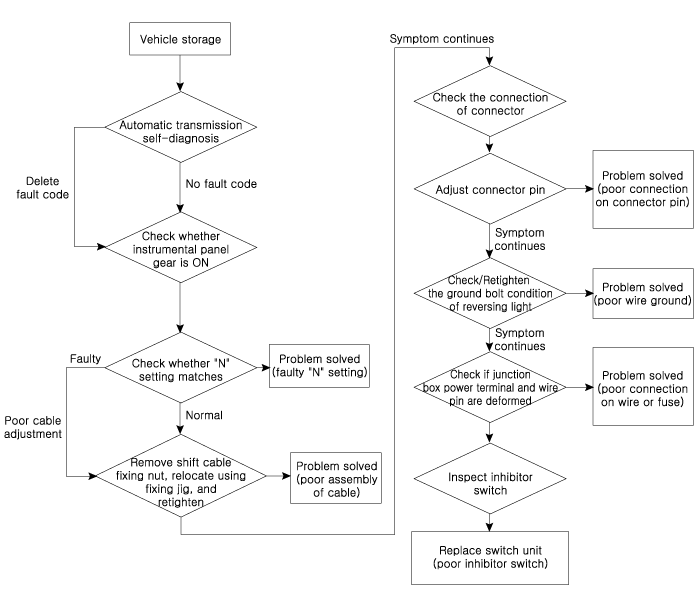
- Check the DTC.
- Check whether the N position setting is correct.
A. Adjust the N position setting (Refer to Automatic Transaxle System - "Inhibitor Switch") - Check the shift cable separation.
A. Adjust the shift cable clearance (Refer to Automatic Transaxle System - "Shift Cable"). - Check whether the connector is connected.
A. Carefully inspect the connector for looseness, poor connection, bending, corrosion, contamination, deformation, or damage. B. Turn the ignition switch to the "ON" position and the engine "OFF", then measure the power supplied to the shift lock switch circuit and the voltage to ground. Specification: approx. 12 V
C. Repair the connector terminal wiring if the connector terminal wiring is faulty. (Refer to ETM - "Wiring Repair".) - Check the ground condition in the back-up lamp circuit.
A. Check the back-up lamp ground location (Refer to ETM - "Wiring Harness Location Chart"). B. Reattach the back-up lamp if the ground condition is not normal. - Inspect the wire connection at the power terminal of the junction box and the fuse lamp.
A. Check whether the fuse holder is separated and whether it holds the fuse firmly. 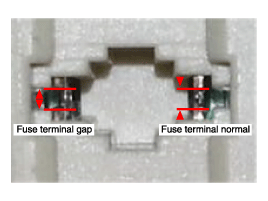
B. Attach the tester fuse to check whether it is connected correctly. 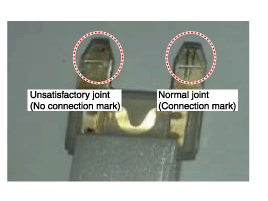
C. Check whether the fuse capacity is suitable for each circuit. D. Check whether the fuse is damaged. E. Check the tightness of the fuse mounting wires, the presence of foreign matter, and the condition of the terminal location. F. Reinstall the terminal that was removed, and inspect it using the method described above. G. If the problem is not resolved, refer to the electrical circuit repair instructions to repair or replace the terminal. - Check the shift lock switch signal.
A. Turn the ignition switch to the "ON" position and the engine "OFF". B. Measure the voltage between each terminal and chassis ground while shifting the shift lever through the "P, R, N, D" ranges. Specified value: Refer to the "Signal code" specification table.
Removal
- Before moving the shift lever to the "N" position, make sure the vehicle is not rolling.
- Disconnect the negative (-) battery cable.
- Remove the air cleaner assembly and air duct. (Refer to Engine Mechanical System - "Air Cleaner")
- Remove the battery and battery tray. (Refer to Engine Electrical System - "Battery")
- Disconnect the shift lock switch connector (A).
- Remove the shift cable mounting nut (B).
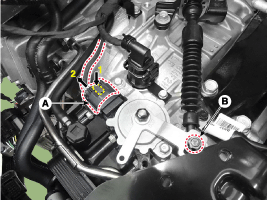
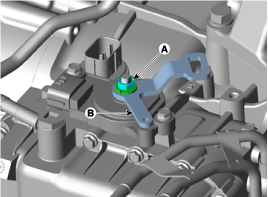
- Remove the manual control lever (B) and washer by removing the nut (A).
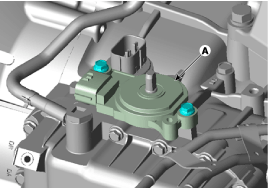
- Remove the shift lock switch (A) after removing the bolts (2 pcs).
Installation
- Make sure the shift lever is in the "N" position.
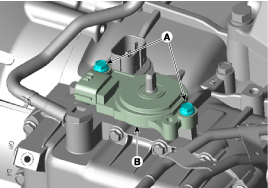
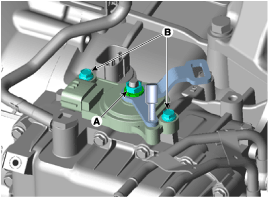
- Loosely tighten the bolts (A) after installing the shift lock switch (B).
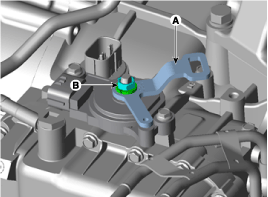
- Loosely tighten the nut (A) after installing the manual control lever (B).
- Align the hole (A) in the manual control lever with the "N" mark. Install the hole (B) of the shift lock switch, then insert the shift lock switch guide pin (SST No.: 09480-A3800).
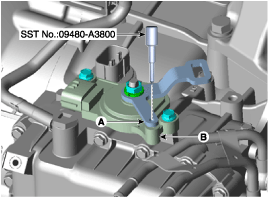
- Tighten the nut (A) and bolts (B) to the specified torque. Tightening torque: A: 17.7 ~ 24 N·m B: 9.8 ~ 11.8 N·m
- Loosely tighten the nut (B) after connecting the shift cable (C) to the manual control lever (D).
- Lightly push the shift cable (C) in the direction shown by arrow "F" to remove the free play of the shift cable.
- Tighten the nut (B) to the specified torque.
Tightening torque: 9.8 ~ 13.7 N·m
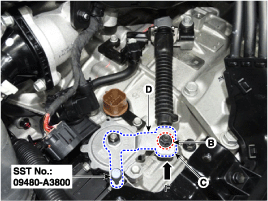
- Remove the shift lock switch guide pin (SST No.: 09480-A3800) from the hole.
- Connect the shift lock switch connector (A).

- Install the battery and battery tray. (Refer to Engine Electrical System - "Battery".)
- Install the air cleaner assembly and air duct. (Refer to Engine Mechanical System - "Air Cleaner".)
- Connect the negative (-) battery cable.
- Make sure the shift lock switch operates smoothly in each range corresponding to each shift lever position.
Test yourself
A quick Hyundai Elantra AD quiz: every answer comes with an explanation and a link to the manual page.
Was this page helpful?