Automatic Transmission
Shift Cable Repair Procedures
In this manual: Automatic Transmission
22steps
~137min
5/5difficulty
1special tools
Done 0 of 22
Removal
- Air cleaner assembly and air duct. (Refer to Engine Mechanical System - "Air Cleaner".)
- Battery and battery tray. (Refer to Engine Electrical System - "Battery".)
- Remove the nut (A) from the manual control lever.
- Remove the shift cable (B) from the bracket (C) on the transaxle side.
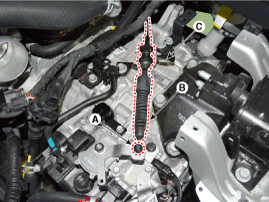
- Remove the floor console assembly. (Refer to Body - "Floor Console".)
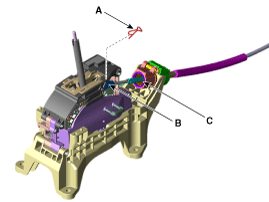
- Disconnect the shift cable.
- Disconnect the cable end (B) from the shift lever.
- Disconnect the cable connector (C) from the shift lever.
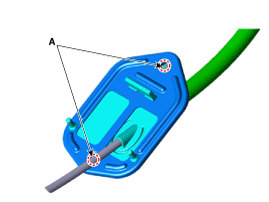
- Disconnect the shift cable retainer (A) after removing the nuts.
- Remove the shift cable by pulling it inward.
Installation
- Install the shift cable retainer (A).
Tightening torque: 11.8 ~ 14.7 N·m

- Adjust the cable after installing the shift lever and manual control lever in the N position.
- Install the shift cable (A) to the shift lever.
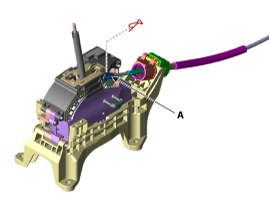

- The ear must be assembled facing upward.

- The bent area (A) must face the front.
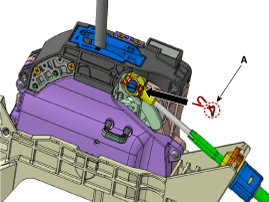
- Insert the cable connector into the AT lever bracket and make sure you hear a click, and that part (A) of the boot protrudes from the connector cover. - Part (A) located inside the cover before assembly. - Part (A) must protrude after the socket is assembled.
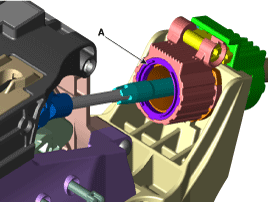
- The ear must be assembled facing upward.
- Install the shift cable (B) into the cable bracket (C).
- Align the hole (E) in the manual control lever with the "N" mark. Install the hole (F) of the shift lock switch, then insert the switch guide pin (SST No: 09480-A3800).
- Lightly tighten the nut (A) after connecting the shift cable (B) to the manual control lever (D).
- Lightly push the shift cable (B) in the direction shown by arrow "F" to remove the shift cable play.
- Tighten the nut (A) to the specified torque.
Tightening torque: 9.8 ~ 13.7 N·m
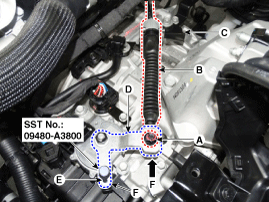
- Remove the shift lock switch guide pin (SST No.: 09480-A3800) from the hole.
- Install the airbag module. (Refer to Restraints - "Airbag Module")
- Install the console assembly. (Refer to Body - "Console")
- Install the air cleaner assembly. (Refer to Engine Mechanical System - "Air Cleaner")
- Install the battery and battery tray. (Refer to Engine Electrical System - "Battery".)
- Install the air duct. (Refer to Engine Mechanical System - "Air Cleaner")
- Make sure the shift lock switch operates smoothly in each range corresponding to each shift lever position.
Test yourself
A quick Hyundai Elantra AD quiz: every answer comes with an explanation and a link to the manual page.
Was this page helpful?