Piston and Connecting Rod Assembly Disassembly and Assembly (Piston Pin Removal and Installation)
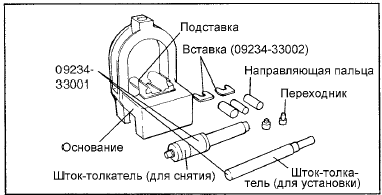
1. Using the special service tools (09234-33001 and 09234-33002), disassemble and assemble the piston and connecting rod assembly.
2. The piston pin is press-fitted into the connecting rod small end, and the piston slides on it.
3. The special service tool set consists of a base with a stand and inserts, guides, adapters, a removal push rod and an installation push rod. When removing or installing the piston pin, the piston is held on the base of the tool. The guide tools help position the piston pin during removal and installation when the connecting rod rests on the stand inserts.
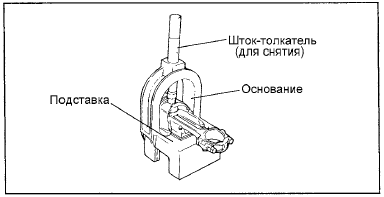
4. To remove the piston pin, place the piston on the base and position the connecting rod on the stand insert.
Insert the removal push rod through the arc of the upper part of the base into the piston pin, and remove the pin using a press.
5. When installing a new pin, install the appropriate support insert to support the connecting rod.
6. Position the upper connecting rod small end inside the piston.
On one side of the piston, insert the appropriate guide through the piston and connecting rod, then lightly press the guide in by hand so that it is held by the piston. On the other side of the piston, insert the piston pin and place the piston and connecting rod together on the base of the tool so that the pin guide is at the bottom.
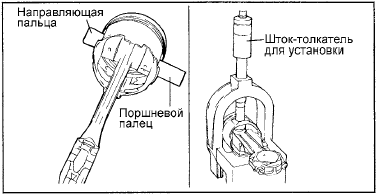
The guide is required to center the connecting rod relative to the piston bosses. If assembled correctly, the pin guide will sit exactly in the center of the arc opening in the upper part of the base and contact the support insert. If a pin guide of the wrong size is used, the piston (and connecting rod) and the piston pin will not align with the base opening.
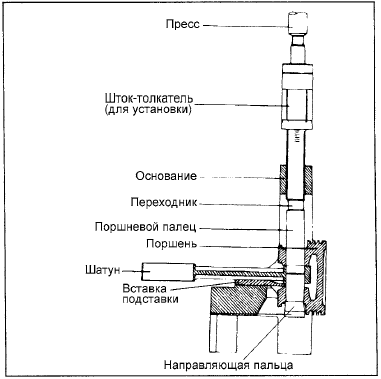
7. Insert the push rod (for installation) through the hole in the arch of the upper part of the base until it stops against the adapter on the piston pin. Using a hydraulic press, press the pin into the piston and the upper connecting rod eye. Continue pressing until the pin guide drops below the base and the push rod contacts the arch of the upper part of the base.
Do not exceed a force of 12500±5000 N when pressing the piston pin in, at the moment the push rod contacts the arc of the upper part of the base.
Test yourself
A quick Hyundai Elantra CN7 quiz: every answer comes with an explanation and a link to the manual page.