Piston and Connecting Rod - Installation
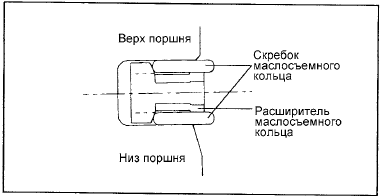
1. Install the oil control ring expander.
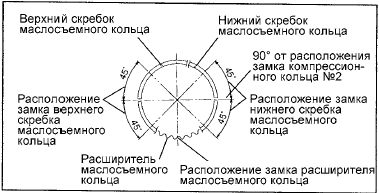
2. Install the upper oil control ring rail.
To install the rail, first insert one end of the rail between the expander and the piston ring groove, then, holding that end, press the rail with your finger to seat it in the groove, as shown in the illustration.
Do not use a piston ring expander when installing the oil control ring side rails.
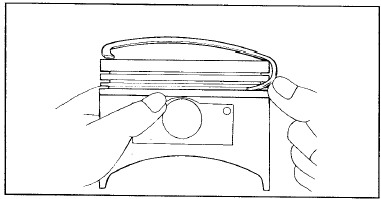
3. Install the lower oil control ring side rail following the procedure in step 2.
4. Apply engine oil to the piston and the piston ring grooves around the entire circumference.
5. Using a piston ring expander, install the No. 2 compression ring.
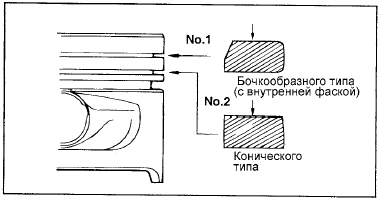
6. Install the No. 1 compression ring.
7. Position the piston ring end gaps as far apart from each other as possible. Make sure no ring end gap is on the piston pin axis or in a direction perpendicular to that axis.
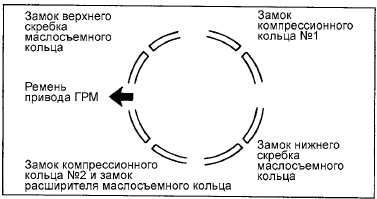
8. Using a special tool, securely hold the piston rings on the piston before installing the piston assembly into the cylinder.
9. Install the upper main bearing inserts into the cylinder block.
10. Install the lower main bearing inserts into the connecting rod caps.
11. When installing, make sure the "front" mark on the piston and the "front" identification mark on the connecting rod face the front of the engine (toward the timing belt).
12. When installing a new connecting rod, make sure the bearing locking tabs on the connecting rod and the connecting rod cap are on the same side.
13. When assembling, tighten the connecting rod cap bolts using the angle-tightening method as follows:
1) Apply oil to the threads of the nuts and to the contact surfaces between the nuts or bolts and the connecting rod.
2) Tighten the connecting rod cap bolts to the initial torque.
Connecting rod cap nut tightening torque: 32 - 35 N·m
Do not reuse connecting rod cap bolts that have been removed during disassembly.
When installing new connecting rod cap bolts, do not tighten them more than three times.
14. Check the side clearance between the lower connecting rod eye and the corresponding crankshaft web.
Connecting rod big end side clearance:
Standard value: 0.1 - 0.25 mm Limit value: 0.4 mm 15. Install the oil strainer.
16. Install the oil pan.
17. Install the cylinder head.
Test yourself
A quick Hyundai Elantra CN7 quiz: every answer comes with an explanation and a link to the manual page.