Suspension System
Rear Shock Absorber Repair Procedures
In this manual: Suspension System
11steps
~66min
3/5difficulty
Done 0 of 11
Removal
- Loosen the wheel nuts slightly. Raise the vehicle and make sure it is securely supported.
- Remove the rear wheel and tire (A) from the rear hub.
Tightening torque: 88.3 ~ 108 N·m

Be careful not to damage the hub bolts when removing the rear wheel and tire.
- Securely support the underside of the rear axle with a jack.
- Loosen the bolt and nut, then separate the rear shock absorber.
Tightening torque: 137.3 ~ 157 N·m (14.0 ~ 16.0 kgf·m, 101.3 ~ 115.7 lbf·ft)
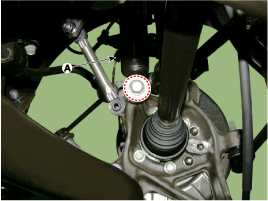
For safety, a jack must be used. - Disconnect the ESC solenoid and wheel speed sensor connectors, then remove the wheel speed sensor bracket by loosening the bolt.

- Loosen the bracket bolt (A) to disconnect the rear shock absorber from the wheel housing panel.
Tightening Torque: 49.0 ~ 64 N·m

- Installation is the reverse of removal.
- Check alignment. (Refer to Tires/Wheels – Wheel Alignment)
- When moving the rear shock absorber assembly, do not pinch the only valve or cable.
- Be careful not to damage the ECS shock absorber assembly connector, which is made of brittle plastic.
- A damaged ECS damper cable may cause system malfunction. Be careful not to damage the ECS damper cable with sharp objects.
Inspection
- Stroke the piston rod (A) several times to check for abnormal resistance or noise.
- If the piston rod does not move smoothly or makes an unusual noise when moving, replace the shock absorber assembly.
- To remove the shock absorber, fully extend the piston rod and drill a hole in the rear part (B) to release the gas.
The escaping gas is harmless, but be careful of chips that may fly off during drilling. Always wear safety glasses or goggles when performing this task.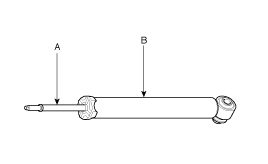
Test yourself
A quick Hyundai Genesis DH quiz: every answer comes with an explanation and a link to the manual page.
Was this page helpful?