Body (Interior and Exterior)
Repair Procedures
In this manual: Body (Interior and Exterior)
13steps
~78min
3/5difficulty
Done 0 of 13
Adjustment
Window Adjustment
|

- Remove the rear door trim. (Refer to Rear Door - "Rear Door Trim")
- Remove the mounting hole cap (A) from the rear door module.
- Carefully slide the front door glass (B) until the glass mounting bolts are visible, then loosen them.

- Check the glass movement.
- Remove the rear door latch rear cover.
- Loosen the bolts (A) just enough to allow the tongue to move.
Tightening Torque: (B): 16.7 ~ 22 N·m
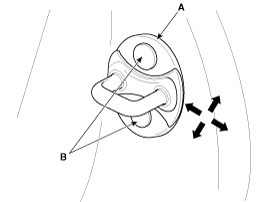
- Tap the striker with a plastic hammer to adjust it. The striker will not move much, but will allow some adjustment.
- While holding the outside handle, press the door against the body to make sure the striker is flush with the body. If the door latches properly, tighten the bolts and recheck.
|
- Make sure the door and body edges are parallel.
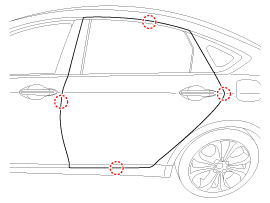
- When adjusting the doors, place the vehicle on a hard, level surface.
- Adjust the hinges (A):
A. Slightly loosen the door mounting bolts and move the door inward or outward until it is flush with the body. B. Slightly loosen the hinge mounting bolts and move the door forward or backward, up or down, to align the gaps.
Tightening torque: (B): 21.6 ~ 26 N·m (C): 37.3 ~ 41 N·mC. Place a shop towel on the jack to avoid damaging the door during adjustment. 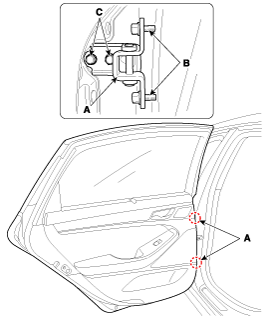
- Apply grease to the hinge moving parts indicated by the arrows.
- Check for water leaks.
Test yourself
A quick Hyundai Genesis DH quiz: every answer comes with an explanation and a link to the manual page.
Was this page helpful?