Remove the engine assembly from the vehicle. (See Engine and Transaxle - Engine and Transaxle)
Remove the transaxle assembly from the engine assembly. (See Manual Transaxle System - Manual Transaxle)
Remove the flywheel. (See Cylinder Block Assembly - Flywheel)
Remove the rear oil seal. (See Cylinder Block Assembly - Rear Oil Seal)
Install the engine on an engine stand for disassembly.
Remove the cylinder head cover. (Refer to Cylinder Head - "Cylinder Head Cover")
Remove the thermostat housing. Refer to Cooling System - "Thermostat".
Remove the timing chain. (Refer to Valve Timing System - Timing Chain)
Remove the intake manifold. (Refer to Exhaust and Intake System - "Intake Manifold")
Remove the exhaust manifold. (Refer to Intake and Exhaust System - "Turbocharger and Exhaust Manifold")
Remove the cylinder head. (See Cylinder Head - Cylinder Head)
Remove the oil pan and oil filter. (See Lubrication System - Oil Pan)
Remove the ladder frame. (See Cylinder Block - Cylinder Block)
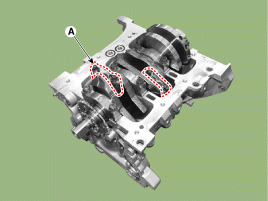
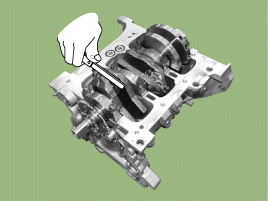
Inspect the connecting rod side clearance.
Check the connecting rod bearing oil clearance.
Remove the piston and connecting rod assembly.
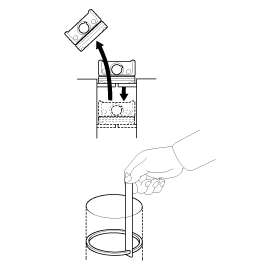
Using a scraper, remove carbon deposits from the top of the cylinder bore.
Remove the connecting rod caps (A).
Push the piston, connecting rod assembly and upper bearing into the cylinder block.
Check the fit between the piston and piston pin. Try to move the piston back and forth on the pin. If noticeable movement exists, replace the piston assembly and piston pin.
Remove the piston rings.
Using a piston ring expander, remove the 2 compression rings (A).
Remove the oil control ring and expander spring (B) by hand.
Remove the connecting rod from the piston.
Remove the snap ring (C) from the piston.
Using a press, remove the piston pin (D) from the piston.
Remove the piston (F) and connecting rod (E).
Inspection
CONNECTING ROD
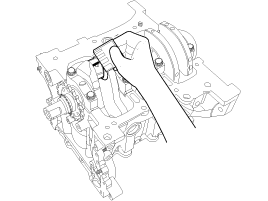
Check the connecting rod axial play. Using a feeler gauge, measure the clearance while moving the connecting rod back and forth.
Standard connecting rod axial play: 0.10~0.25 mm (0.0039~0.0098 in.)
If the connecting rod axial play is not within the specified value, install a new connecting rod.
If the value is still out of the specified range, replace the crankshaft.
Check the connecting rod bearing oil clearance.
Check that the marks on the cap and connecting rod are aligned for correct assembly.
Remove the 2 connecting rod cap bolts.
Remove the connecting rod cap and lower bearing.
Clean the crankshaft main bearing journal and bearing.
Place Plastigage across the crankshaft journal.
Install the lower bearing and cap, then tighten the bolts.
Tightening torque: 10.8 ~ 14.7 N·m +88~92°
Remove the 2 bolts, connecting rod cap and lower bearing.
Measure the Plastigage at its widest point.
Standard oil clearance: 0.018 ~ 0.036 mm (0.0007 ~ 0.0014 in.)
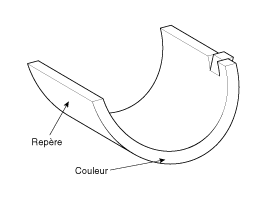
If the plastigage measurements are too large or too small, remove the upper and lower bearings, then install a new bearing marked with the same color. Measure the oil clearance again.
If the plastigage reading still shows incorrect clearance, immediately use bearings of a larger or smaller size. (Refer to the Connecting Rod Bearing Selection Table.) Measure the oil clearance again.
Select fitting from the selection table. CONNECTING ROD MARK LOCATIONCONNECTING ROD IDENTIFICATION
Rating
Mark
Connecting Rod Large End Inside Diameter
0
B
42.000~42.006 mm (1.6535 ~ 1.6540 in.)
1
B
42.006~42.012 mm (1.6537 ~ 1.6540 in.)
2
AGAINST
42.012~42.018 mm (1.6540 ~ 1.6542 in.)
Crankshaft Journal Bearing Mark LocationCrankshaft Main Bearing Identification
GRADE
Mark
Crankshaft Journal Outer Diameter
I
1
38.966~38.972 mm (1.5340 ~ 1.5343 in.)
II
2
38.960~38.966 mm (1.5338 ~ 1.5340 in.)
III
3
38.954~38.960 mm (1.5335 ~ 1.5338 in.)
CONNECTING ROD BEARING MARK LOCATIONCONNECTING ROD BEARING IDENTIFICATION
Rating
Color
Connecting Rod Bearing Thickness
B
BLUE
1.514~1.517 mm (0.0596 ~ 0.0597 in.)
B
BLACK
1.511~1.514 mm (0.0595 ~ 0.0596 in.)
AGAINST
NONE
1.508~1.511 mm (0.0594 ~ 0.0595 in.)
D
GREEN
1.505~1.508 mm (0.0593 ~ 0.0594 in.)
E
YELLOW
1.502~1.505 mm (0.0591 ~ 0.0593 in.)
Select fitting from the selection table. CONNECTING ROD BEARING SELECTION TABLE
Connecting Rod Bearing
Connecting Rod Mark
0 (A)
1 (b)
2 (c)
Crankshaft Journal Bearing Mark
I (1)
E (Yellow)
D (Green)
C (None)
II(2)
D (Green)
C (None)
B (Black)
III(3)
C (None)
B (Black)
Blue)
Clean the Piston
Using a scraper, remove carbon deposits from the piston top.
Using a suitable tool or a broken ring, clean the piston ring grooves.
Using solvent and a brush, thoroughly clean the piston.
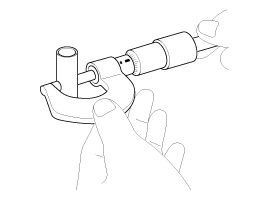
Standard piston outer diameter is measured 30 mm (1.18 in.) from the piston top.
Standard diameter: 70.965~70.995 mm (2.7939~2.7951 in.)
Calculate the difference between the cylinder bore diameter and the piston diameter.
Piston-to-cylinder clearance: 0.025~0.045 mm (0.0010~0.0018 in.)
Check the piston ring side clearance. Using a feeler gauge, measure the clearance between a new ring and the ring groove wall of the piston. Piston ring groove width No. 1: 1.235 ~ 1.250 mm (0.0486 ~ 0.0492 in.) No. 2: 1.23 ~ 1.25 mm (0.0484 ~ 0.0492 in.) Oil ring: 2.010 ~ 2.025 mm (0.0791 ~ 0.0797 in.) Piston ring width No. 1: 1.170 ~ 1.185 mm (0.0461 ~ 0.0467 in.) No. 2: 1.17 ~ 1.19 mm (0.0460 ~ 0.0468 in.) Oil ring: 1.90 ~ 1.96 mm (0.0748 ~ 0.0772 in.) Piston ring side clearance No. 1: 0.05 ~ 0.08 mm (0.0020 ~ 0.0031 in.) No. 2: 0.04 ~ 0.08 mm (0.0015 ~ 0.0031 in.) Oil ring: 0.050 ~ 0.125 mm (0.0020 ~ 0.0049 in.)If the clearance exceeds the maximum value, replace the piston.
Check the piston ring end gap. To measure the piston ring end gap, insert the piston ring into the cylinder bore. Position the ring at a right angle to the cylinder wall, lightly pressing it with the piston. Measure the gap with a feeler gauge. If it exceeds the repair limit, replace the piston ring. If the gap is too large, recheck the cylinder bore diameter against the wear limit. If the bore diameter is outside the repairable limit, the cylinder block must be replaced. Piston ring end gap No. 1: 0.13 ~ 0.23 mm (0.0051 ~ 0.0091 in.) No. 2: 0.25 ~ 0.40 mm (0.0098 ~ 0.0157 in.) Oil ring: 0.2 ~ 0.7 mm (0.0079 ~ 0.0276 in.)
Measure the piston-to-pin clearance. Piston pin-to-piston clearance: 0.005 ~ 0.012 mm (0.0002 ~ 0.0005 in.)
Calculate the difference between the piston pin outer diameter and the connecting rod small end bore inner diameter. Piston pin-to-connecting rod small end clearance: 0.005 ~ 0.014 mm (0.0002 ~ 0.0006 in.)
PISTON AND PISTON RINGS / PISTON PINS
Installation
Install the piston and connecting rod.
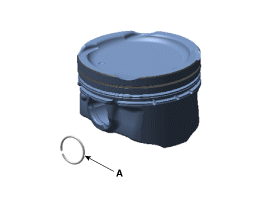
Install the snap ring (A) on one side of the piston pin hole.
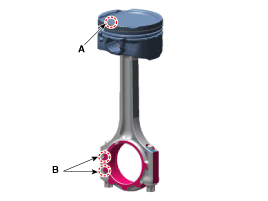
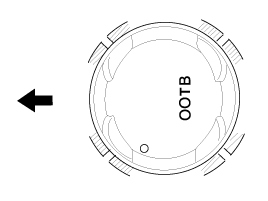
Align the front mark (A) on the piston with the mark on the connecting rod (B).
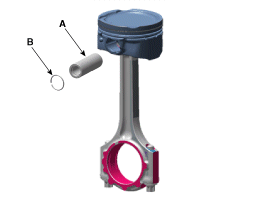
Insert the piston pin (A) into its hole and the small end of the connecting rod.
Install the snap ring (B) on the other side after inserting the piston pin.
Install the piston rings.
Install the oil ring expander and 2 side rails by hand.
Using a piston ring expander, install the two compression rings with the code mark facing up.
Position the piston rings so that the ring end gaps are as shown.
Install the connecting rod bearings.
Align the bearing tab with the connecting rod groove and cap.
Install the bearings (A) on the connecting rod and connecting rod cap (B).
Install the piston and connecting rod assembly.
Install the piston ring compressor and check that the bearing is in place. Then install the piston into the cylinder and tap it lightly with the wooden handle of a hammer.
Stop as soon as the piston ring compressor is released, and check the alignment of the connecting rod before pushing the piston further into the cylinder.
Apply engine oil to the threads of the bolts. Install the connecting rod caps with the bearings and tighten the bolts.
Tightening torque: 10.8 ~ 14.7 N·m +88~92°
Using the special service tool (09221-4A000), tighten the bolts by the angle-tightening method.
Check the side clearance between the piston and the connecting rod.
Install the remaining parts in the reverse order of removal.
?
Test yourself
A quick Hyundai i20 quiz: every answer comes with an explanation and a link to the manual page.