Connecting Rod Installation
NOTICE
To minimize vibration, the connecting rods should have the same weight mark.
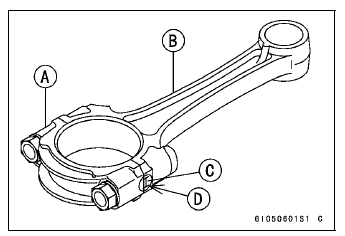
Big End Cap [A] Connecting Rod [B] Weight Mark, Alphabet [C] Diameter Mark [D] (“” or No Mark)
NOTICE
If the connecting rods, big end bearing inserts, or crankshaft are replaced with new ones, select the bearing insert and check clearance with a plastigage (press gauge) before assembling engine to be sure the correct bearing inserts are installed.
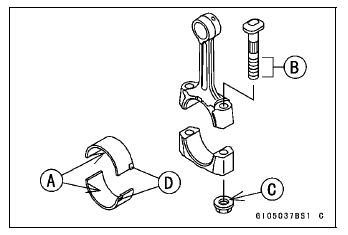
- Apply molybdenum disulfide oil solution to the inner surface of the upper and lower bearing inserts [A].
- Apply molybdenum disulfide oil solution to the threads [B] and seating surface [C] of the connecting rod nuts.
- Install the inserts so that their nails [D] are on the same side and fit them into the recess of the connecting rod and cap.
NOTICE
Wrong application of oil and grease could cause bearing damage.
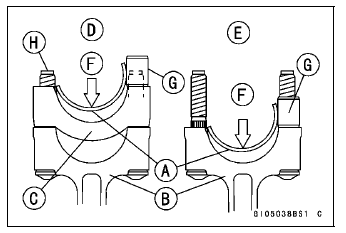
When installing the inserts [A], be careful not to damage the insert surface with the edge of the connecting rod [B] or the cap [C]. One way to install inserts is as follows.
Installation [D] to Cap Installation [E] to Connecting Rod Push [F] Spare Dowel Pin [G] Connecting Rod Bolts [H]
- Remove debris and clean the surface of inserts.
- Install the cap on the connecting rod, aligning the weight and diameter marks.
- Install each connecting rod on its original crankpin.
The connecting rod big end is bolted using the “plastic region fastening method”.
This method precisely achieves the needed clamping force without exceeding it unnecessarily, allowing the use of thinner, lighter bolts further decreasing connecting rod weight.
There are two types of the plastic region fastening. One is a bolt length measurement method and other is a rotation angle method. Observe one of the following two, but the bolt length measurement method is preferable because this is a more reliable way to tighten the big end nuts.
NOTICE
The connecting rod bolts are designed to stretch when tightened. Never reuse the connecting rod bolts. See the table below for correct bolt and nut usage.
NOTICE
Be careful not to overtighten the nuts. The bolts must be positioned on the seating surface correctly to prevent the bolt heads from hitting the crankcase.
(1) Bolt Length Measurement Method
- Be sure to clean the bolts, nuts, and connecting rods thoroughly with a high flash-point solvent, because the new connecting rods, bolts, and nuts are treated with an anti-rust solution.
Gasoline and low flash-point solvents can be flammable and/or explosive and cause severe burns. Clean the bolts, nuts, and connecting rods in a well-ventilated area, and take care that there are no sparks or flame anywhere near the working area; this includes any appliance with a pilot light.
Do not use gasoline or a low flash-point solvent to clean them.
NOTICE
Immediately dry the bolts and nuts with compressed air after cleaning. Clean and dry the bolts and nuts completely.
- Install new bolts and nuts in reused connecting rod.
If the connecting rod assembly was replaced, use the bolts and nuts attached to the new connecting rod assembly.
- Apply a small amount of molybdenum disulfide oil solution to the following portions.

- Dent both bolt head and bolt tip with a punch as shown in the figure.
- Before tightening, use a point micrometer to measure the length of new connecting rod bolts and record the values to find the bolt stretch.
Connecting Rod [A] Dent here with a punch [B].
Nuts [C] Fit micrometer pins into dents [D].
Bolt Length after tightening – Bolt Length before tightening = Bolt Stretch
Connecting Rod Bolt Stretch Usable Range: 0.24  0.34 mm (0.0094
 0.0134 in.)
- Check the length of the connecting rod bolts.
If the stretch is more than the usable range, the bolt has stretched too much. An overelongated bolt may break in use.
(2) Rotation Angle Method
If you do not have a point micrometer, you may tighten the nuts using the “Rotation Angle Method”.
- Be sure to clean the bolts, nuts and connecting rods thoroughly with a high flash-point solvent, because the new connecting rods, bolts and nuts are treated with an anti -rust solution.
Gasoline and low flash-point solvents can be flammable and/or explosive and cause severe burns. Clean the bolts, nuts, and connecting rods in a well-ventilated area, and take care that there are no sparks or flame anywhere near the working area; this includes any appliance with a pilot light.
Do not use gasoline or a low flash-point solvent to clean them.
NOTICE
Immediately dry the bolts and nuts with compressed air after cleaning. Clean and dry the bolts and nuts completely.
- Install new bolts and nuts in reused connecting rod.
If the connecting rod assembly was replaced, use the bolts and nuts attached to the new connecting rod assembly.
- Apply a small amount of molybdenumdisulfide oil solution to the following portions.
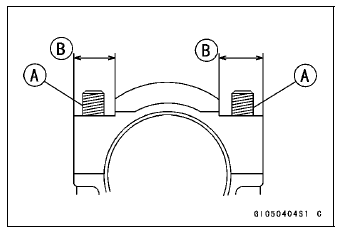
- First, tighten the nuts with 20 N·m of torque.
- Next, tighten the nuts 150°.
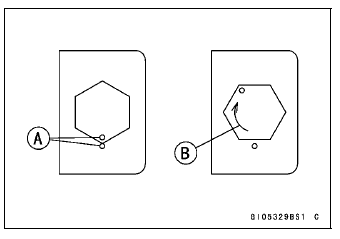
Mark [A] the connecting rod big end caps and nuts so that nuts can be turned 150° [B] properly. 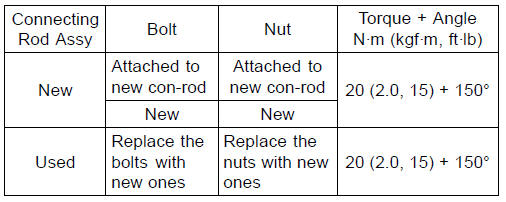
Test yourself
A quick Kawasaki Ninja ZX-10R quiz: every answer comes with an explanation and a link to the manual page.