In this manual: Heating, Ventilation, and Air Conditioning
11steps
~66min
3/5difficulty
Done 0 of 11
Inspection
Check the condenser fins for blockage and damage. If blocked, wash them with water and blow out with compressed air. If bent, carefully straighten them using a screwdriver or pliers.
Check the condenser connections for leaks and repair or replace them as necessary.
Replacement
Be sure to read and observe the "General Safety Information and Caution" before performing any work on the high voltage system. Failure to follow the safety instructions may result in serious electrical injury.
Before performing any work, be sure to disconnect high voltage related to the high voltage system (refer to "High Voltage Disconnection Procedure"). Failure to follow safety instructions may result in serious electric shock.
Charge the refrigerant using the refrigerant recovery/recycling/charging station.
Disconnect the negative (-) battery terminal.
Disconnect the high-voltage circuit. (Refer to Electric Vehicle Battery System - "High Voltage Disconnection Procedure")
Remove the front bumper cover. (Refer to Body - "Front Bumper Cover")
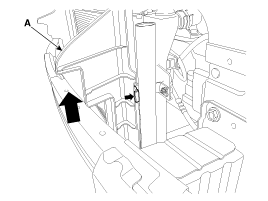
Remove the side air guard (A) by pulling it upward after pressing the locking hook in the direction of the arrow. [LH][RH]
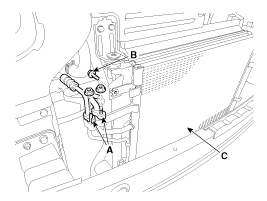
Remove the refrigerant line (A) after loosening the mounting nuts.
Disconnect the condenser (C) from the radiator by loosening the mounting bolt. [LH][RH]
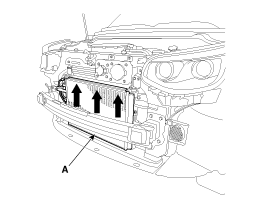
Remove the condenser assembly (A) from the radiator assembly.
Install in the reverse order of removal, and pay attention to the following:
If installing a new condenser, add refrigerant oil (POE oil).
Replace the O-rings with new ones at each fitting and apply a thin coat of refrigerant oil before installation. Be sure to use the correct O-rings for R-134a to prevent leakage.
Be careful not to damage the radiator and condenser fins when installing the condenser.
Make sure the lower condenser support cushions are securely seated in the holes.
Charge the system and check that it operates properly.
?
Test yourself
A quick Kia Soul EV Owner's Manual quiz: every answer comes with an explanation and a link to the manual page.