Engine Mechanical System
CVVT and Camshaft Repair Procedures
In this manual: Engine Mechanical System
27steps
~162min
4/5difficulty
Done 0 of 27
Removal
- Remove the cylinder head cover. (Refer to Cylinder Head Assembly - Cylinder Head Cover)
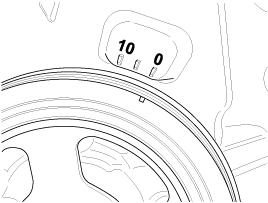
- Turn the crankshaft pulley/damper so that piston No. 1 is at top dead center (TDC).
- Turn the crankshaft damper pulley and align its groove with the mark on the timing chain cover (0° mark on the scale).
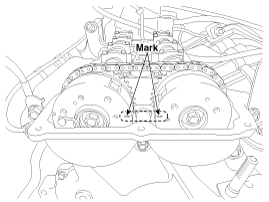
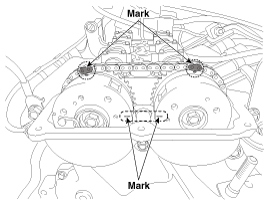
- Make sure the TDC alignment marks on the intake and exhaust CVVT sprockets are in a straight line on the cylinder head surface, as shown in the illustration. If not, turn the crankshaft damper pulley one full revolution (360°).
- Mark the timing chain links to match the timing marks on the CVVT sprockets with indelible marker.
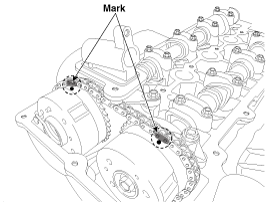
- Turn the crankshaft damper pulley and align its groove with the mark on the timing chain cover (0° mark on the scale).
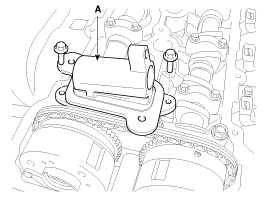
- Remove the exhaust oil control valve (OCV) adapter (A).
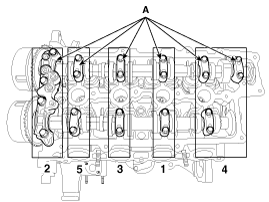
- Remove the camshaft bearing caps (A) in the order shown in the illustration.
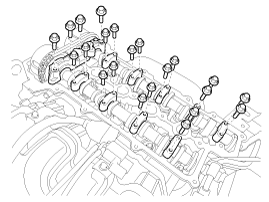
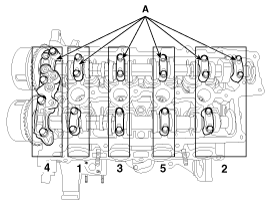
- Remove the engine mount support bracket.
- Place a jack under the oil pan.
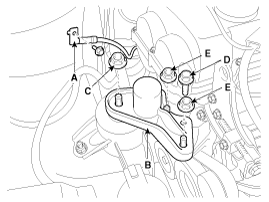
- Disconnect the ground cable (A) and remove the engine support bracket (B).
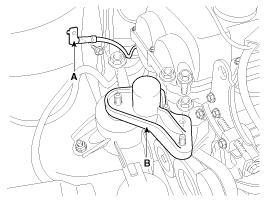
- Slightly raise the engine with a jack to create space for releasing the timing chain tensioner.
- Remove the bolt (A) from the service hole in the timing chain cover.
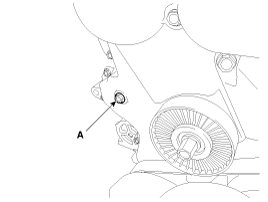
- Lock the timing chain tensioner in the fully retracted position.
- Insert a pick tool into the service hole in the timing chain cover, and push down the hole in the left side of the ratchet plate (A) on the tensioner to lift the pawl (B: located inside the tensioner behind the ratchet plate).
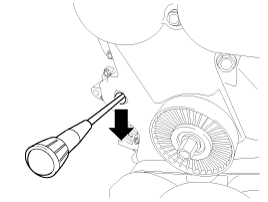
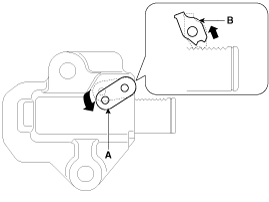
- With the pawl raised, ask an assistant to lift the exhaust CVVT and camshaft (A) to allow the tensioner plunger (B) to retract.
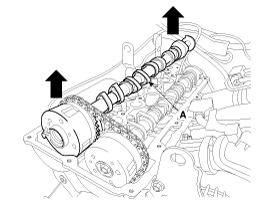
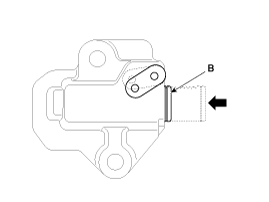
- When the tensioner plunger is fully retracted, lift the ratchet plate (A) on the left side again through the service hole in the chain cover to align the hole in the ratchet plate with the hole in the tensioner body behind the ratchet plate, then lock the tensioner by inserting a pick tool through the holes of the ratchet plate and tensioner body.
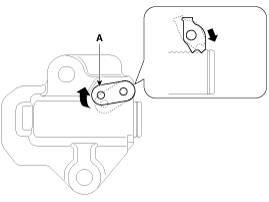
- Insert a pick tool into the service hole in the timing chain cover, and push down the hole in the left side of the ratchet plate (A) on the tensioner to lift the pawl (B: located inside the tensioner behind the ratchet plate).
- Separate the exhaust camshaft (A) from the exhaust CVVT by removing the bolt.
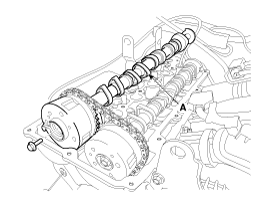
- Remove the exhaust CVVT (A) from the timing chain.
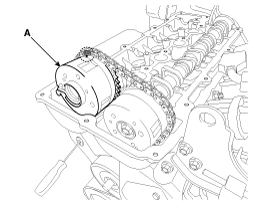
- Remove the intake CVVT and camshaft (A).
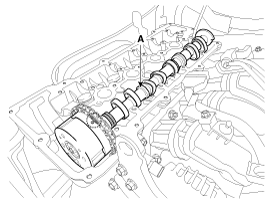
- Remove the intake CVVT (A) from the intake camshaft (B).
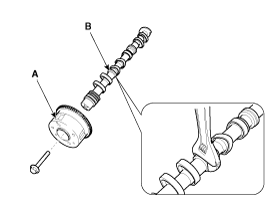
Inspection
Camshaft- Measure the cam lobe height with a micrometer and inspect the cam lobe surface for wear. Replace the camshaft if necessary.
Cam lobe height Intake: 44.15 mm (1.738 in) Exhaust: 43.55 mm (1.715 in)
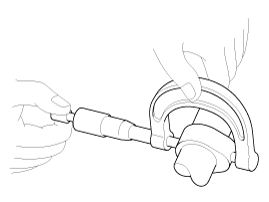
- Inspect the camshaft journal surface for wear. If the camshaft journal is severely damaged, replace the camshaft.
- Inspect the camshaft journal oil clearance.
- Clean the camshaft journals and bearing caps.
- Place the camshafts on the cylinder head.
- Place a strip of Plastigage on each camshaft journal.
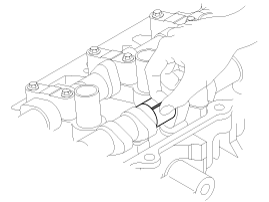
- Install the bearing caps and tighten the bolts to the specified torque. Tightening torque Step 1 M6 bolt: 5.9 N·m M8 bolt: 9.8 N·m Step 2 M6 bolts: 11.8 - 13.7 N·m M8 bolts: 18.6 - 23 N·m
- Remove the bearing caps.
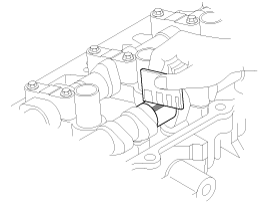
- Measure the Plastigage at its widest point. If the clearance is greater than specified, replace the camshaft. If necessary, replace the bearing caps and cylinder head as an assembly.
Camshaft bearing cap oil clearance
Standard: 0.027 - 0.058 mm (0.0011 - 0.0023 in.)
Limit: 0.1 mm (0.0039 in.)
- Inspect the camshaft end play.
- Inspect the camshaft end play.
- Measure the camshaft end play by moving the camshaft back and forth using a dial indicator. If the end play is greater than specified, replace the camshaft. If necessary, replace the bearing caps and cylinder head as an assembly.
Camshaft end play
Standard: 0.1 - 0.2 mm (0.0039 - 0.0079 in.)
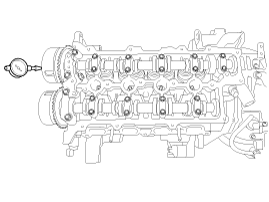
- Remove the camshafts.
- Inspect the CVVT for smooth rotation.
- Clamp the camshaft in a vise. Be careful not to damage the cam lobes and journals in the vise.
- Make sure the CVVT is locked by turning it clockwise or counterclockwise. It should not rotate.
- Intake CVVT: Seal one of the two advance oil holes in the camshaft journal with tape. Exhaust CVVT: Seal one of the two oil holes in the camshaft journal with tape.
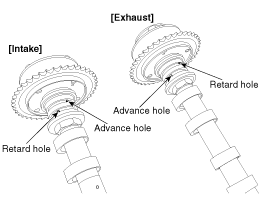
- Intake CVVT: Apply approx. 150 kPa (1.5 kgf/cm², 21 psi) of compressed air to the unsealed advance hole to release the lock. Exhaust CVVT: Apply approx. 150 kPa (1.5 kgf/cm², 21 psi) of compressed air to the unsealed retard hole to release the lock.
- Intake CVVT: Apply compressed air and rotate the CVVT in the advance direction (counterclockwise) within its phase range, and make sure the CVVT rotates smoothly.
Exhaust CVVT: Apply compressed air and rotate the CVVT in the retard direction (clockwise), and make sure the CVVT rotates smoothly.
CVVT phase range
Intake: 25° ±1° (from most retarded position to most advanced position)
Exhaust: 20° ±1° (from most advanced position to most retarded position)
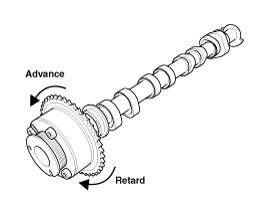
- Intake CVVT: Rotate the CVVT to the fully retarded position (clockwise), then make sure the CVVT is locked. Exhaust CVVT: Rotate the CVVT to the fully advanced position (counterclockwise), then make sure the CVVT is locked.
Installation
- Install the intake CVVT (A) onto the intake camshaft.
Tightening torque: 63.7 ~ 74 N·m
- Install the intake CVVT and camshaft (A) so that the timing mark on the intake CVVT sprocket is aligned with the mark (painted link) on the timing chain.
- Install the exhaust CVVT (A), aligning the alignment mark on the exhaust CVVT sprocket with the mark (painted link) on the timing chain.
- Install the exhaust camshaft (A) onto the exhaust CVVT.
Tightening torque: 63.7 ~ 74 N·m
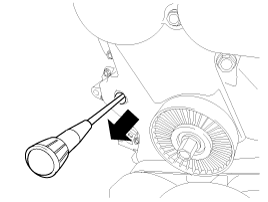
- Remove the pick tool from the service hole in the timing chain cover.
- Make sure that each alignment mark on the intake and exhaust CVVT sprockets is aligned, as shown in the illustration.
- Install the bolt (A) into the service hole in the timing chain cover.
Tightening torque: 27.5 ~ 30 N·m
- Install the engine mount bracket.
- Connect the ground cable (A) and install the engine support bracket (B).
Tightening torque
Ground cable bolt: 10.8 - 13.7 N·m
Bolt (C): 88.3 - 108 N·m
Bolt (D) and nuts (E): 58.8 - 74 N·m
- Remove the jack from the oil pan.
- Connect the ground cable (A) and install the engine support bracket (B).
Tightening torque
Ground cable bolt: 10.8 - 13.7 N·m
Bolt (C): 88.3 - 108 N·m
Bolt (D) and nuts (E): 58.8 - 74 N·m
- Install the camshaft bearing caps (A) in the sequence shown in the illustration and tighten the bolts to the specified torque. Tightening torque Step 1 M6 bolt: 5.9 N·m M8 bolt: 9.8 N·m Step 2 M6 bolts: 11.8 - 13.7 N·m M8 bolts: 18.6 - 23 N·m
- Install the exhaust oil control valve (OCV) adapter (A).
Tightening torque: 9.8 ~ 11.8 N·m
- Install the cylinder head cover. (Refer to Cylinder Head Assembly - "Cylinder Head Cover")
Test yourself
A quick Kia Cee'd quiz: every answer comes with an explanation and a link to the manual page.
Was this page helpful?