Bulbs
Replacing light bulbs in the Lexus GS L10 is described in detail. This section explains how to remove the front turn signal lights and the outer underbody lights and gives instructions for safe work to avoid damage. Important notes on LED lights, condensation, and the recommended genuine parts reflect the quality standards of the Lexus GS and help you maintain the vehicle lighting properly.
You can replace the following light bulbs yourself. The difficulty of replacement varies depending on the bulb. Because there is a risk of damaging components, we recommend having the replacement performed by a Lexus dealer or authorized repair shop, or another qualified repair shop with the necessary equipment.
Preparing to Replace Light Bulbs
Check the wattage of the light bulb to be replaced.
Location of Light Bulbs
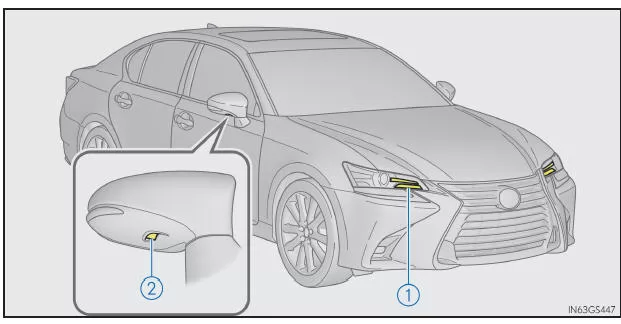
- Front Turn Signal Light (Vehicles with Single-Bulb Headlights)
- Underbody Light
Replacing Light Bulbs
■ Front Turn Signal Light (Vehicles with Single-Bulb Headlights)
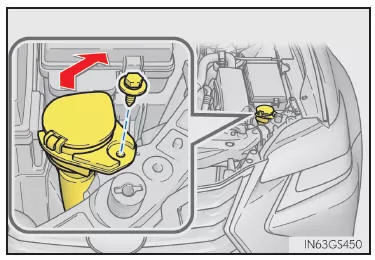
1. Left side only: Remove the screw and move the washer fluid reservoir filler neck.
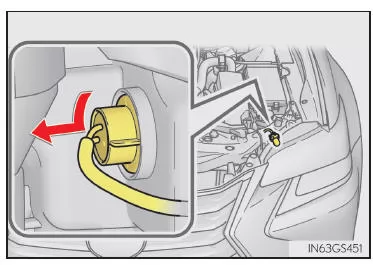
2. Turn the bulb socket counterclockwise.
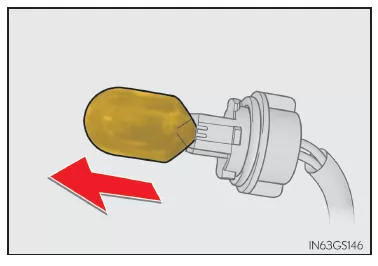
3. Remove the light bulb.
4. To install, reverse the removal procedure.
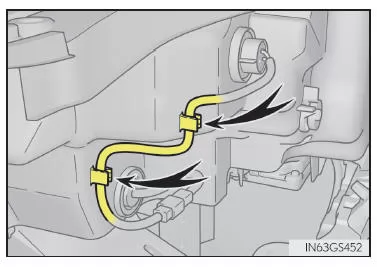
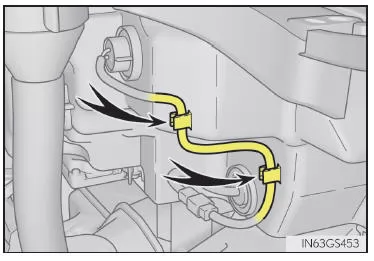
After installing the bulb socket, secure the wiring with the retaining clips. When replacing the left lamp, be sure to reinstall the screw of the washer fluid reservoir filler neck in its original position.
Right side
Left side
■ Outer puddle light
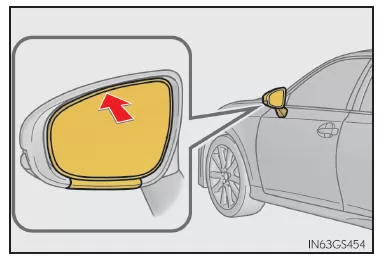
1. Press the upper part of the outer mirror to tilt the mirror surface upward, and apply protective tape to the lower part of the mirror cover.
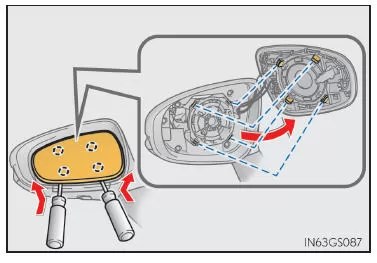
2. Insert 2 flat-blade screwdrivers wrapped with protective tape and release the claws behind the mirror.
Pry the mirror toward you, releasing the 2 claws at the same time.
Work carefully so that the mirror does not fall.
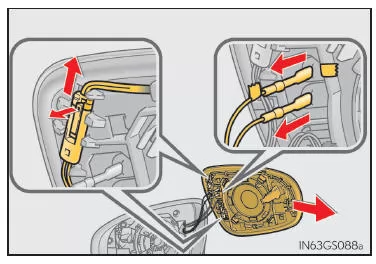
3. Disconnect the connectors behind the mirror and remove the mirror.
When disconnecting the thin connectors, be sure to mark one of the connectors with a piece of adhesive tape to avoid mixing them up during reinstallation.
Work carefully so that the mirror does not fall.
Do not touch the greased parts of the mirror.
The number of connectors depends on the vehicle specification.
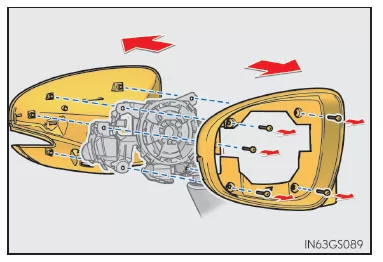
4. Remove the screws and take off the mirror cover.
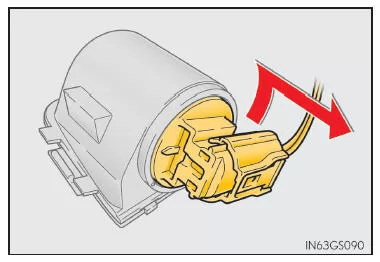
5. Turn the bulb socket counterclockwise.
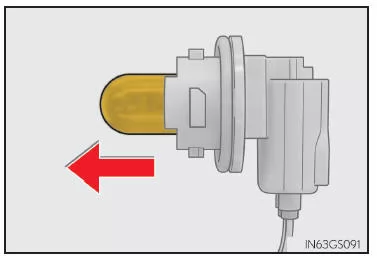
6. Remove the bulb.

7. After installing the new bulb, secure the socket to the lamp housing.
When installing the socket, the marks on the lamp housing and on the socket must be aligned.
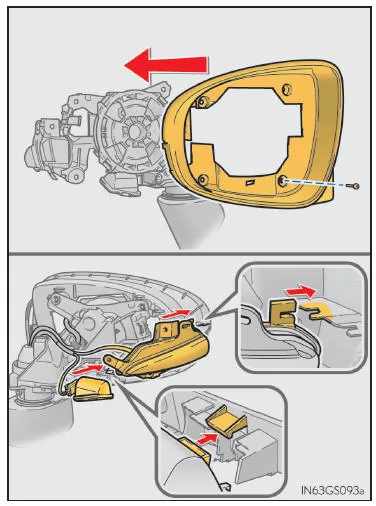
8. Install the trim cover on the mirror frame, secure it with a screw, and install the side turn signal light and the outer puddle light.
Use only the screw position shown in the illustration.
Side turn signal light: Align the claws on the light and cover, then install the parts.
Outer puddle light: Engage the claws in the groove of the lamp housing into the cover, then secure the part.

9. Release the claws, then separate the upper and lower parts of the rear side cover of the mirror.
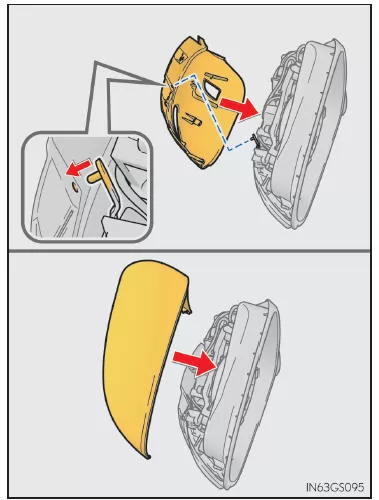
10. Install the cover on the back of the mirror. Insert the lower part first, then the upper part.
When inserting the lower part of the cover, insert the pin of the side turn signal light into the hole in the cover.
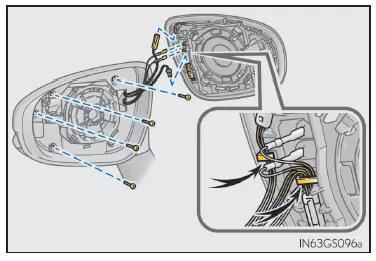
11. Secure the cover with screws and reconnect the connectors.
Secure the wires back into the hooks.
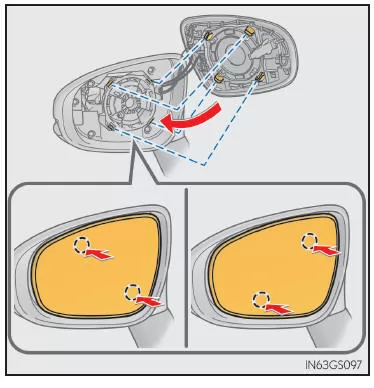
12. Align the claws correctly and attach the mirror by engaging the diagonally opposite claw pairs in the correct order.
Press in the claws in the order shown in the illustration until you hear a click.
If no click is heard, do not force the claws in.
Instead, remove the mirror again and check that the claws are correctly aligned with each other.
■ Replacing the following lamps
If any of the lamps listed below has burned out, have them replaced by a Lexus dealer or authorized repairer, or another qualified and properly equipped workshop.
- Headlights
- Front position lights/daytime running lights
- Fog Lights
- Front turn signal lights (vehicles with triple-lamp headlights)
- Side turn signal lights
- Stop/tail lights
- Brake lights
- Rear Fog Light
- Rear turn signal lights
- Back-Up Lamp
- Additional brake light
- License plate lights
■ LED lights
The lights, except the front turn signal lights (vehicles with single-lamp headlights) and the outer puddle light, each consist of a number of LEDs.
If any of the LEDs has burned out, take your vehicle to a Lexus dealer or authorized repairer, or another qualified and properly equipped workshop, to have the light replaced.
■ Condensation on the inside of the lens
Temporary condensation on the inside of the headlight lens is not a malfunction. In the following cases, consult a Lexus dealer or authorized repairer, or another qualified and properly equipped workshop:
- Large water droplets form on the inside of the lens.
- Water has collected inside the headlight.
■ When Replacing Light Bulbs
WARNING
■ Replacing bulbs
- Turn off the lights. Do not attempt to replace a bulb right after turning the lights off. The bulbs become very hot and can cause burns.
- Never touch the glass envelope of a bulb with bare hands. If you must hold the glass envelope, use a clean, dry cloth to prevent moisture and oil from getting onto the bulb. If the bulb is scratched or dropped, it may burn out or shatter.
- Install the bulbs and all mounting parts completely. Otherwise, heat damage, fire, or water entry into the headlight unit may occur. This may cause damage to the headlights or condensation on the lens.
■ How to prevent damage and fire
- Make sure the bulbs are installed correctly and fully locked in place.
- Check the wattage of a bulb before installing it to prevent heat damage.
■ Replacing the outer puddle light
If the front window prevents you from replacing the light properly, open the window on the side you are working on to make enough room. If you continue without making enough room, you may scratch the vehicle.
The Lexus GS GRL1 (2016–2020) provides clear instructions for replacing various lamps. This reflects the sports sedan's high standard of safety and ease of service. The careful procedures for the interior lighting and turn signals in particular underline the vehicle's premium character.
The use of LED technology keeps the Lexus GS 4th generation durable and modern. The notes on safe handling of lamps minimize risks during maintenance work.
FAQMay I replace the headlight bulbs myself?
Lexus recommends having the headlights replaced only by a qualified service workshop.
Why should I not install bulbs with a different wattage?
Incorrect wattage can cause overheating and damage the lamp.
Test yourself
A quick Lexus GS quiz: every answer comes with an explanation and a link to the manual page.