Wheel change. Wheel fitting
Fitting snow chains on the Mercedes E-Class (4th gen, W212, 2009–2016) requires care and attention to special instructions. This section shows which axles snow chains are permitted on and gives tips on how drivers can safely improve traction in winter.
Preparing the vehicle
 Park the vehicle on a firm, non-slip, level surface.
Apply the parking brake.
Set the front wheels to the straight-ahead position.Vehicles with manual transmission: Fully depress the clutch pedal and engage first gear or reverse gear.
Vehicles with automatic transmission: Shift the transmission to position P.Vehicles with AIRMATIC: Make sure the vehicle level is set to "Normal" more.
Switch off the engine.Remove the key from the ignition lock.
Open the driver's door.
Remove the key from the ignition lock more.
If equipped, remove the wheel change tool from the vehicle more.Additionally secure the vehicle against rolling away.
Info

Apart from some country-specific variants, the vehicles are not equipped with wheel change tools. Some wheel change tools are vehicle-specific. Ask a qualified specialist workshop which wheel change tools are needed for a wheel change on your vehicle.
Wheel change tools that may be required include, for example:- Jack
- Wheel chock
- Wheel wrench
Securing the vehicle against rolling away
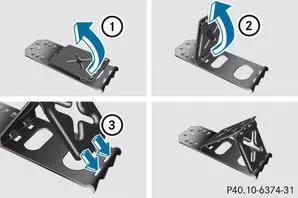
If your vehicle is equipped with a wheel chock, you will find it in the wheel change tool kit more.
The folding wheel chock additionally secures the vehicle against rolling away, for example during a wheel change.Swing both plates upward .
Swing the lower plate outward .
Insert the tabs of the lower plate fully into the openings of the base plate .
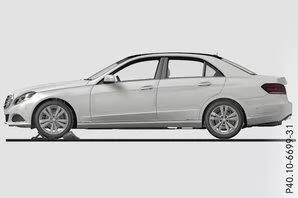
Securing the vehicle on level ground (sedan example)
On level ground: Place wedges or other suitable objects in front of and behind the wheel diagonally opposite the wheel being changed.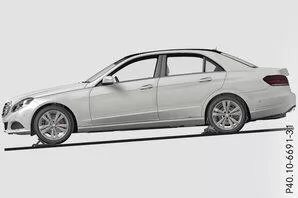
Securing the vehicle on a slight incline (sedan example)
On a slight incline: Place wedges or other suitable objects under the wheels of the front and rear axle.Lifting the vehicle
WARNINGIf you do not position the jack correctly at the designated jacking point on the vehicle, the jack may tip over while the vehicle is raised. Risk of injury!
Position the jack only at the designated jacking point on the vehicle. The base of the jack must be perpendicular to the jacking point on the vehicle.When raising the vehicle, observe the following:
- Use only the vehicle-specific jack approved and released by Mercedes-Benz to raise the vehicle. Improper use of the jack may cause it to tip over while the vehicle is raised.
- The jack is intended only for briefly lifting the vehicle when changing a wheel. It is not suitable for maintenance work under the vehicle.
- Do not change a wheel on inclines or downhill gradients.
- Before lifting the vehicle, secure it with the parking brake and wheel chocks to prevent it from rolling. Never release the parking brake while the vehicle is raised.
- The jack must stand on a level, firm and non-slip surface. On loose ground, use a large, flat and load-bearing base. On slippery ground, use a non-slip base, e.g. a rubber mat on tiles.
- Do not use wooden blocks or similar items as a jack base. Otherwise the jack may not reach its load capacity because of its limited lifting height.
- Make sure the distance between the bottom of the tyre and the ground is no more than 3 cm.
- Never place your hands or feet under the raised vehicle.
- Do not lie under the raised vehicle.
- Do not start the engine while the vehicle is raised.
- Do not open or close any door, the trunk lid or the tailgate while the vehicle is raised.
- Make sure no persons are inside the vehicle while it is being raised.
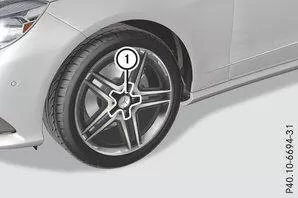
Removing: Remove the center cap of the wheel hub cover.Turn to the left and remove.
Installing: Before installation, make sure the wheel hub coveris in the open position. To do this, turn the center cap to the left.
Place the wheel hub coveronto the hub and turn the center cap to the right until the wheel hub coverclicks into place audibly and can be felt.
Make sure the wheel hub coveris firmly installed.
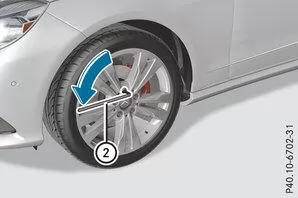
On the wheel to be changed, loosen the wheel bolts with the wheel wrenchby approximately one turn. Do not unscrew the bolts.
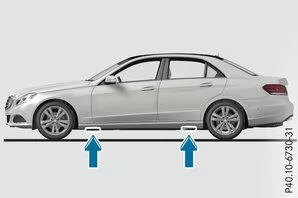
Jacking points (sedan example)
The jacking points are behind the wheel arches of the front wheels and in front of the wheel arches of the rear wheels (arrows).AMG vehicles and vehicles with AMG equipment: The vehicle has covers on the side member trim at the jacking points to protect the bodywork.
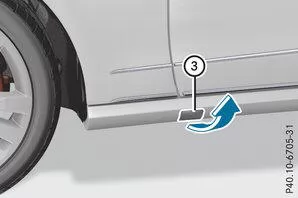
Cover, front (example: vehicles with AMG Sport Package)
AMG vehicles and vehicles with AMG equipment: The coverflip up.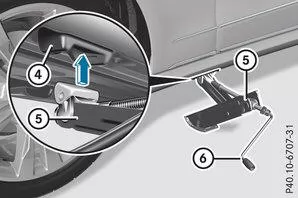
Place the jack at the jacking point
 .
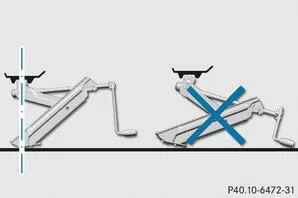
Make sure the base of the jack is positioned vertically below the jacking point.
Turn the crank to the right until the jackis fully seated at the jacking point.The jack base must rest evenly on the ground.
Continue turning the crankuntil the tyre is no more than 3 cm from the ground.
Remove the wheel
Note AMG vehicles: When removing and fitting the wheel, the rim can strike the ceramic brake disc and damage it. Therefore, work carefully and have a second person assist you. Alternatively, you can use a second centering bolt. Do not place the wheel bolts in sand or dirt. Otherwise the threads of the wheel bolts and wheel hubs may be damaged when screwed in.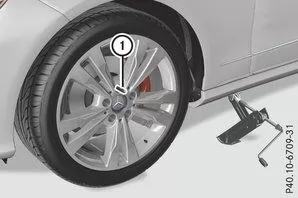
Fully unscrew the top wheel bolt.
Screw the centering pininto the thread in place of the wheel bolt.
Fully unscrew the remaining wheel bolts.
Remove the wheel.
Installing the new wheel
WARNINGWheel bolts can loosen if they are oiled or greased, or if the wheel bolt or hub threads are damaged. A wheel may then come off while driving. Risk of accident!
Never oil or grease the wheel bolts. If a thread is damaged, contact a qualified specialist workshop immediately. Have damaged wheel bolts or a damaged wheel hub thread replaced. Do not continue driving.WARNING
If you tighten the wheel bolts or wheel nuts while the vehicle is raised, the jack may tip over. Risk of injury!Tighten the wheel bolts or wheel nuts only when the vehicle is lowered.
Be sure to observe the instructions and safety notes on "Changing a wheel" for more information.
Use only wheel bolts intended for the wheel and the vehicle. For safety reasons, Mercedes-Benz recommends using only wheel bolts approved by Mercedes-Benz and for the corresponding wheel.NOTE
AMG vehicles: When removing and fitting the wheel, the rim may strike the ceramic brake disc and damage it. Proceed carefully and have a second person assist you. Alternatively, you can use a second centering pin.
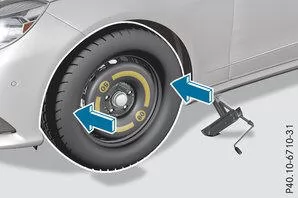
Clean the contact surfaces of the wheel and wheel hub.
Slide the new wheel onto the centering pin and press it on.
Screw in the wheel bolts and tighten them lightly.
Unscrew the centering pin.
Screw in the last wheel bolt and tighten it lightly.
Vehicles with "folding" spare wheel: Inflate the "folding" spare wheel for more information.
Only then lower the vehicle.
Lowering the vehicle
WARNINGIf you do not tighten the wheel bolts or wheel nuts to the specified tightening torque, the wheels may come loose. Risk of accident!
After a wheel change, have the tightening torque checked immediately by a qualified specialist workshop.NOTE
Vehicles with "folding" spare wheel: Before lowering the vehicle, inflate the "folding" spare wheel with the tyre inflator. Otherwise the rim may be damaged.
Turn the jack crank to the left until the vehicle is firmly back on the ground.
Set the jack aside.
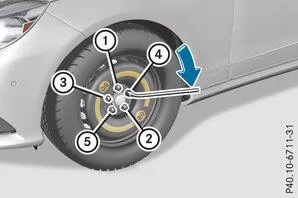
Tighten the wheel bolts evenly in the specified sequence, in a star pattern.toTightening torque must be 130 N·m.
Turn the jack back to its starting position.
Stow the jack and the remaining wheel-change tools back in the trunk/cargo area.
AMG vehicles and vehicles with AMG equipment: Fit the cover to the side member trim.
Check the tyre pressure of the newly installed wheel and adjust it if necessary.
Observe the recommended tyre pressure for more information.
Info
Vehicles with tyre pressure monitoring: All fitted wheels must be equipped with functioning sensors.
Tyre care and maintenance on the Mercedes E-Class W212 (model years 2009–2016) is an important part of the safety concept. Regular checks of tread depth and tyre pressure extend service life and ensure optimal handling.
Mercedes recommends using approved care products so as not to attack the tyre material. This keeps the premium level of the W212 in terms of safety and efficiency.
The combination of proper care and precise engineering makes the E-Class a benchmark in the upper midsize segment.
Test yourself
A quick Mercedes-Benz E-Class quiz: every answer comes with an explanation and a link to the manual page.