Camera Aiming Adjustment
Work Procedure
Always adjust the camera aiming after removing and installing or replacing the front camera unit.
Always adjust the camera aiming after removing and installing or replacing the windshield glass.
Preparation
PERFORM SELF-DIAGNOSIS
Perform self-diagnosis of front camera unit.
Is any DTC detected?
YES>>Perform diagnosis on the detected DTC and repair or replace the applicable item. Refer to DTC Index.
NO>>GO TO 2.
PREPARATION BEFORE CAMERA AIMING ADJUSTMENT
Perform pre-inspection for diagnosis.
Adjust the tire pressure to the specified pressure value.
Maintain no-load in vehicle.
Check if coolant and engine oil are filled up to correct level and fuel tank is full.
Set shift position “P” position and release the parking brake.
Clean the windshield.
Completely clear off the instrument panel.
GO TO 3.
PREPARATION OF AIMING ADJUSTMENT JIG
Prepare the aiming adjustment jig according to the following procedure and the figure.
Prepare six sheets of white paper and black paper, respectively, with dimensions of 120 mm (4.72 in) × 120 mm (4.72 in) to create a left target and right target.
Tape three sheets of black paper and three sheets of white paper together to make a target of 360 mm (14.17 in) × 240 mm (9.45 in).
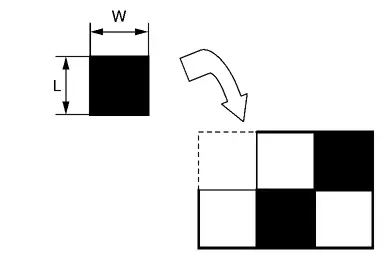
L : 120 mm (4.72 in) W : 120 mm (4.72 in) Stick a printed target mark on the board with a scotch tape or a piece of double-sided tape.
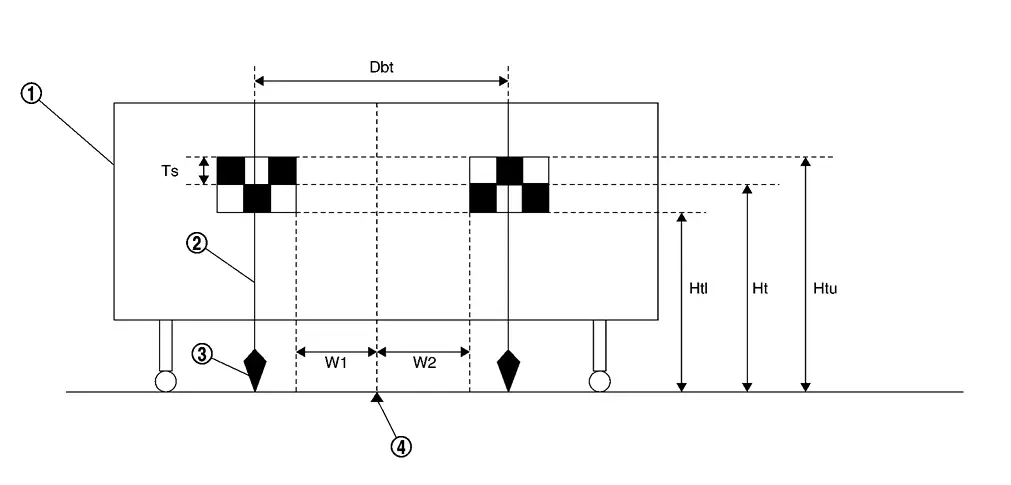

White wall 
String 
Cone 
Center between two targets Side of a target (Ts) : 120 mm (4.72 in) Height of a target lower end (Htl) : 1,180 mm (46.46 in) Height of a target center (Ht) : 1,300 mm (51.18 in) Height of a target upper end (Htu) : 1,420 mm (55.91 in) Width between a right target center from a left target center (Dbt) : 720 mm (28.35 in) W1 : 180 mm (7.09 in) W2 : 180 mm (7.09 in)
Proceed to Target Setting.
Target Setting
TARGET SETTING
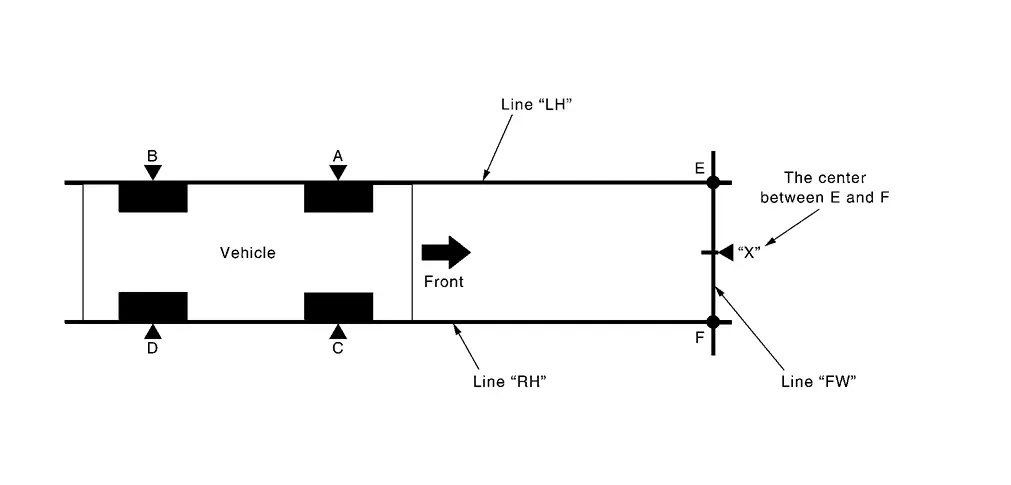
| A – E (C – F) | : 3,000 mm (118.11 in) |
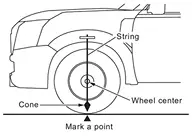
Mark points “A”, “B”, “C” and “D”at the center of the lateral surface of each wheels.
Draw line “LH” passing through points “A” and “B” on the left side of vehicle.
Mark point “E” on the line “LH” at the positions 3,000 mm (118.11 in) from point “A”.
Draw line “RH” passing through points “C” and “D” on the right side of vehicle in the same way as step 2.
Mark point “F” on the line “RH” at the positions 3,000 mm (118.11 in) from point “C”.
Draw line “FW” passing through the points “E” and “F” on the front side of vehicle.
Mark point “X” at the center of point “E” and “F” on the line “FW”.
Place a target on either side of point “X”. Each distance from point “X” must be equal each other.
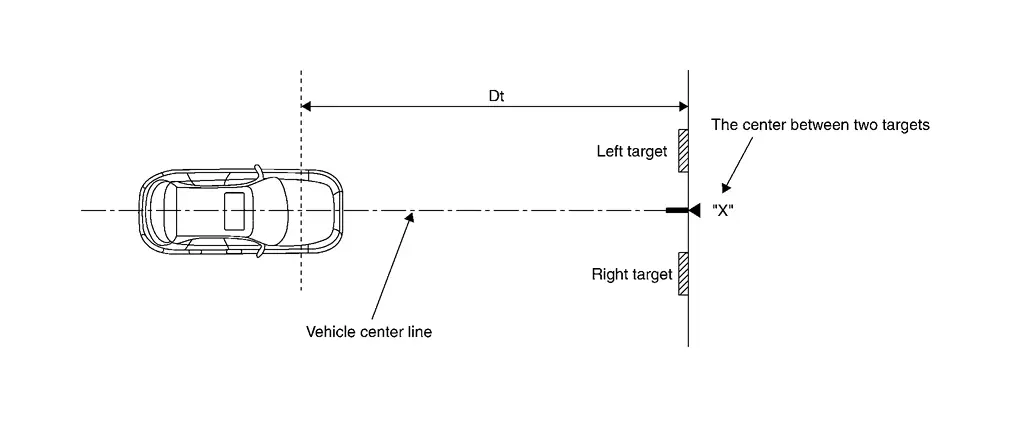
Dt : 3,000 mm (118.11 in)
Proceed to Camera Aiming Adjustment.
Camera Aiming Adjustment
CHECK VEHICLE HEIGHT
Measure the wheelarch height.
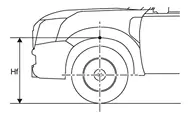
| Hfl: Front left wheelarch height [mm] | |
| Hfr: Front right wheelarch height [mm] |
GO TO 2.
CAMERA AIMING ADJUSTMENT
With CONSULT
Select “Work Support” on “LANE CAMERA” with CONSULT.
Select “AUTO AIM”.
Confirm the following items;
The target should be accurately placed.
The vehicle should be stopped.
Select “Start” to perform camera aiming.
Input the following parameters, and then select “Start”.
Hfl : Measured value Hfr : Measured value vehicle Reference Value : 789 VP : 0 Dt : 3,000 mm Dbt : 720 mm Htu : 1,420 mm Htl : 1,180 mm Ts : 120 mm Confirm the displayed item.
“Normally Completed”: Select “Completion”.
"Suspension" or "Abnormally completed": Select "Completion", perform the following services.
Displayed item Possible cause Service procedure Abnormally completed 1 Internal processing error Check self-diagnosis result. If DTC is detected, perform trouble diagnosis.
Turn the ignition switch OFF→ON, then position the target appropriately again and perform camera aiming.
If abnormally completed even after aiming again, replace front camera unit.
2 3 4 Front camera unit malfunction If front camera unit is already replaced, perform C/U configuration again.
Turn the ignition switch OFF→ON, then accurately position the target again and perform camera aiming.
If abnormally completed even after aiming again, replace front camera unit.
5 Internal process time out Turn the ignition switch OFF→ON, then accurately position the target and perform camera aiming again.
If abnormally completed even after aiming again, replace front camera unit.
6 Ignition switch is not turned yet OFF→ON after replacing front camera unit. Turn the ignition switch OFF→ON, then position the target appropriately again and perform camera aiming. 7 Writing value malfunction If front camera unit is already replaced, perform configuration.
Position the target appropriately again. Then perform the aiming again.
If abnormally completed even after performing above procedure, replace front camera unit.
8 Position of front camera unit is not correct. Accurately position front camera unit.
Accurately position the target again, and perform camera aiming.
9 Camera aiming input value is invalid.
Input value is not correct during camera aiming.
Correct the camera aiming input value and perform camera aiming again. 16 Other error Check self-diagnosis result. If DTC is detected, perform trouble diagnosis.
Turn the ignition switch OFF→ON, then position the target appropriately again and perform camera aiming.
If abnormally completed even after aiming again, replace front camera unit.
18 Front camera unit cannot detect target
Target is not positioned
Position of front camera unit is not correct.
Inappropriate work environment.
Inappropriate vehicle condition
Input value is not correct during camera aiming.
Appropriately position the front camera unit.
Appropriately position the target again and perform camera aiming.
19 Roll angle is outside the threshold.
Position of front camera unit is not correct.
Inappropriate work environment.
Inappropriate vehicle condition.
Input value is not correct during camera aiming.
20 Front camera unit cannot detect the target. Perform front camera unit C/U configuration.
Check target setting information.
Position the target appropriately again. Then perform the aiming again.
21 Parameter read error Perform front camera unit C/U configuration.
Check target setting information and perform camera aiming.
22 "Dt" input value error Check target setting information and perform camera aiming. 23 "Ts" input value error 24 Yow angle is outside the threshold.
Position of target is not correct.
Position of front camera unit is not correct.
Inappropriate work environment.
Inappropriate vehicle condition.
Input value is not correct during camera aiming.
Appropriately position the front camera unit.
Appropriately position the target again and perform camera aiming.
25 Pitch angle is outside the threshold.
Position of target is not correct.
Position of front camera unit is not correct.
Inappropriate work environment.
Inappropriate vehicle condition.
Input value is not correct during camera aiming.
26 Detect several targets.
Position of target is not correct.
Position of front camera unit is not correct.
Inappropriate work environment.
Inappropriate vehicle condition.
Input value is not correct during camera aiming.
27 Aiming error Perform camera aiming again 28 Front camera unit cannot detect the left target Appropriately position the target again and perform camera aiming. 30 Front camera unit cannot detect the right target 31 Aiming error Perform camera aiming again 255 No aiming done Turn the ignition switch OFF→ON, then position the target appropriately again and perform camera aiming.
Confirm that “Normally completed” is displayed and then select “End” to close the adjustment procedure.
GO TO 3.
PERFORM SELF-DIAGNOSIS
With CONSULT
Perform self-diagnosis of “LANE CAMERA” with CONSULT.
Is any DTC detected?
YES>>Perform diagnosis on the detected DTC and repair or replace the applicable item. Refer to DTC Index.
NO>>GO TO 4.
ACTION TEST
Perform the following system operation by action test.
LDW: Refer to Work Procedure.
I-LI: Refer to Work Procedure.
I-BSI: Refer to Work Procedure.
TSR: Refer to Work Procedure.
WORK END
TARGET MARK SAMPLE