Selector
GENERAL INFORMATION
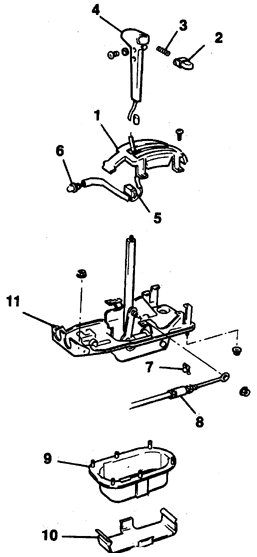
Selector Components
1. Selector position indicator plate
2. Button
3. Spring
4. Handle
5. Connector
6. Indicator lamp
7. Cable sheath bracket
8. Cable
9. Cover
10. Bracket
11. Selector mechanism assembly
Removal
PROCEDURE
1. Raise the front of the vehicle and support it on stands.
2. Move the selector to the P position.
3. Remove the center section of the instrument panel.
4. Remove the nut, take out the cable sheath bracket, and disconnect the cable from the selector.
5. Disconnect the connectors from the overdrive switch and the indicator lamp.
6. Remove the screws, press the button, and remove the selector handle.
7. If necessary, remove the button and the switch spring.
8. Remove the nuts (access from below and from inside the cabin) and remove the selector mechanism.
9. The selector mechanism is a non-serviceable unit and cannot be repaired.
Installation
PROCEDURE
1. Install the selector mechanism and tighten the nuts.
2. Install the spring and the button into the selector handle.
3. Route the wiring and install the handle.
4. Tighten the screws and check that the selector is locked in position.
5. Connect the connectors.
6. Connect the cable, secure the sheath to the bracket, tighten the nut, and install the clip.
7. Adjust the selector cable and install the center section of the instrument panel.
Test yourself
A quick Nissan Sunny quiz: every answer comes with an explanation and a link to the manual page.