Fault location tree
| ALP 1 | No communication with the ABS ECU |
INSTRUCTIONS
None
| Make sure the diagnostic tool is not the cause of the fault by trying to communicate with an ECU on another vehicle. If the tool is not the cause and communication cannot be established with any other ECU on the same vehicle, a faulty ECU may be disturbing the multiplexed network. Check the battery voltage and carry out the necessary work to obtain a compliant voltage (9.5 V < battery voltage < 17.5 V). |
| Carry out a multiplexed network diagnosis using the diagnostic tool. |
| Check the presence and condition of the ABS fuses in the passenger compartment fuse panel and in the engine fuse box. Check the ECU connector connection and the condition of its terminals. Check the ABS earths (quality, corrosion, tightness of the earth screw above the ABS unit). Check that the ECU is correctly supplied:Earth on pins 1 and 4 of the 26-pin connector. |
| Check that the diagnostic socket is correctly supplied: + Before ignition on pin 16. |
| If communication still cannot be established after these checks, contact your Techline. |
AFTER REPAIR
Clear the ECU memory.
Carry out a road test followed by a further check with the diagnostic tool.
| ALP 2 | One or more wheels locking |
INSTRUCTIONS
Only refer to this customer complaint after a complete check with the diagnostic tool.
Reminder: Wheel lock on a vehicle fitted with ABS, or tyre squeal that the customer perceives as locking, may be a normal system response and should not systematically be considered a fault:
|
If a wheel really is locking, raise the vehicle so the wheels can be turned, and check:
Use parameters PR001, PR002, PR003 and PR004 while slowly turning the associated wheels, and make sure the results are consistent. If the measured value is zero, turn the other wheels to confirm an electrical reversal of the sensors, and repair the wiring.
Use commands AC003 "Front left wheel solenoid valves", AC004 "Front right wheel solenoid valves", AC005 "Rear left wheel solenoid valves" and AC006 "Rear right wheel solenoid valves" while pressing the brake pedal, and check for 5 release-lock cycles on the wheel concerned (see the chapter "Command mode processing"). If the 5 cycles are not performed on the tested wheel (wheel held locked), check whether they are performed on another wheel to confirm reversed piping. Repair if necessary. If the 5 cycles are not performed on a wheel with no reversed piping, replace the hydraulic unit. |
| Check that the sensor holder does not turn. Check that the wheel speed sensor is securely fitted (clip-fitted). Check the conformity of the tone wheels using the specific command SC001 "Tone wheel teeth check": condition, number of teeth = 48. If the fault persists after these checks, contact your Techline. |
AFTER REPAIR
Carry out a road test, then a check with the diagnostic tool.
| ALP 3 | Pulling |
INSTRUCTIONS
Only refer to this customer complaint after a complete check with the diagnostic tool.
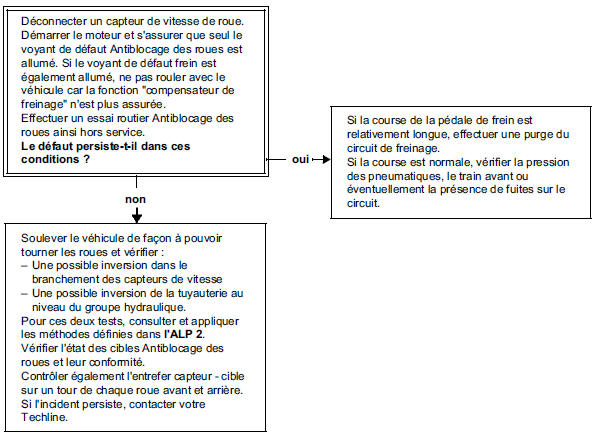
AFTER REPAIR
Carry out a road test, then a check with the diagnostic tool.
| ALP 4 | Snaking |
INSTRUCTION
Only refer to this customer complaint after a complete check with the diagnostic tool.
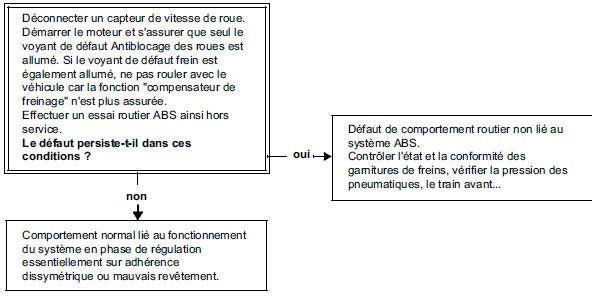
AFTER REPAIR
Carry out a road test, then a check with the diagnostic tool.
| ALP 5 | Unexpected ABS operation at low speed and light pedal effort |
INSTRUCTIONS
Only refer to this customer complaint after a complete check with the diagnostic tool.
Note: ABS regulation is "sensitive" on very low grip surfaces (ice, wet tiles, etc.).
Vibrations may be felt through the brake pedal, caused by normal system reactions in certain situations:- Driving over speed bumps.
- Tight bend with inside rear wheel lifted.
This feeling may be caused simply by the "brake force distribution" function becoming active when rear axle pressure is limited.
If the problem is different, check the speed sensor connectors (micro-breaks) and the air gaps.
AFTER REPAIR
Carry out a road test, then a check with the diagnostic tool.
| ALP 6 | Unexpected ABS operation on poor road surfaces |
INSTRUCTIONS
Only refer to this customer complaint after a complete check with the diagnostic tool.
On rough roads, it is normal to feel jolts and pedal vibrations, as well as more squealing than on good road surfaces.This results in an impression of variable braking efficiency, which is to be considered normal.
AFTER REPAIR
Carry out a road test, then a check with the diagnostic tool.
| ALP 7 | Unexpected ABS operation when using special equipment (radio telephone, CB, etc.) |
INSTRUCTIONS
Only refer to this customer complaint after a complete check with the diagnostic tool.
Check that the equipment causing the problem is approved for use.Check that this equipment has been correctly installed without modifying the original wiring, in particular that of the ABS (connections to earth and to + before ignition / + after ignition of the ABS are not permitted).
AFTER REPAIR
Carry out a road test, then a check with the diagnostic tool.
| ALP 8 | Longer brake pedal travel after a regulation phase (with a leaking pedal when regulation starts) |
INSTRUCTIONS
Only refer to this customer complaint after a complete check with the diagnostic tool.
| Air passing from the hydraulic unit regulation channels into the brake circuits. Bleed the circuits following the procedure recommended in the Repair Manual (using diagnostic tool command modes). After the work, carry out a road test with ABS regulation. |
| If the fault persists, repeat the previous operation once or twice more. If the customer complaint is particularly pronounced and bleeding does not improve it, contact your Techline. |
AFTER REPAIR
Carry out a road test, then a check with the diagnostic tool.
| ALP 9 | Long pedal |
INSTRUCTIONS
Only refer to this customer complaint after a complete check with the diagnostic tool.
Air in the brake circuits.Carry out a conventional bleed of the circuits, starting with the right rear brake, then left rear, left front, and finally right front. Repeat the operation if necessary.
AFTER REPAIR
Carry out a road test, then a check with the diagnostic tool.
| ALP 10 | Brake pedal vibration |
INSTRUCTIONS
Only refer to this customer complaint after a complete check with the diagnostic tool.
Normal brake pedal response during an ABS regulation phase or when rear axle pressure is limited ("brake force distribution" function).AFTER REPAIR
Carry out a road test, then a check with the diagnostic tool.
| ALP 11 | Noise from pump, piping or hydraulic unit |
INSTRUCTIONS
Only refer to this customer complaint after a complete check with the diagnostic tool.
Unit vibration: Check the presence and condition of the hydraulic unit mounting rubber bushings.Pipe vibration: check that all pipes are securely clipped into their retaining clips and that there is no contact between pipes or between pipes and the bodywork.
To determine where the noise is coming from, use the actuation commands for the solenoid valves "Front left wheel solenoid valves", "Front right wheel solenoid valves", "Rear left wheel solenoid valves" and "Rear right wheel solenoid valves" while pressing the brake pedal.
AFTER REPAIR
Carry out a road test, then a check with the diagnostic tool.
Test yourself
A quick Renault Megane quiz: every answer comes with an explanation and a link to the manual page.