Meter Illumination does not Dim at Night
If the dimmer switch is turned to TAIL, HEAD or AUTO, the main body ECU sends a TAIL relay signal, panel light illumination signal, panel relay signal and TAIL cancel OFF signal to the combination meter. Then the meter and accessory meter become dim.
HINT:
w/ TAIL Cancel Switch:
When the headlights are illuminated and the TAIL cancel switch is turned on, the meter does not dim.
WIRING DIAGRAM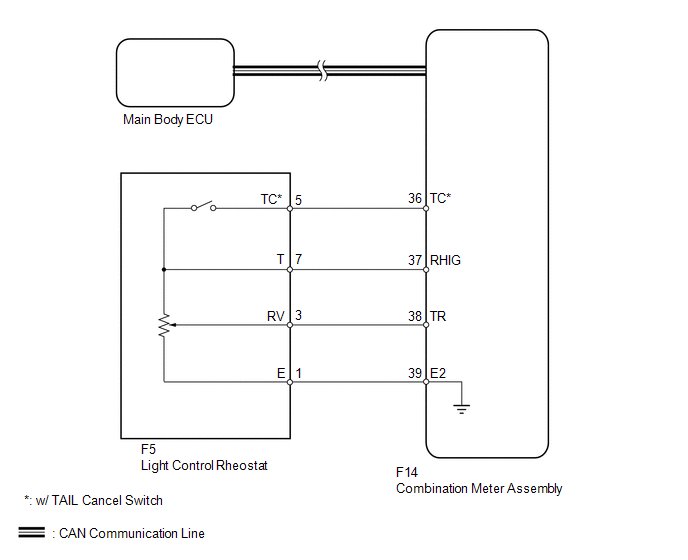
PROCEDURE
CHECK CAN COMMUNICATION SYSTEM
(a) Check for DTCs (See page  ).
Result
Result | Proceed to |
|---|---|
CAN communication system DTC is not output |
A |
CAN communication system DTC is output |
B |
| B |  | Go to CAN COMMUNICATION SYSTEM |
|

READ VALUE USING TECHSTREAM (LIGHT CONTROL RHEOSTAT)
(a) Operate the Techstream according to the display and select the Data List (See page ).
Combination Meter
Tester Display | Measurement Item/Range | Normal Condition | Diagnostic Note |
|---|---|---|---|
Tail Cancel SW* |
TAIL cancel switch condition/ON or OFF |
on: TAIL cancel switch on off: TAIL cancel switch off |
- |
Rheostat value |
Light control rheostat switch input/Min.: 0, Max.: 100 |
Light control rheostat switch is fully turned downward (0) → fully turned upward (100) |
Unit: % |
- *: w/ TAIL Cancel Switch
OK:
Light brightness can be changed within specified range by manual operation.
| OK | | REPLACE COMBINATION METER ASSEMBLY |
|
INSPECT LIGHT CONTROL RHEOSTAT
w/o TAIL Cancel Switch:
(a) Inspect the light control rheostat.
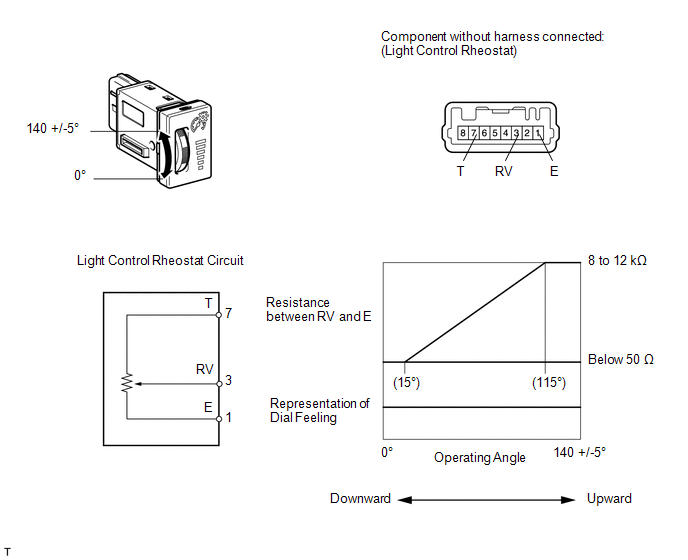
(1) Remove the light control rheostat (See page ).
(2) Measure the resistance according to the value(s) in the table below.
Standard Resistance:
Tester Connection | Switch Condition | Specified Condition |
|---|---|---|
7 (T) - 1 (E) |
Always |
8 to 12 kΩ |
3 (RV) - 1 (E) |
Light control rheostat fully turned upward → fully turned downward |
8 to 12 kΩ → Below 50 Ω |
w/ TAIL Cancel Switch:
(b) Inspect the light control rheostat.
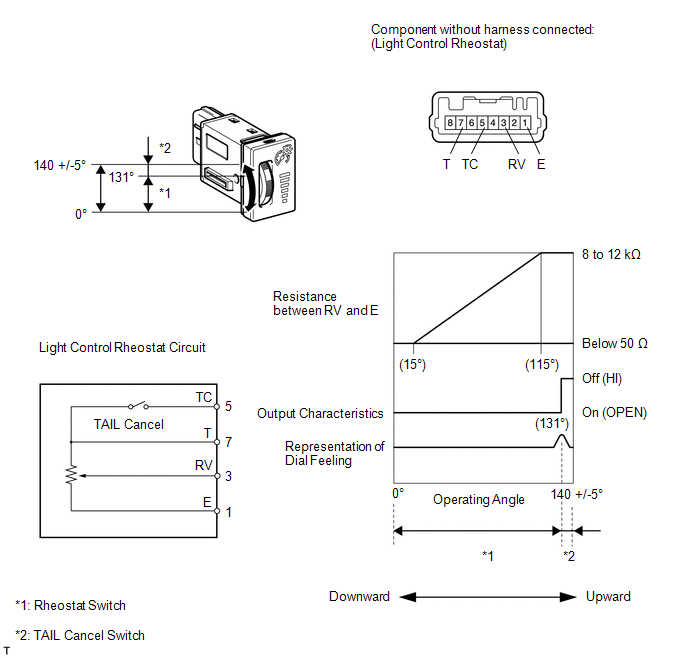
(1) Remove the light control rheostat (See page ).
(2) Measure the resistance according to the value(s) in the table below.
Standard Resistance:
Tester Connection | Switch Condition | Specified Condition |
|---|---|---|
7 (T) - 5 (TC) |
TAIL cancel switch off → on |
1 MΩ or higher → Below 1 Ω |
7 (T) - 1 (E) |
Always |
8 to 12 kΩ |
3 (RV) - 1 (E) |
Light control rheostat fully turned upward → fully turned downward |
8 to 12 kΩ → Below 50 Ω |
| NG | | REPLACE LIGHT CONTROL RHEOSTAT |
|
CHECK HARNESS AND CONNECTOR (COMBINATION METER - LIGHT CONTROL RHEOSTAT)
(a) Disconnect the F14 meter connector.
(b) Disconnect the F5 rheostat connector.
(c) Measure the resistance according to the value(s) in the table below.
Standard Resistance:
Tester Connection | Condition | Specified Condition |
|---|---|---|
F14-37 (RHIG) - F5-7 (T) |
Always |
Below 1 Ω |
F14-38 (TR) - F5-3 (RV) |
||
F14-39 (E2) - F5-1 (E) |
||
F14-36 (TC) - F5-5 (TC)* |
- *: w/ TAIL Cancel Switch
| OK | | REPLACE COMBINATION METER ASSEMBLY |
| NG | | REPAIR OR REPLACE HARNESS OR CONNECTOR |
Test yourself
A quick Toyota 4Runner quiz: every answer comes with an explanation and a link to the manual page.