Reassembly
REASSEMBLY
PROCEDURE
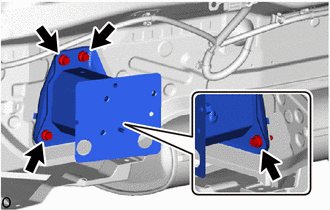
1. INSTALL LH REAR BUMPER ARM SUBASSEMBLY (for USA and Canada)
(a) Install the LH rear bumper arm subassembly with the 4 bolts. Torque: 18 N·m {184 kgf·cm, 13 ft·lbf} |
 |
2. INSTALL RH REAR BUMPER ARM SUBASSEMBLY (for USA and Canada)
HINT:
Repeat the same procedure for the right side and the left side.
3. INSTALL REAR BUMPER REINFORCEMENT SUBASSEMBLY
(a) for USA and Canada:
(1) Engage the guides to install the rear bumper reinforcement subassembly. |
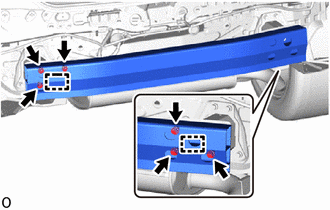 |
(2) Install the 6 bolts.
Torque:
34 N·m {347 kgf·cm, 25 ft·lbf}
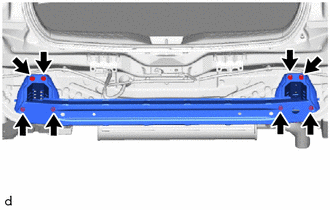
(b) except USA and Canada:
(1) Install the rear bumper reinforcement subassembly with the 8 bolts. Torque: 18 N·m {184 kgf·cm, 13 ft·lbf} |
 |
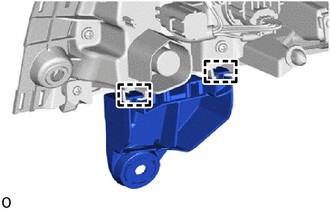
4. INSTALL LH REAR BUMPER UPPER RETAINER
(a) Engage the claws to install the LH rear bumper upper retainer. |
 |
5. INSTALL RH REAR BUMPER UPPER RETAINER
HINT:
Perform the same procedure as for the left side.
6. INSTALL LH REAR COMBINATION LIGHT
- for LED type:
Click here

- for bulb type:
Click here
7. INSTALL RIGHT REAR COMBINATION LIGHT
HINT:
Perform the same procedure as for the left side.
8. INSTALL LEFT REAR COMBINATION LIGHT COVER
- for LED type:
Click here
- for bulb type:
Click here
9. INSTALL RIGHT REAR COMBINATION LIGHT COVER
HINT:
Perform the same procedure as for the left side.
10. INSTALL LEFT REAR BUMPER SIDE RETAINER
(a) Engage the claw and guide to install the left rear bumper side retainer, as shown in the illustration.
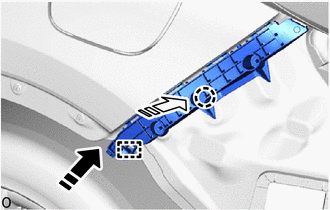
 |
Install in this direction (1) |
 |
Install in this direction (2) |
(b) Reinstall the 2 screws. |
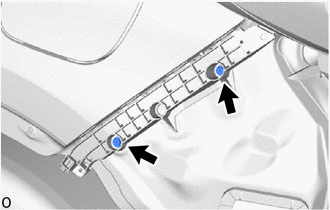 |
11. INSTALL RIGHT REAR BUMPER SIDE RETAINER
HINT:
Perform the same procedure as for the left side.
12. INSTALL REAR BUMPER CENTER STOPPER
(a) Engage the claws and guides to install the rear bumper center stopper. |
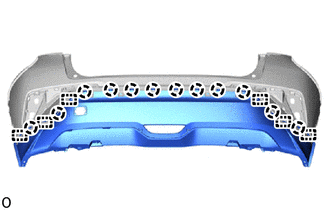 |
(b) Install the 6 outer moulding retainers. |
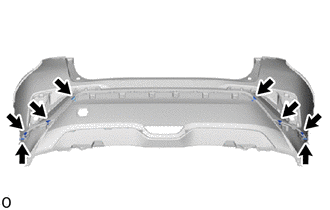 |
(c) Install the 2 clips.
13. INSTALL LEFT REAR BUMPER SIDE REINFORCEMENT
(a) Engage the claw to install the left rear bumper side support, as shown in the illustration. |
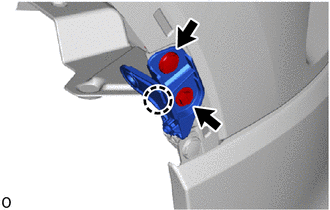 |
(b) Install the clip.
(c) Install the screw.
14. INSTALL RIGHT REAR BUMPER SIDE REINFORCEMENT
HINT:
Perform the same procedure as for the left side.
15. INSTALL LEFT REAR BUMPER PAD
HINT:
When installing the left rear bumper pad, heat the rear bumper assembly using a heat lamp.
Heating TemperatureItem | Temperature |
|---|---|
Rear Bumper Assembly |
40 à 60 °C |
CAUTION:
- Do not touch heated parts or the heat lamp. Touching them may cause burns.
- Prolonged contact with heated parts may cause burns.
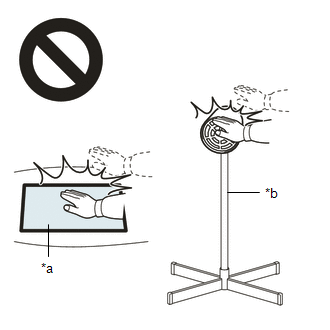
*a |
Hot Surface |
*b |
Heat Lamp |
NOTICE:
Do not overheat the rear bumper assembly.
(a) Clean the surface of the rear bumper assembly.
(1) Using a heat lamp, heat the surface of the rear bumper assembly.
(2) Remove the double-sided adhesive tape from the rear bumper assembly.
(3) Remove any adhesive residue using a cleaning agent.
(b) Remove the protective sheet from the new left rear bumper pad.
HINT:
After removing the release liner, prevent the adhesive surface from contacting foreign matter.
(c) Install the left rear bumper pad as shown in the illustration. HINT: Install the rear bumper pad along the position line on the left side of the rear bumper cover. |
|
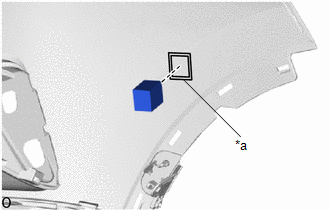
16. INSTALL RIGHT REAR BUMPER PAD
HINT:
Perform the same procedure as for the left side.
17. INSTALL REAR BUMPER PAD
HINT:
When installing the rear bumper pad, heat the rear bumper assembly using a heat lamp.
Heating TemperatureItem | Temperature |
|---|---|
Rear Bumper Reinforcement Subassembly (for US and Canada) |
40 à 60 °C |
Rear Bumper Assembly (except US and Canada) |
40 à 60 °C |
CAUTION:
- Do not touch heated parts or the heat lamp. Touching them may cause burns.
- Prolonged contact with heated parts may cause burns.
*a |
Hot Surface |
*b |
Heat Lamp |
NOTICE:
Do not overheat the rear bumper reinforcement subassembly (for US and Canada) or the rear bumper assembly (except US and Canada).
(a) Clean the surface of the rear bumper reinforcement subassembly (for US and Canada) or the rear bumper assembly (except US and Canada).
(1) Using a heat lamp, heat the surface of the rear bumper reinforcement subassembly (for US and Canada) or the rear bumper assembly (except US and Canada).
(2) Remove the double-sided adhesive tape from the rear bumper reinforcement subassembly (for US and Canada) or the rear bumper assembly (except US and Canada).
(3) Remove any adhesive residue using a cleaning agent.
(b) Remove the protective sheet from the new rear bumper pad.
HINT:
After removing the release liner, prevent the adhesive surface from contacting foreign matter.
(c) for US and Canada:
(1) Install the rear bumper pad as shown in the illustration. HINT: Install the rear bumper pad at the corner point of the rear bumper reinforcement subassembly. |
|
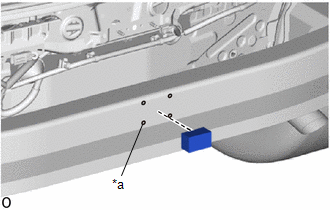
(d) except US and Canada:
(1) Install the rear bumper pad as shown in the illustration. HINT: Install the rear bumper pad along the position line of the rear bumper center stopper. |
|
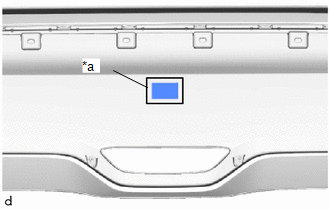
18. INSTALL REAR BUMPER PLATE NO. 1
(a) Engage the hook. |
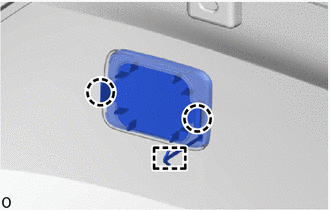 |
(b) Engage the claws to install the rear bumper plate No. 1.
19. INSTALL LEFT REAR BUMPER PLATE
(a) Engage the claws to install the left rear bumper plate. |
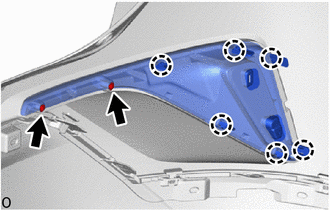 |
(b) Reinstall the 2 screws.
20. INSTALL RIGHT REAR BUMPER PLATE
HINT:
Perform the same procedure as for the left side.
21. INSTALL LEFT REFLECTOR ASSEMBLY
(a) Engage the claw to install the reflector assembly. |
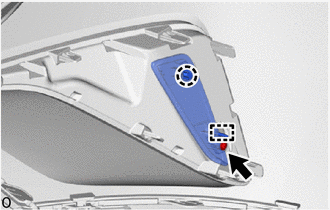 |
(b) Install the screw.
22. INSTALL FOG LIGHT BRACKET
(a) Engage the claws to install the fog light bracket. |
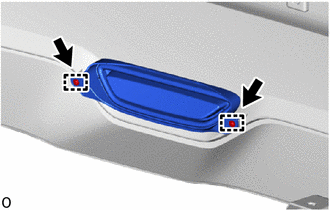 |
(b) Reinstall the 2 screws.