Installation
INSTALLATION
PROCEDURE
1. INSTALL LOWER DEFROSTER NOZZLE ASSEMBLY
(a) Engage the claws to install the lower defroster nozzle assembly. |
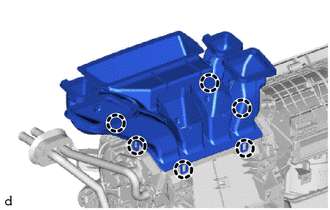 |
2. TEMPORARILY INSTALL THE AIR CONDITIONING UNIT ASSEMBLY
(a) Temporarily install the air conditioning unit assembly to the instrument panel reinforcement sub-assembly with 3 bolts.
3. INSTALL THE INSTRUMENT PANEL REINFORCEMENT SUB-ASSEMBLY WITH AIR CONDITIONING UNIT ASSEMBLY
NOTICE:
When installing the air conditioning unit assembly, discharge static electricity by touching the vehicle body to prevent damage to components.
(a) Engage the guides to install the instrument panel reinforcement sub-assembly with the air conditioning unit assembly as shown in the illustration.
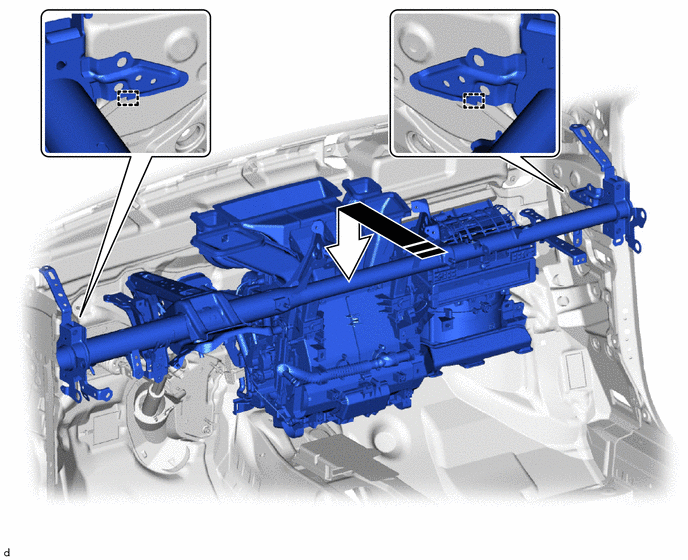
 |
Install in this direction |
- |
- |
(b) Connect the 2 connectors. |
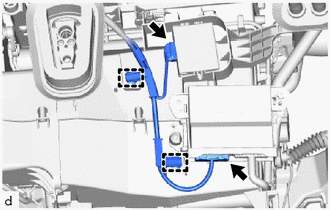 |
(c) Engage the clips.
(d) Install the 5 bolts.
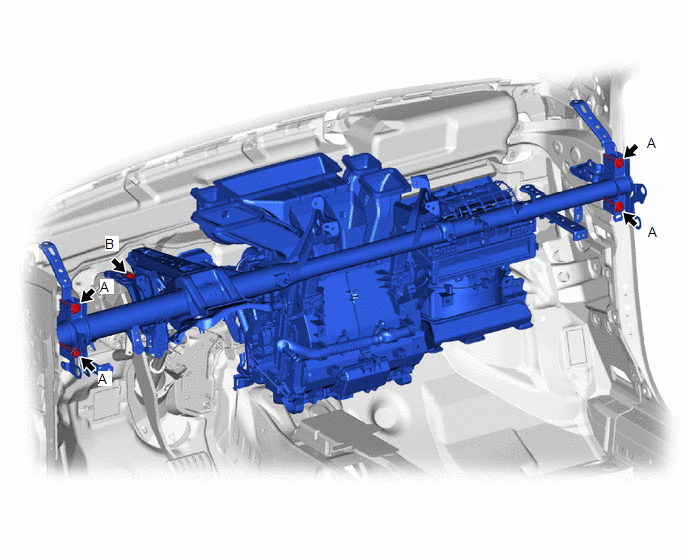
Torque:
Bolt A:
25 N·m {255 kgf·cm, 18 ft·lbf}
Bolt B:
24 N·m {241 kgf·cm, 17 ft·lbf}
(e) Temporarily install the nut.
(f) Install the 2 bolts.
Torque:
25 N·m {255 kgf·cm, 18 ft·lbf}
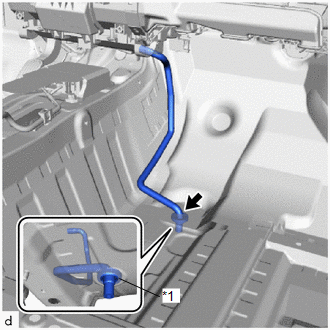
4. CONNECT COOLER DRAIN HOSE
(a) Connect the cooler drain hose. NOTICE: If the cooler drain hose grommet is disconnected from the vehicle body when connecting the cooler drain hose, be sure to replace it with a new one. Failure to do so may cause water leakage. |
|
5. CONNECT INSTRUMENT PANEL WIRE
(a) Engage the clips and hook to connect the instrument panel wire.
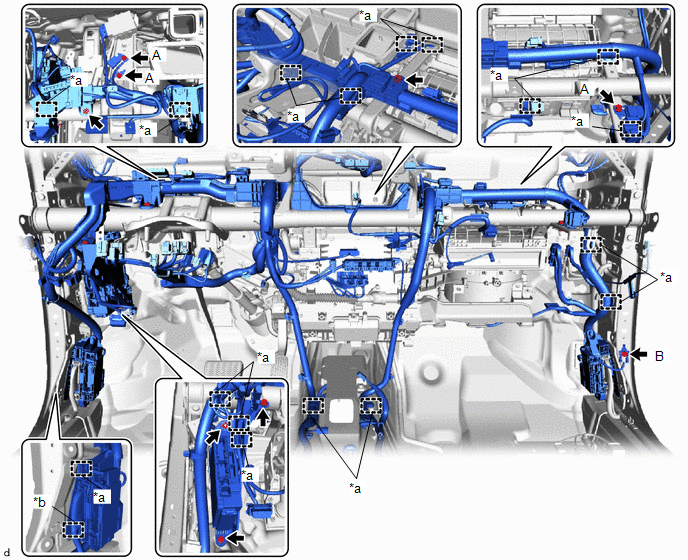
*a |
Clip |
*b |
Hook |
(b) Install the instrument panel junction block assembly with the main body ECU using the bolt and nut.
Torque:
8 N·m {82 kgf·cm, 71 in·lbf}
(c) Install the 4 bolts to connect the 4 ground cables.
Torque:
Bolt A:
10.5 N·m {107 kgf·cm, 8 ft·lbf}
Bolt B (part number 90119-06995):
10.5 N·m {107 kgf·cm, 8 ft·lbf}
Bolt B (part number 90119-W0017):
8.5 N·m {87 kgf·cm, 75 in·lbf}
(d) Install the bolt and screw.
Torque:
Bolt:
8 N·m {82 kgf·cm, 71 in·lbf}
(e) Connect all connectors.
6. INSTALL SUB-ASSEMBLY BETWEEN INSTRUMENT PANEL AND COWL BRACE NO. 3 (for cold region vehicles)
(a) Install the No. 3 instrument panel brace sub-assembly with the bolt and nut. Torque: Bolt: 10 N·m {102 kgf·cm, 7 ft·lbf} Nut: 6 N·m {61 kgf·cm, 53 in·lbf} |
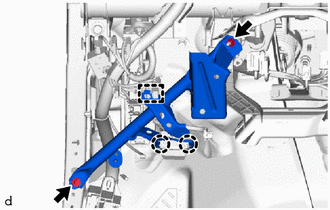 |
(b) Engage the clip and claws.
7. INSTALL SUB-ASSEMBLY BETWEEN INSTRUMENT PANEL AND COWL BRACE NO. 3 (except cold region vehicles)
(a) Install the No. 3 instrument panel brace sub-assembly with the bolt and nut. Torque: Bolt: 10 N·m {102 kgf·cm, 7 ft·lbf} Nut: 6 N·m {61 kgf·cm, 53 in·lbf} |
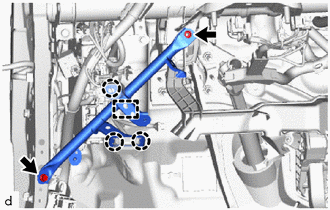 |
(b) Engage the clip and claws.
8. INSTALL INSTRUMENT PANEL REINFORCEMENT SUB-ASSEMBLY NO. 2
(a) Install the No. 2 instrument panel reinforcement sub-assembly with the bolt and nut. Torque: Bolt: 20 N·m {204 kgf·cm, 15 ft·lbf} Nut: 18 N·m {184 kgf·cm, 13 ft·lbf} |
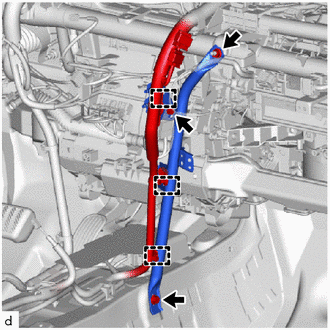 |
(b) Temporarily install the screw.
HINT:
Do not fully tighten the screw.
(c) Install the ground wire with its bolt.
Torque:
10.5 N·m {107 kgf·cm, 8 ft·lbf}
(d) Engage the clips to connect the wire harness.
9. INSTALL INSTRUMENT PANEL REINFORCEMENT SUB-ASSEMBLY NO. 1
(a) Install the No. 1 instrument panel reinforcement sub-assembly with the bolt and nut.
Torque:
Bolt:
20 N·m {204 kgf·cm, 15 ft·lbf}
Nut:
18 N·m {184 kgf·cm, 13 ft·lbf}
(b) Temporarily install the screw.
HINT:
Do not fully tighten the screw.
(c) Engage the clips to connect the wire harness. |
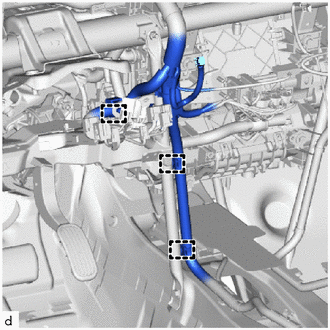 |
(d) With PTC heater:
(1) Connect the ground wire with its bolt.
Torque:
10.5 N·m {107 kgf·cm, 8 ft·lbf}
(e) Install the relay block assembly with the 2 nuts.
Torque:
8 N·m {82 kgf·cm, 71 in·lbf}
10. INSTALL AIR CONDITIONING UNIT ASSEMBLY
(a) Tighten the 3 bolts, 2 screws and nut in the order shown in the illustration to install the air conditioning unit.
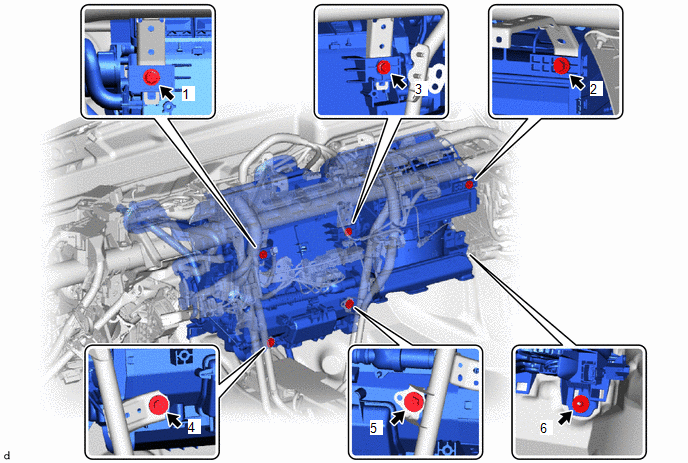
Torque:
9.8 N·m {100 kgf·cm, 87 in·lbf}
11. INSTALL REAR AIR DUCT NO. 1 (with rear air duct)
(a) Engage the claws to install rear air duct No. 1, as shown in the illustration.
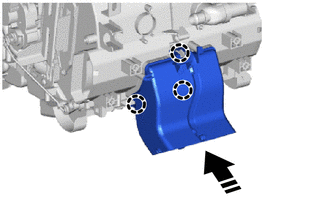
|
Install in this direction |
12. INSTALL REAR AIR DUCT NO. 2 (with rear air duct)
(a) Engage the claws to install the No. 2 rear air duct as shown in the illustration.
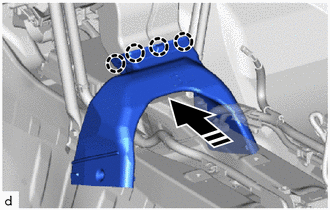
|
Install in this direction |
13. INSTALL REAR AIR DUCT NO. 3 (with rear air duct)
(a) Engage the claws to install the No. 3 rear air duct as shown in the illustration.
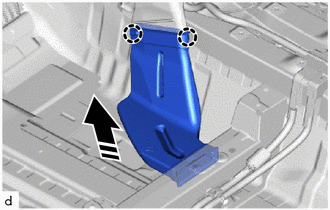
|
Install in this direction |
14. INSTALL REAR AIR DUCT NO. 4 (with rear air duct)
(a) Engage the claws to install the No. 4 rear air duct as shown in the illustration.
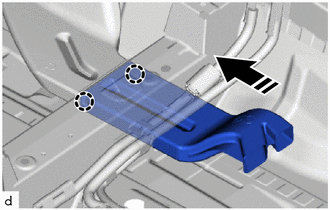
|
Install in this direction |
(b) Install the front floor carpet assembly to its original position as shown in the illustration.
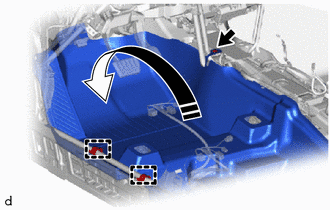
|
Install in this direction |
(c) Install the clip.
(d) Engage the 2 clips.
(e) Install the 2 front floor carpet clips.
15. INSTALL REAR AIR DUCT NO. 5 (with rear air duct)
(a) Engage the claws to install the No. 5 rear air duct as shown in the illustration.
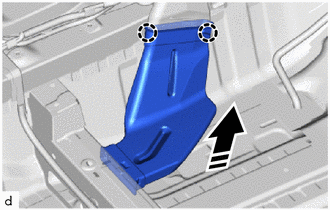
|
Install in this direction |
16. INSTALL REAR AIR DUCT NO. 6 (with rear air duct)
(a) Engage the claws to install the No. 6 rear air duct as shown in the illustration.
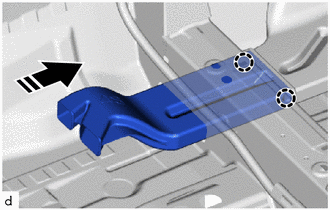
|
Install in this direction |
17. INSTALL INSTRUMENT PANEL INSULATOR PAD NO. 3
(a) Engage the clips to install the No. 3 instrument panel insulator pad. |
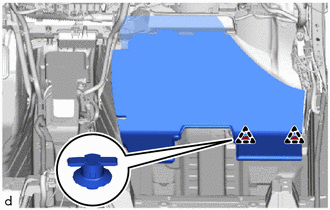 |
(b) Engage the clips to install the front carpet assembly, as shown in the illustration.
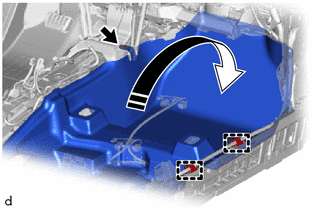
|
Install in this direction |
(c) Install the clip.
(d) Install the 2 front carpet clips.
18. INSTALL COOLER THERMISTOR (CABIN TEMPERATURE SENSOR)
(a) Connect the suction hose and connector to install the cooler thermistor (cabin temperature sensor).
19. INSTALL RH ECU INTEGRATION BOX
Click here
20. INSTALL FRONT WIPER RELAY ASSEMBLY
Click here
21. INSTALL STEERING COLUMN ASSEMBLY
Click here
22. INSTALL INSTRUMENT PANEL SAFETY PAD SUB-ASSEMBLY
Click here
23. INSTALL LH FRONT SEAT ASSEMBLY
Click here
24. INSTALL RH FRONT SEAT ASSEMBLY
HINT:
Perform the same procedure as for the left side.
25. CONNECT SUCTION TUBE SUB-ASSEMBLY
(a) Remove the vinyl tape from the cooler A suction hose and liquid tube sub-assembly.
(b) Apply a sufficient amount of compressor oil to 2 new O-rings and the mating surfaces of the cooler A suction hose and liquid tube sub-assembly.
Compressor oil:
VC100YF or equivalent
(c) Reinstall the O-rings on the suction tube and refrigerant tube sub-assembly for cooler A.
NOTICE:
Keep the O-rings and the O-ring mating surface free of foreign matter.
(d) Connect the suction tube and refrigerant tube sub-assembly for cooler A.
(e) Reinstall the bolt.
Torque:
9.8 N·m {100 kgf·cm, 87 in·lbf}
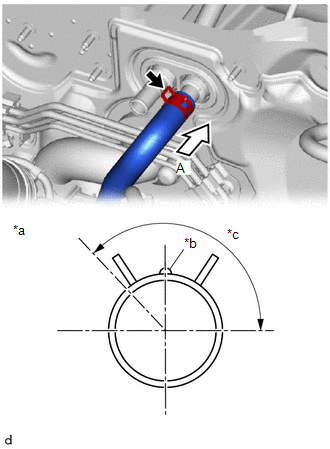
26. CONNECT HEATER WATER INLET HOSE
(a) Connect the heater water outlet hose with the (white) mark facing up, and engage the clamp in the area shown in the illustration. NOTICE: Proceed carefully to avoid damaging the heater water inlet hose. |
|
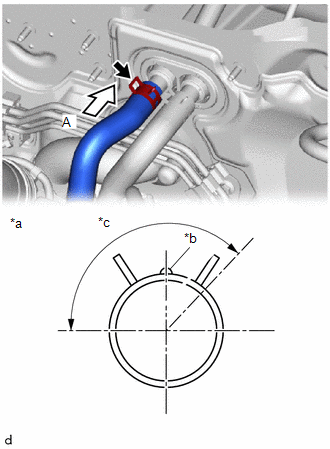
27. CONNECT HEATER WATER OUTLET HOSE
(a) Connect the heater water outlet hose with the (white) mark facing up, and engage the clamp in the area shown in the illustration. NOTICE: Proceed carefully to avoid damaging the heater water outlet hose. |
|
28. INSTALL COWL TOP OUTER PANEL SUB-ASSEMBLY
Click here
29. INSTALL LH COWL BODY MOUNTING REINFORCEMENT
Click here
30. INSTALL RH COWL BODY MOUNTING REINFORCEMENT
Click here
31. INSTALL LH WATERPROOF PROTECTIVE PLATE
Click here
32. INSTALL HEATER AIR DUCT SPLASH SHIELD SEAL NO. 1
Click here
33. INSTALL FRONT WIPER MOTOR AND LINK ASSEMBLY
Click here
34. ADD ENGINE COOLANT
Click here
35. CHECK FOR ENGINE COOLANT LEAK
Click here
36. CHARGE AIR CONDITIONING SYSTEM WITH REFRIGERANT (for HFC-134a (R134a))
Click here
37. CHARGE AIR CONDITIONING SYSTEM WITH REFRIGERANT (for HFO-1234yf (R1234yf))
Click here
38. WARM UP ENGINE (for HFC-134a (R134a))
Click here
39. WARM UP ENGINE (for HFO-1234yf (R1234yf))
Click here
40. CHECK FOR REFRIGERANT LEAK (for HFC-134a (R134a))
Click here
41. CHECK FOR REFRIGERANT LEAK (for HFO-1234yf (R1234yf))
Click here
42. INITIALIZE SERVO MOTOR
Click here