Heater / Air Conditioning
Installation
In this manual: Heater / Air Conditioning
~1min read
INSTALLATION
PROCEDURE
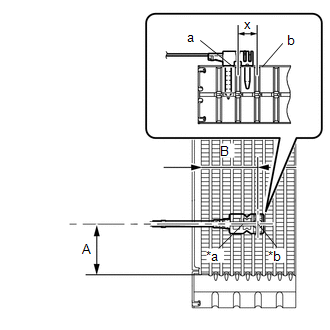
1. INSTALL NO. 1 COOLER THERMISTOR
(a) Install the No. 1 cooler thermistor as shown in the illustration. Installation Position:
NOTICE:
|
|
2. INSTALL COOLER EVAPORATOR SUB-ASSEMBLY NO. 1
Click here
3. INSTALL COOLER EXPANSION VALVE
Click here
4. INSTALL HEATER UNIT SUB-ASSEMBLY
Click here
5. INSTALL HEATER CLIP
Click here
6. INSTALL HEATER PIPE GROMMET
Click here
7. INSTALL HEATER RADIATOR DAMPER SERVO SUB-ASSEMBLY NO. 1
Click here
8. INSTALL AIR CONDITIONING WIRE HARNESS ASSEMBLY
Click here
9. INSTALL BLOWER ASSEMBLY
Click here
Was this page helpful?