Brake master cylinder
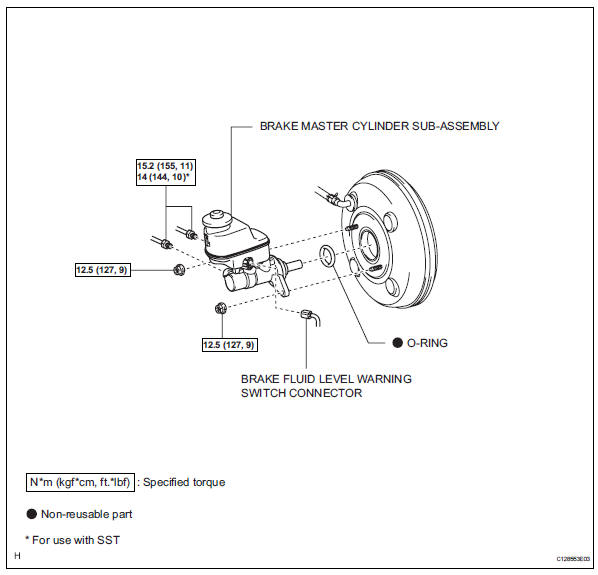

On-vehicle inspection
- Check brake fluid level warning switch
- Remove the reservoir filler cap and strainer.
- Disconnect the brake fluid level warning switch connector.
- Measure the resistance of the switch.
There is a float inside the reservoir. Its position can be changed by increasing or decreasing the brake fluid level.
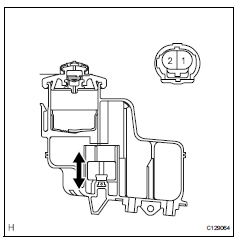
Standard resistance

If the value is not as specified, replace the brake master cylinder reservoir sub-assembly.
- Add brake fluid to the max level.
- The master cylinder and piston are designed so that the piston can easily fall out. Prevent this by making sure that the tip of the master cylinder points downward when handling the master cylinder.
- Make sure foreign matter does not attach to the master cylinder's piston. If foreign matter attaches, clean it off with a cloth. Then apply lithium soap base glycol grease to the entire outer circumference contact surface area of the piston.
- Remove air cleaner case sub-assembly
- Remove the air cleaner case (see page em-98).
Refer to the procedures from the removal of the purge vsv up until the removal of the air cleaner case.
- Drain brake fluid
Wash off brake fluid immediately if it comes in contact with any painted surface.
- Remove brake master cylinder subassembly
- Release the vacuum pressure in the brake booster as follows.
- Stop the engine.
- Depress the brake pedal several times.
- Disconnect the brake fluid level warning switch connector labeled a.
- Using sst, disconnect the 2 brake lines labeled b from the master cylinder.
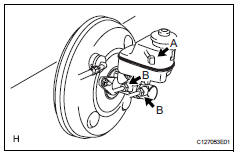
- Remove the 2 nuts.
- Pull out the master cylinder from the brake booster.
- The master cylinder and piston are designed so that the piston can easily fall out. Prevent this by making sure that the tip of the master cylinder points downward when handling the master cylinder.
- Make sure foreign matter does not attach to the master cylinder's piston. If foreign matter attaches, clean it off with a cloth. Then apply lithium soap base glycol grease to the entire outer circumference contact surface area of the piston.
- Remove the o-ring from the master cylinder.
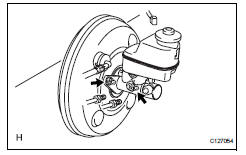
Removal (2006/01- ) Notice:
- The master cylinder and piston are designed so that the piston can easily fall out. Prevent this by making sure that the tip of the master cylinder points downward when handling the master cylinder.
- Make sure foreign matter does not attach to the master cylinder's piston. If foreign matter attaches, clean it off with a cloth. Then apply lithium soap base glycol grease to the entire outer circumference contact surface area of the piston.
- Remove air cleaner case sub-assembly (for 2az-fe)
- Remove the air cleaner case (see page em-98).
Refer to the procedures from the removal of the purge vsv up until the removal of the air cleaner case.
- Remove air cleaner case (for 2gr-fe)
- Remove the air cleaner case (see page em-21).
Refer to the procedures from the removal of the air cleaner cap sub-assembly up until the removal of the air cleaner case.
- Drain brake fluid
Wash off brake fluid immediately if it comes in contact with any painted surface.
- Remove brake m.der subassembly
- Release the vacuum pressure in the brake booster as follows.
- Stop the engine.
- Depress the brake pedal several times.
- Disconnect the brake fluid level warning switch connector labeled a.
- Using sst, disconnect the 2 brake lines labeled b from the master cylinder.

Sst 09023-00101

- Remove the 2 nuts.
- Pull out the master cylinder from the brake booster.
- The master cylinder and piston are designed so that the piston can easily fall out. Prevent this by making sure that the tip of the master cylinder points downward when handling the master cylinder.
- Make sure foreign matter does not attach to the master cylinder's piston. If foreign matter attaches, clean it off with a cloth. Then apply lithium soap base glycol grease to the entire outer circumference contact surface area of the piston.
- Remove the o-ring from the master cylinder.
- The master cylinder and piston are designed so that the piston can easily fall out. Prevent this by making sure to tip of the master cylinder points downward when handling the master cylinder.
- Make sure foreign matter does not attach to the master cylinder's piston. If foreign matter attaches, clean it off with a cloth. Then apply lithium soap base glycol grease to the entire outer circumference contact surface area of the piston.
- Remove brake master cylinder ring pin
- Remove brake master cylinder reservoir sub-assembly
- Remove master cylinder reservoir grommet
- Remove brake master cylinder reservoir filler cap assembly
- Remove brake master cylinder reservoir strainer
- The master cylinder and piston are designed so that the piston can easily fall out. Prevent this by making sure that the tip of the master cylinder points downward when handling the master cylinder.
- Make sure foreign matter does not attach to the master cylinder's piston. If foreign matter attaches, clean it off with a cloth. Then apply lithium soap base glycol grease to the entire outer circumference contact surface area of the piston.
- Inspect and adjust brake booster push rod
Adjust the booster push rod when the master cylinder is replaced with a new one. Adjustment is not necessary when the master cylinder is reinstalled and the booster is replaced with a new one.
- Set sst on the master cylinder and lower the rod of sst until it just touches the piston.
Sst 09737-00013
If there is clearance between the sst main body and the shell of the brake booster, the push rod is protruding too far. If the chalk does not stick to the tip of the brake booster push rod, the push rod protrusion is insufficient.
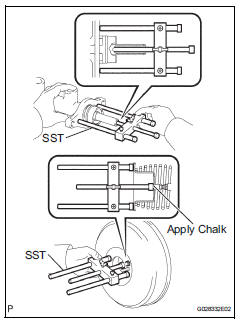
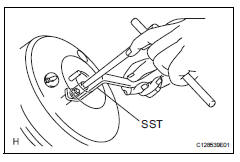
- If the clearance is not within the standard, adjust the length by holding the rod using sst and turning the tip of the rod using a 7 mm socket driver.
Check the push rod clearance again after adjusting.
Reassembly Notice:
- The master cylinder and piston are designed so that the piston can easily fall out. Prevent this by making sure to tip of the master cylinder points downward when handling the master cylinder.
- Make sure foreign matter does not attach to the master cylinder's piston. If foreign matter attaches, clean it off with a cloth. Then apply lithium soap base glycol grease to the entire outer circumference contact surface area of the piston.
- Install brake master cylinder reservoir strainer
- Install brake master cylinder reservoir filler cap assembly
- Install master cylinder reservoir grommet
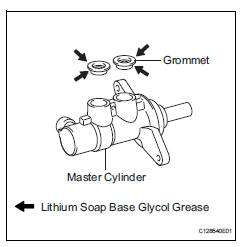
- Apply lithium soap base glycol grease to 2 new grommets, and then install them to the master cylinder.
- Install brake master cylinder reservoir sub-assembly
- Install brake master cylinder ring pin
- Install brake master cylinder subassembly
- The master cylinder and piston are designed so that the piston can easily fall out. Prevent this by making sure that the tip of the master cylinder points downward when handling the master cylinder.
- Make sure foreign matter does not attach to the master cylinder's piston. If foreign matter attaches, clean it off with a cloth. Then apply lithium soap base glycol grease to the entire outer circumference contact surface area of the piston.
- Install a new o-ring to the master cylinder.
- Install the master cylinder to the booster with the 2 nuts.
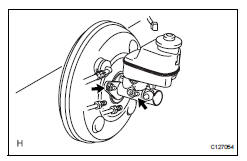

- Using sst, connect the 2 brake lines labeled b to the master cylinder.
Use a torque wrench with a fulcrum length of 30 cm (11.81 In.).
- Connect the brake fluid level warning switch connector labeled a to the master cylinder.
- Fill reservoir with brake fluid (see page br- 6)
- Bleed air from brake master cylinder (see page br-7)
- Bleed air from brake line (see page br-7)
- Bleed air from abs and traction actuator assembly (see page br-8)
- Check brake fluid level in reservoir (see page br-6)
- Check for brake fluid leakage
- Install air cleaner case sub-assembly
- Install the air cleaner case (see page em-105).
Refer to the procedures from the installation of the air cleaner case up until the installation of the purge vsv.
Installation (2006/01- )- Install brake master cylinder subassembly
- The master cylinder and piston are designed so that the piston can easily fall out. Prevent this by making sure that the tip of the master cylinder points downward when handling the master cylinder.
- Make sure foreign matter does not attach to the master cylinder's piston. If foreign matter attaches, clean it off with a cloth. Then apply lithium soap base glycol grease to the entire outer circumference contact surface area of the piston.
- Install a new o-ring to the master cylinder.
- Install the master cylinder to the booster with the 2 nuts.
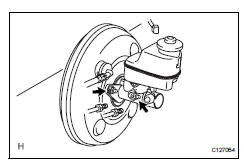

- Using sst, connect the 2 brake lines labeled b to the master cylinder.
Use a torque wrench with a fulcrum length of 30 cm (11.81 In.).
- Connect the brake fluid level warning switch connector labeled a to the master cylinder.
- Fill reservoir with brake fluid (see page br- 6)
- Bleed air from brake master cylinder (see page br-7)
- Bleed air from brake line (see page br-7)
- Bleed air from abs and traction actuator assembly (see page br-8)
- Check brake fluid level in reservoir (see page br-6)
- Check for brake fluid leakage
- Install air cleaner case sub-assembly (for 2az-fe)
- Install the air cleaner case (see page em-105).
Refer to the procedures from the installation of the air cleaner case up until the installation of the purge vsv.
- Install air cleaner case (for 2gr-fe)
- Install the air cleaner case (see page em-31).
Refer to the procedures from the installation of the air cleaner case up until the installation of the air cleaner cap sub-assembly.
Test yourself
A quick Toyota RAV4 quiz: every answer comes with an explanation and a link to the manual page.