Headlight assembly
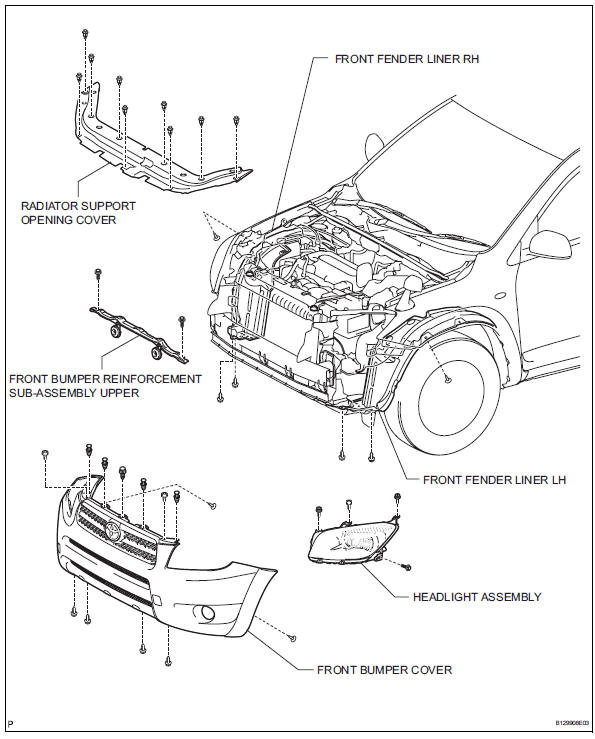
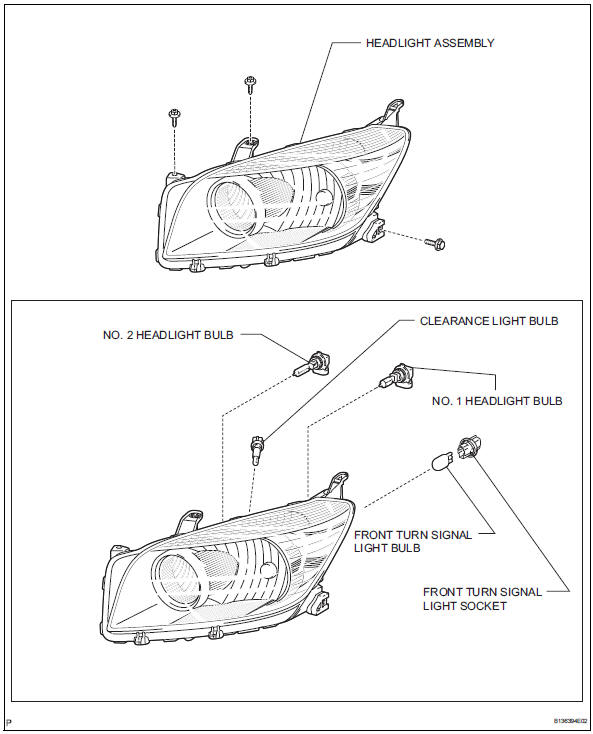
Removal Hint:
- Use the same procedures for the rh and lh sides.
- The procedures listed below are for the lh side.
- Disconnect cable from negative battery terminal
- Remove front fender liner lh (see page et-4)
- Remove front fender liner rh (see page et-4)
- Remove radiator support opening cover (see page et-4)
- Remove front bumper cover (see page et-5)
- Remove front bumper reinforcement subassembly upper
- Disconnect the 2 horn connectors.
- Remove the 2 bolts and reinforcement.
- Remove headlight assembly
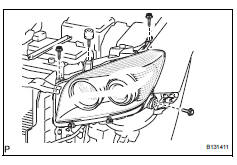
- Remove the 3 screws and bolt.
- Disconnect the connectors and remove the headlight.
- Use the same procedures for the rh and lh sides.
- The procedures listed below are for the lh side.
- Remove no. 1 Headlight bulb
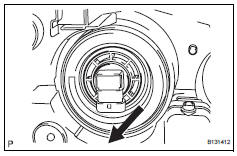
- Turn the bulb in the direction indicated by the arrow and pull to remove it.
- Remove no. 2 Headlight bulb
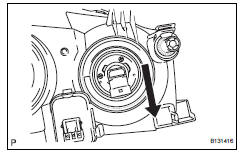
- Turn the bulb in the direction indicated by the arrow and pull to remove it.
- Remove clearance light bulb
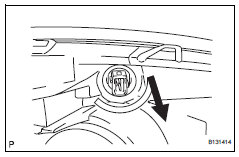
- Turn the bulb in the direction indicated by the arrow and pull to remove it.
- Remove front turn signal light bulb
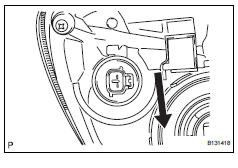
- Turn the bulb/socket unit in the direction indicated by the arrow and pull to remove it.
- Remove the bulb from the socket.
- Vehicle preparation for headlight aim adjustment
- Prepare the vehicle:
- Ensure that the vehicle has no damage or deformation around the headlights.
- Fill up the fuel tank.
- Make sure that all of the different types of oil in the vehicle (engine oil, etc.) Are filled to the specified levels.
- Make sure that the coolant is filled to the specified level.
- Inflate the tires to the appropriate pressure.
- Place the spare tire, tools, and jack in their original positions.
- Unload the vehicle.
- Have a person that weighs approximately 55 kg (121 lb) sit in the driver seat.
- Preparation for headlight aiming (using a screen)
- Prepare the vehicle according to the following conditions:
- Move the vehicle to a location that is sufficiently dark so that the headlight cutoff line can be visually checked. The cutoff line is an imaginary plane below which headlight light is projected and above which light is not projected.
- Move the vehicle to a level surface.
- Point the front of the vehicle at a wall. The wall must be perpendicular to the surface that the vehicle is on.
- Position the vehicle 10 m (32.8 Ft.) From the wall.
- Push down on the vehicle several times to settle the suspension. Do not damage the suspension.
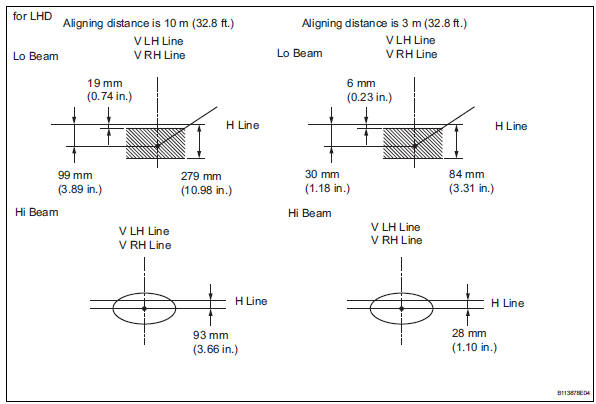
A distance of 10 m (32.8 Ft.) Between the vehicle and the wall is necessary for proper aim adjustment.
If unavailable, secure a distance of exactly 3 m (9.8 Ft.). In the illustrations below, view the part of the illustration applicable to the distance from the vehicle to the wall
Notice:Be careful not to damage the suspension.
- Prepare a piece of thick white paper that is approximately 2 m (6.6 Ft.) (Height) x 4 m (13.1 Ft.) (Width) to use as a screen.
- Draw a vertical line down the center of the screen (v line).
- Set the screen as shown in the illustration.
- Stand the screen perpendicular to the ground.
- Align the v line on the screen with the center of the vehicle.
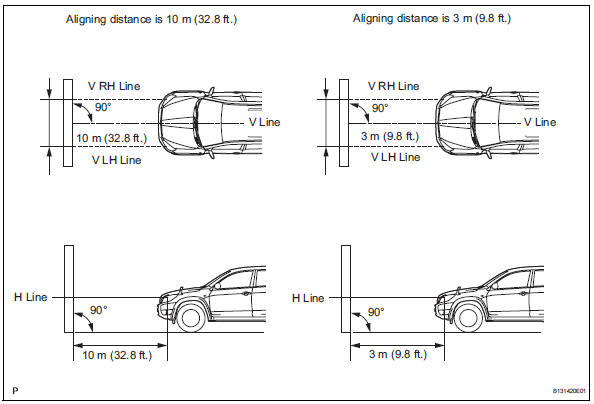

- Draw base lines (h line and v lh, v rh lines) on the screen as shown in the illustration.
- The base lines differ for ''lo beam inspection'' and ''hi beam inspection''.
- Mark the headlight bulb center marks on the screen. If the center mark cannot be observed on the headlight, use the center of the headlight bulb or the manufacturer's name marked on the headlight as the center mark.
H line (headlight height): draw a horizontal line across the screen so that it passes through the center marks. The h line should be at the same height as the headlight bulb center marks of the lo beam headlights.
V lh line, v rh line (center mark position of lh and rh headlights): draw 2 vertical lines so that they intersect the h line at each center mark.
- Inspect headlight aiming
- Choose a headlight to inspect first. Cover or disconnect the connector of the other headlight to prevent light from that headlight from affecting the headlight aiming inspection.
When checking the aim of the hi beam bulb, cover the lo beam bulb or disconnect the connector.
Notice:Do not keep the headlight covered for more than 3 minutes. The headlight lens is made of synthetic resin, and may easily melt or be damaged due to heat.
- Start the engine.
Engine speed must be 1,500 rpm or more.
- Turn on the headlights and make sure that the cutoff line is within the specified area shown in the illustration.
- Adjust headlight aiming
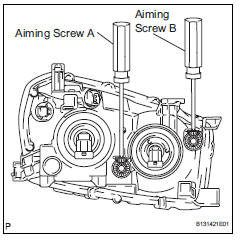
- Adjust the vertical headlight aim into the specified range by turning aiming screw a with a screwdriver.
- Perform lo beam aim adjustment.
- The headlight aim moves down when turning the aiming screw clockwise, and moves up when turning the aiming screw counterclockwise.
- Adjust the aim vertically by turning the vertical aiming screw and the horizontal aiming screw at a 5:4 ratio (5 turns of the vertical aiming screw for 4 turns of the horizontal aiming screw).
If the screw is tightened too much, loosen it and then retighten it so that the final turn of the screw is in the clockwise direction.
- Adjust the horizontal headlight aim into the specified range by turning aiming screw b with a screwdriver.
Perform lo beam aim adjustment.
Notice:If the screw is tightened too much, loosen it and then retighten it so that the final turn of the screw is in the clockwise direction.
Reassembly Hint:- Use the same procedures for the rh and lh sides.
- The procedures listed below are for the lh side
- Install front turn signal light bulb
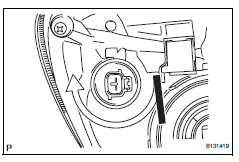
- Install the bulb to the socket.
- Insert the bulb/socket unit into the headlight.
- Turn the bulb/socket unit in the direction indicated by the arrow to install it.
- Install clearance light bulb
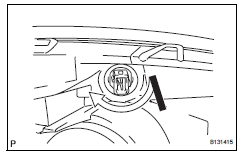
- Insert the bulb into the headlight.
- Turn the bulb in the direction indicated by the arrow to install it.
- Install no. 2 Headlight bulb

- Insert the bulb into the headlight.
- Turn the bulb in the direction indicated by the arrow to install it.
- Install no. 1 Headlight bulb
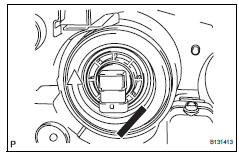
- Insert the bulb into the headlight.
- Turn the bulb in the direction indicated by the arrow to install it.
- Use the same procedures for the rh and lh sides.
- The procedures listed below are for the lh side.
- Install headlight assembly lh
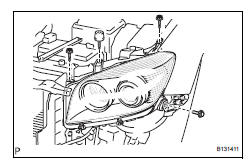
- Connect the connectors with the headlight.
- Install the 3 screws and bolt
- Install front bumper reinforcement subassembly upper
- Install the reinforcement with the 2 bolts.
- Connect the 2 horns connectors.
- Install front bumper cover (see page et-11)
- Install radiator support opening cover (see page et-12)
- Install front fender liner rh (see page et- 10)
- Install front fender liner lh (see page et- 12)
- Connect cable to negative battery terminal
- Adjust headlight aiming
- Adjust the headlight aiming (see page li-94 ).
Test yourself
A quick Toyota RAV4 quiz: every answer comes with an explanation and a link to the manual page.