2Az-fe engine mechanical
Removal
In this manual: 2Az-fe engine mechanical
88steps
~538min
5/5difficulty
2special tools
Done 0 of 88
- Discharge fuel system pressure (see page fu-9)
- Disconnect cable from negative battery terminal
- Remove hood sub-assembly (see page ed-4)
- Remove radiator support opening cover
- Remove battery clamp sub-assembly
- Loosen the bolt and nut, and remove the battery clamp.
- Remove battery
- Remove battery tray
- Remove front wheel
- Remove no. 1 Engine under cover
- Remove no. 2 Engine under cover
- Remove front fender apron rh
- Remove no. 1 Engine cover (see page em-22)
- Drain engine coolant (see page co-6)
- Drain automatic transaxle fluid
- Drain automatic transaxle fluid for u241e (2wd) (see page ax-146).
- Drain automatic transaxle fluid for u140f (4wd) (see page ax-147).
- Remove radiator assembly
- Remove the radiator (see page co-29).
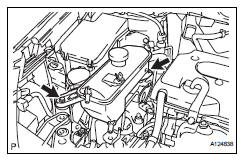
- Remove radiator reservoir
- Remove the 2 bolts and reservoir.
- Remove purge vsv (see page ec-15)
- Remove air cleaner cap (see page es-411)
- Remove air cleaner filter element subassembly
- Remove air cleaner case sub-assembly
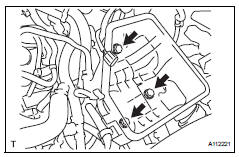
- Remove the 3 bolts from the air cleaner case.
- Disconnect the case from the no. 1 Air cleaner inlet.

- Remove front battery carrier
- Disconnect the 2 clamps of the engine wire.
- Remove the 4 bolts and front battery carrier.
- Remove battery bracket reinforcement
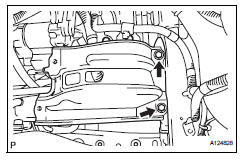
- Remove the 2 bolts and battery bracket reinforcement.
- Remove battery carrier bracket
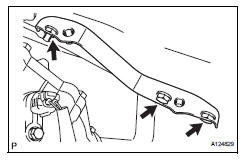
- Remove the 2 bolts, nut and battery carrier bracket.
- Disconnect union to connector tube hose
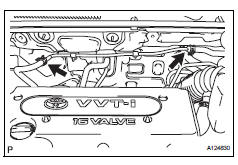
- Disconnect the 2 union to connector tube hoses from the booster vacuum tube.
- Disconnect heater water inlet hose

- Disconnect the heater water inlet hose from the heater unit.
- Disconnect heater water outlet hose
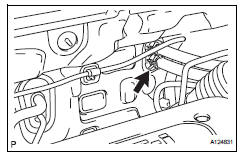
- Disconnect the heater water outlet hose from the heater unit.
- Disconnect fuel tube (see page fu-10)
- Remove throttle body (see page es-412)
- Disconnect no. 2 Ventilation hose (see page fu-10)
- Remove fuel delivery pipe sub-assembly (see page fu-10)
- Remove intake manifold (see page es-419)
- Remove intake manifold insulator (see page es-420)
- Remove transaxle control cable assembly
- Remove the transaxle control cable for u241e (2wd) (see page ax-129).
- Remove the transaxle control cable for u140f (4wd) (see page ax-129).
- Remove front suspension member reinforcement rh (see page em-6)
- Remove fan and generator v belt (see page em-6)
- Remove generator assembly (see page ch-9)
- Remove cooler compressor assembly
- Remove the cooler compressor (see page ac-216).
Disconnect the compressor together with the lowpressure and high-pressure hoses, then secure it to the vehicle side using rope.
- Remove ecm (see page es-429)
- Disconnect engine wire
- Remove the engine room relay block cover.
- Remove the nut and disconnect the 2 engine wire connectors.
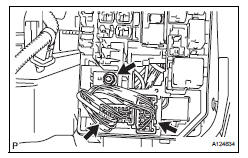
- Remove the bolt and engine wire cover. Then disconnect the engine wire from the engine wire cover.
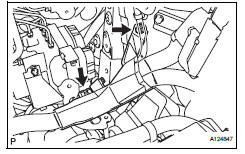
- Disconnect the ground cable connector.
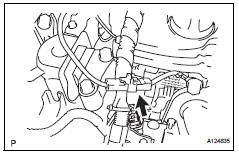
- Remove the nut from the positive (+) battery terminal to disconnect the engine wire.
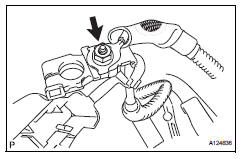
- Disconnect the ground cable from the clamp located near the starter.
- Remove the bolt and ground cable located near the starter.
- Remove front exhaust pipe assembly (see page ex-3)
- Remove front drive shaft assembly
- Remove the front drive shaft (for 2wd) (see page ds-7).
- Remove the front drive shaft (for 4wd) (see page ds-40).
- Remove propeller shaft assembly (for 4wd) (see page pr-3)
- Remove engine mounting insulator fr
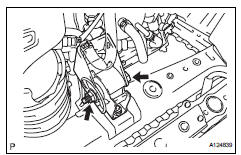
- Remove the through bolt and nut.
- Remove the 2 bolts and engine mounting insulator fr.
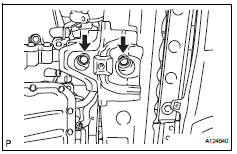
- Remove engine mounting insulator rr
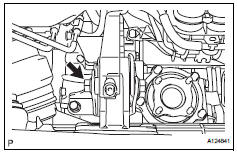
- Remove the through bolt.
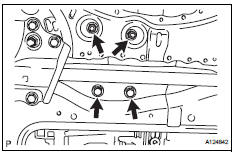
- Remove the 2 nuts, 2 bolts and engine mounting insulator rr.
- Remove engine assembly with transaxle

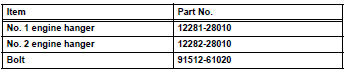
- Install the no. 1 And no. 2 Engine hangers with the bolts as shown in the illustration.
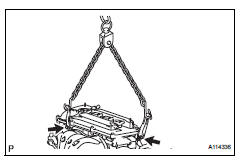
- Attach the sling device to the engine hangers and chain block.
- Carefully remove the engine with transaxle from the vehicle.
- Remove engine mounting insulator rh
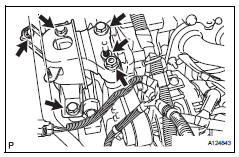
- Remove the 2 nuts, 4 bolts and engine mounting insulator rh.
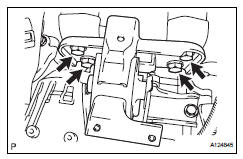
- Remove engine mounting insulator lh
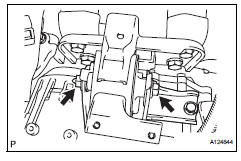
- Remove the through bolt and nut.
- Remove the 4 bolts and engine mounting insulator lh.
- Remove drive shaft bearing bracket (for 2wd)
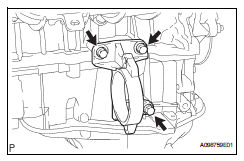
- Remove the 3 bolts and bracket.
- Remove drive shaft bearing bracket (for 4wd)
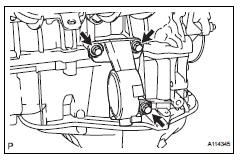
- Remove the 3 bolts and bracket.
- Remove transfer assembly (for 4wd) (see page tf-59)
- Remove starter assembly (see page st-7)
- Remove automatic transaxle assembly
- Remove the automatic transaxle for u241e (2wd) (see page ax-147).
- Remove the automatic transaxle for u140f (4wd) (see page ax-148).
- Remove torque converter clutch assembly
- Remove the torque converter clutch for u241e (2wd) (see page ax-148).
- remove the torque converter clutch for u140f (4wd) (see page ax-149)
- Remove drive plate sub-assembly
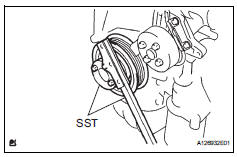
- Using sst, hold the crankshaft.
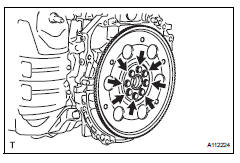
- Remove the 8 bolts, rear spacer, drive plate and front spacer.
Test yourself
A quick Toyota RAV4 quiz: every answer comes with an explanation and a link to the manual page.
Was this page helpful?