Caution:Wait at least 90 seconds after disconnecting the cable from the negative (-) battery terminal to prevent airbag and seat belt pretensioner activation.
Remove front wheel rh
Remove no. 1 Engine under cover
Remove front fender apron rh
Remove no. 1 Engine cover (see page em-22)
Remove ignition coil assembly (see page ig-9)
Remove spark plug
Remove the 4 spark plugs.
Remove cylinder head cover sub-assembly (see page em-24)
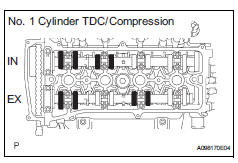
Set no. 1 Cylinder to tdc/compression (see page em-25)
Check valve clearance
Check only the valves indicated.
Using a feeler gauge, measure the clearance between the valve lifter and camshaft.
Standard valve clearance (cold)
Record any out-of-specification valve clearance measurements. They will be used later to determine the required replacement valve clearance lifters.
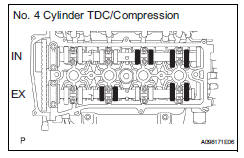
Turn the crankshaft 1 revolution (360°) and set the no. 4 Cylinder to the tdc/compression.
Check only the valves indicated.
Using a feeler gauge, measure the clearance between the valve lifter and camshaft.
Standard valve clearance (cold)
Record any out-of-specification valve clearance measurements. They will be used later to determine the required replacement valve lifters.
Adjust valve clearance
Remove the no. 2 Camshaft (see page em-60).
Remove the camshaft (see page em-61).
Remove the valve lifters.
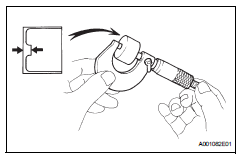
Using a micrometer, measure the thickness of the removed valve lifters.
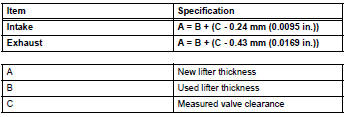
Calculate the thickness of a new lifter so that the valve clearance comes within the specified values.
New lifter thickness Calculation example (intake):
Measured intake valve clearance = 0.40 Mm (0.0158 In.) (Measured - specification = excess clearance) (a)0.40 Mm (0.0158 In.) - 0.24 Mm (0.0095 In.) = 0.16 Mm (0.0063 In.)
Measured used lifter thickness = 5.250 Mm (0.2067 In.)
New lifter thickness = 5.410 Mm (0.2130 In.) (Excess clearance + used lifter thickness = ideal new lifter) (a)0.16 Mm (0.0063 In.) + 5.250 Mm (0.2067 In.) = 5.410 Mm (0.2130 In.)
Closest new lifter = 5.420 Mm (0.2134 In.) – Select no. 42 Lifter
Select a new lifter with a thickness as close as possible to the calculated values.
Hint:
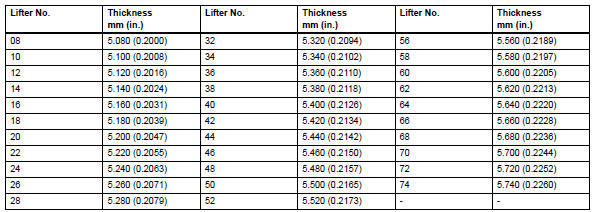
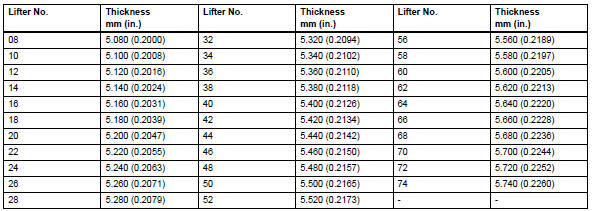
Lifters are available in 35 sizes in increments of 0.020 Mm (0.0008 In.), From 5.060 To 5.740 Mm (0.1992 To 0.2260 In.
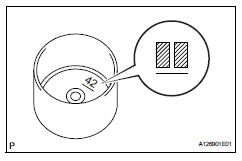
The identification number inside the valve lifters shows the value to 2 decimal places. (The illustration shows 5.420 Mm (0.2134 In.)
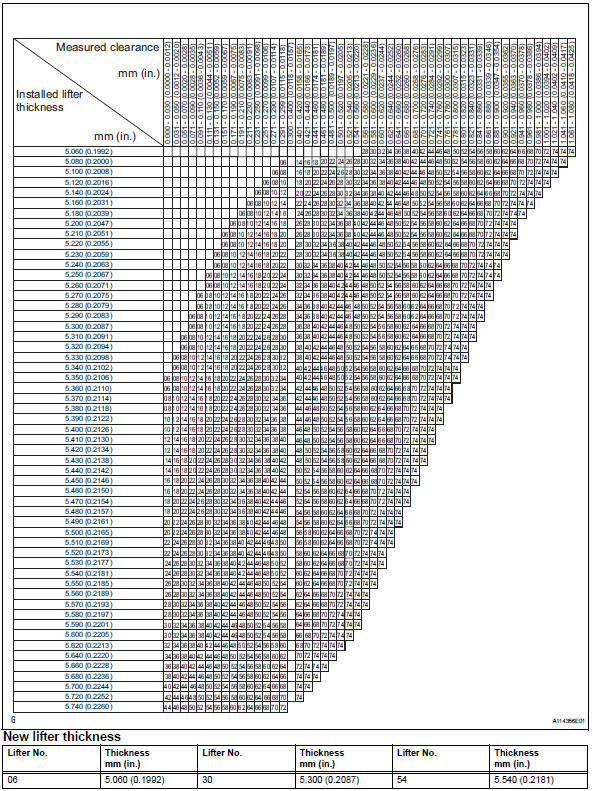
Valve lifter selection chart (intake).
Standard intake valve clearance (cold): 0.19 To 0.29 Mm (0.0075 To 0.0114 In.)Example:
The 5.250 Mm (0.2067 In.) Lifter is installed, and the measured clearance is 0.400 Mm (0.0157 In.).
Replace the 5.250 Mm (0.2067 In.) Lifter with a new no. 42 Lifter.
Valve lifter selection chart (exhaust).
Standard exhaust valve clearance (cold): 0.38 To 0.48 Mm (0.0150 To 0.0189 In.)Example:
The 5.340 Mm (0.2102 In.) Lifter is installed, and the measured clearance is 0.430 Mm (0.0169 In.).
Replace the 5.340 Mm (0.2102 In.) Lifter with a new no. 42 Lifter.
Install the selected valve lifter.
Install camshaft
Apply a light coat of engine oil to the journal portion of the camshaft.
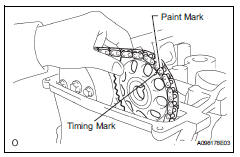
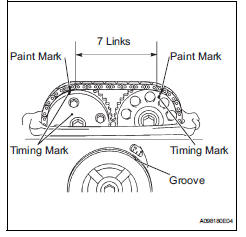
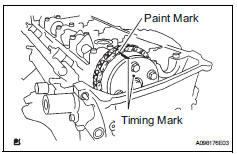
Install the timing chain onto the camshaft timing gear with the paint mark aligned with the timing mark in the camshaft timing gear as shown in the illustration.
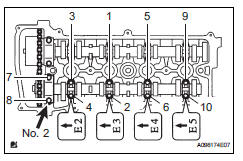
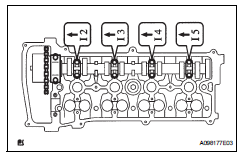
Examine the front marks and numbers, and check that the order is as shown in the illustration. Then install the bearing caps into the cylinder head.
Apply a light coat of engine oil on the threads and under the heads of the bearing cap bolts.
Using several steps, uniformly tighten the 10 bearing cap bolts in the sequence shown in the illustration.
Torque: 29.5 N*m (301 kgf*cm, 22 ft.*Lbf) for no.
1 Bearing cap 9.0 N*m (92 kgf*cm, 80 in.*Lbf) for no. 3 Bearing cap
Install no. 2 Camshaft
Apply a light coat of engine oil to the journal portion of the no. 2 Camshaft.
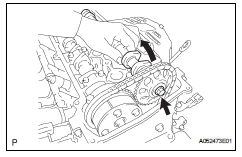
Put the no. 2 Camshaft on the cylinder head with the paint mark of the chain aligned with the timing mark on the camshaft timing sprocket.
While holding the no. 2 Camshaft by hand, temporarily tighten the camshaft timing sprocket set bolt.
Examine the front marks and numbers, and check that the order is as shown in the illustration. Then install the bearing caps onto the cylinder head.
Apply a light coat of engine oil to the threads and under the heads of the bearing cap bolts.
Using several steps, uniformly tighten the 10 bearing cap bolts in the sequence shown in the illustration.
Torque: 29.5 N*m (301 kgf*cm, 22 ft.*Lbf) for no.
2 Bearing cap 9.0 N*m (92 kgf*cm, 80 in.*Lbf) for no. 3 Bearing cap
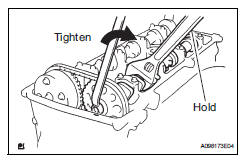
While holding the camshaft with a wrench, tighten the camshaft timing sprocket set bolt.
Torque: 54 n*m (551 kgf*cm, 40 ft.*Lbf)Notice:
Be careful not to damage the valve lifter.
Check that the paint marks on the chain are aligned with the timing marks on the camshaft timing gear and camshaft timing sprocket. Also, check that the crankshaft pulley groove is aligned with the timing mark "0" of the timing chain cover.
Install no. 1 Chain tensioner
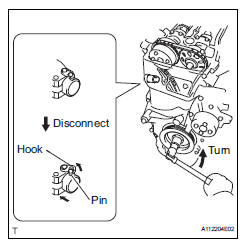
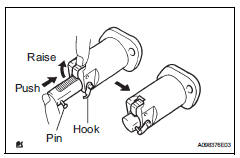
Release the ratchet pawl, then fully push in the plunger and hook the hook to the pin so that the plunger is in the position shown in the illustration.
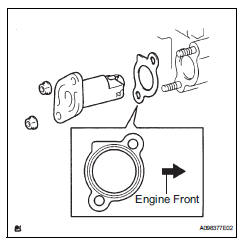
Install a new gasket and the chain tensioner with the 2 nuts
Torque: 9.0 N*m (92 kgf*cm, 80 in.*Lbf)Notice:
When installing the chain tensioner, set the hook again if the hook releases the plunger.
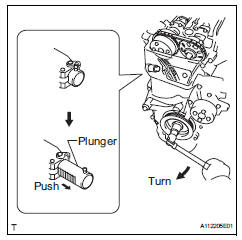
Turn the crankshaft counterclockwise, then disconnect the plunger knock pin from the hook.
Turn the crankshaft clockwise, then check that the plunger is extended.
Install cylinder head cover sub-assembly (see page em-40)
Install spark plug
Install the 4 spark plugs.
Torque: 25 n*m (255 kgf*cm, 18 ft.*Lbf)
Install ignition coil assembly (see page ig-9)
Connect cable to negative battery terminal
Check for engine oil leaks
Install no. 1 Engine cover (see page em-43)
Install front fender apron rh
Install no. 1 Engine under cover
Install front wheel rh
?
Test yourself
A quick Toyota RAV4 quiz: every answer comes with an explanation and a link to the manual page.