Installation
1. TEMPORARILY TIGHTEN COMPRESSOR AND MAGNETIC CLUTCH
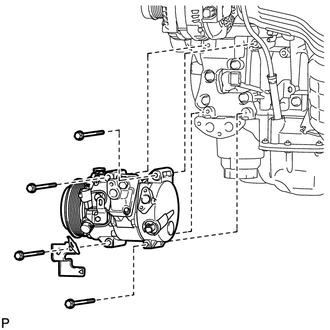
(a) Temporarily install the compressor and magnetic clutch and bracket with the 4 bolts. |
 |
2. INSTALL COMPRESSOR AND MAGNETIC CLUTCH
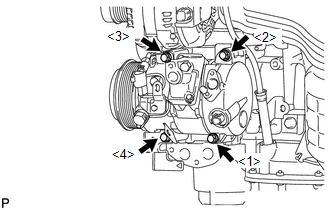
(a) Install the compressor and magnetic clutch and bracket with the 4 bolts. Torque: 25 N·m {255 kgf·cm, 18 ft·lbf} NOTICE: Tighten the bolts in the order shown in the illustration to install the compressor and magnetic clutch. |
 |
(b) Engage each clamp. |
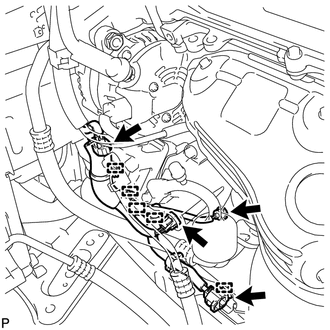 |
(c) Connect each connector.
3. CONNECT SUCTION HOSE SUB-ASSEMBLY
(a) Remove the attached vinyl tape from the hose.
(b) Apply sufficient compressor oil to a new O-ring and the fitting surface of the compressor and magnetic clutch.
Compressor oil:
ND-OIL 8 or equivalent
(c) Install the O-ring onto the suction hose sub-assembly.
NOTICE:
Keep the O-ring and O-ring fitting surfaces free from dirt or any foreign objects.
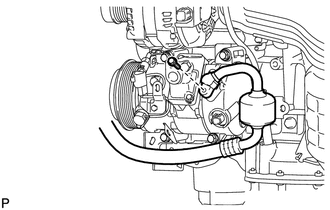
(d) Install the suction hose sub-assembly onto the compressor and magnetic clutch with the bolt. Torque: 9,8 N·m {100 kgf·cm, 87 in·lbf} |
 |
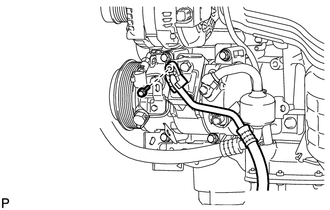
4. CONNECT COOLER REFRIGERANT DISCHARGE HOSE
(a) Remove the attached vinyl tape from the hose.
(b) Apply sufficient compressor oil to a new O-ring and the fitting surface of the compressor and magnetic clutch.
Compressor oil:
ND-OIL 8 or equivalent
(c) Install the O-ring onto the discharge hose.
NOTICE:
Keep the O-ring and O-ring fitting surfaces free from dirt or any foreign objects.
(d) Install the cooler refrigerant discharge hose onto the compressor and magnetic clutch with the bolt. Torque: 9,8 N·m {100 kgf·cm, 87 in·lbf} |
 |
5. INSTALL RADIATOR ASSEMBLY AND FAN ASSEMBLY WITH MOTOR

6. INSTALL COOLER CONDENSER ASSEMBLY
7. CONNECT AIR CONDITIONING TUBE AND ACCESSORY ASSEMBLY
8. CONNECT COOLER REFRIGERANT DISCHARGE HOSE
9. INSTALL UPPER RADIATOR SUPPORT
10. CONNECT OUTLET OIL COOLER HOSE
11. CONNECT INLET OIL COOLER HOSE
12. INSTALL NO. 2 RADIATOR HOSE
13. CONNECT NO. 1 RADIATOR HOSE
14. CONNECT OUTLET RESERVE TANK HOSE
15. INSTALL HOOD LOCK SUPPORT SUB-ASSEMBLY
16. INSTALL HOOD LOCK ASSEMBLY (w/o Engine Hood Courtesy Switch)
17. INSTALL HOOD LOCK ASSEMBLY (w/ Engine Hood Courtesy Switch)
18. INSTALL LOW PITCHED HORN ASSEMBLY
19. INSTALL HIGH PITCHED HORN ASSEMBLY
20. INSTALL INLET NO. 1 AIR CLEANER
21. INSTALL BATTERY
22. INSTALL AIR CLEANER CASE
23. INSTALL AIR CLEANER CAP WITH HOSE
24. INSTALL INLET NO. 2 AIR CLEANER
25. INSTALL RADIATOR GRILLE
26. INSTALL V-RIBBED BELT
27. INSTALL FRONT FENDER APRON RH
28. INSTALL FRONT FENDER LINER RH
29. INSTALL FRONT WHEEL RH
30. ADD ENGINE COOLANT
31. ADD AUTOMATIC TRANSAXLE FLUID
for U660F: (See page )
for U660E: (See page )
32. CONNECT CABLE TO NEGATIVE BATTERY TERMINAL
NOTICE:
When disconnecting the cable, some systems need to be initialized after the cable is reconnected (See page ).
33. CHARGE WITH REFRIGERANT
34. WARM UP ENGINE
35. INSPECT FOR REFRIGERANT LEAK
36. INSPECT FOR COOLANT LEAK
37. INSTALL V-BANK COVER SUB-ASSEMBLY
38. INSTALL COOL AIR INTAKE DUCT SEAL
39. INSTALL NO. 2 ENGINE UNDER COVER
40. INSTALL NO. 1 ENGINE UNDER COVER
41. INSPECT HOOD SUB-ASSEMBLY
42. ADJUST HOOD SUB-ASSEMBLY
Test yourself
A quick Toyota Venza quiz: every answer comes with an explanation and a link to the manual page.