Transmission Type 020
PROCEDURE
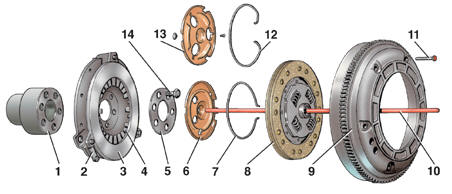
Clutch (transmission type 020) 1 – crankshaft flange; 2 – pressure plate cover; 3 – pressure plate; 4 – diaphragm spring; 5 – washer; 6 – clutch release plate; 7 – retaining spring (clutch diameter 190 mm); 8 – driven disc; 9 – flywheel; 10 – pushrod; 11 – bolt; 12 – retaining spring (clutch diameter 200/210 mm); 13 – clutch release plate (clutch diameter 200/210 mm); 14 – bolt
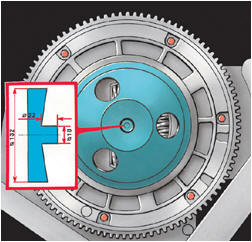
Clutch Driven Disc Centering Tool (transmission type 020)
Removal PROCEDURE 1. Remove the transmission (see subsection 5.1). 2. Mark the position of pressure plate cover 2 relative to flywheel 9. 3. Lock flywheel 9. Caution To prevent cover distortion, loosen the bolts diagonally, turning each bolt only one turn at a time. 4. Loosen flywheel mounting bolts 11 and remove them evenly. 5. Remove flywheel 9 and driven disc 8. 6. Mark the position of retaining spring 7 and clutch release plate 6 to ensure correct installation. 7. Pry retaining spring 7 up with a screwdriver and remove clutch release plate 6. 8. Unscrew bolts 14 securing pressure plate cover 2. The bolts are secured with threadlocker and are very tight. 9. Remove pressure plate cover 2 with washer 5. Assembly Caution Before installing a new pressure plate cover, remove the anti-corrosion coating from the pressure plate friction surface. Do not remove grease from other areas.
PROCEDURE 1. Check the condition of the clutch (see subsection 4.2.1). 2. Install pressure plate cover 2 with washer 5 and fit new bolts 14 (coated with Loctite 270 or Omnifit 150 type M), tightening evenly in a diagonal sequence to 75 N·m for bolts without a collar and to 100 N·m for bolts with a collar. 3. Install clutch release plate 6 with retaining spring 7, ensuring correct orientation. 4. Apply lithium grease to the seat of clutch release plate 6 for pushrod 10 and to the tip of pushrod 10. 5. Apply a thin layer of Moly paste or graphite grease to the splines of driven disc 8 hub. 6. Slide driven disc 8 onto the transmission input shaft splines and move it carefully back and forth. 7. Remove excess grease by taking driven disc 8 off the input shaft. 8. Install driven disc 8 and flywheel 9 aligned with the dowels and the marks made earlier, and hand-tighten bolts 11 (do not fully tighten). 9. Center driven disc 8 using the centering tool (see illustration Clutch Driven Disc Centering Tool (transmission type 020)). 10. Tighten bolts 11 (see illustration Clutch (transmission type 020)) evenly in a diagonal sequence to 20 N·m. 11. Install the transmission (see subsection 5.1).
Test yourself
A quick Volkswagen Golf quiz: every answer comes with an explanation and a link to the manual page.