Exterior mirror
Extra equipment Volkswagen R GmbH
Assembly overview - Exterior mirror
Assembly overview - Exterior mirror, electrically adjustable

Note
The illustration shows the left side. The right side is performed in the same way.
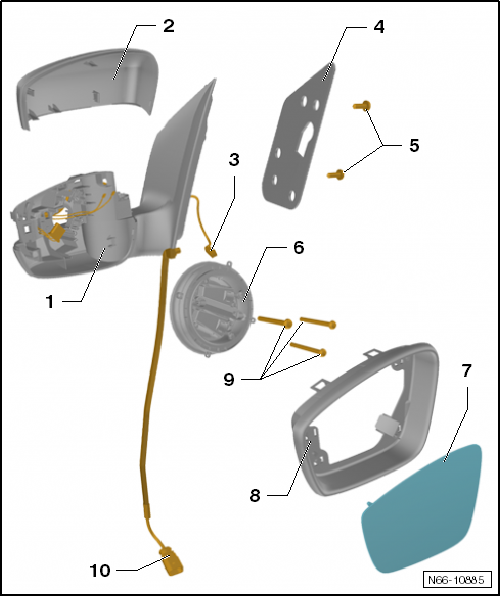
- Mirror base plate
- Remove and install
- Mirror housing
- Material: ABS
- for vehicles Volkswagen R GmbH mirror housing chrome gloss
- Remove and install
- Electrical wire with plug connector
- optional for LED interior monitoring
- Damping
- Bolt
- 2 pieces
- Tightening torque: 12 N·m
- Adjustment unit
- Remove and install
- Mirror glass
- Remove and install
- Trim panel
- Remove and install
- Bolt
- 3 pcs.
- Tightening torque: 2 N·m
- Electrical wire with plug connector
- optional for LED interior monitoring
Assembly overview - Exterior mirror, manually adjustable

Note
The illustration shows the left side. The right side is performed in the same way.
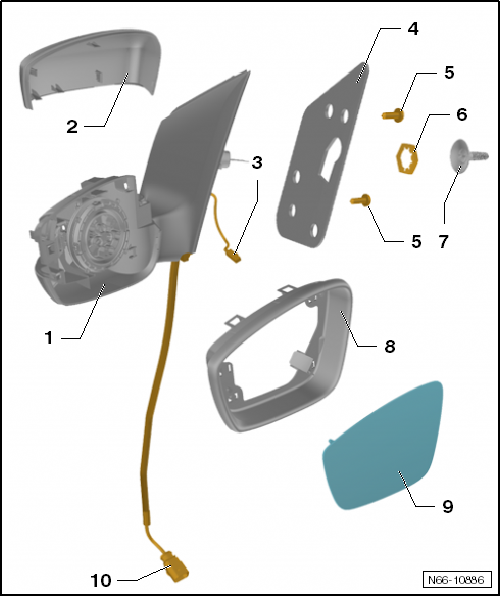
- Mirror base plate
- Remove and install
- Mirror housing
- Material: ABS
- Remove and install
- Electrical wire with plug connector
- optional for LED interior monitoring
- Damping
- Bolt
- 2 pieces
- Tightening torque: 12 N·m
- Hex nut
- Tightening torque: 2 N·m
- Actuating button
- Trim panel
- Remove and install
- Mirror glass
- Remove and install
- Electrical wire with plug connector
- optional for LED interior monitoring
Remove and install mirror glass
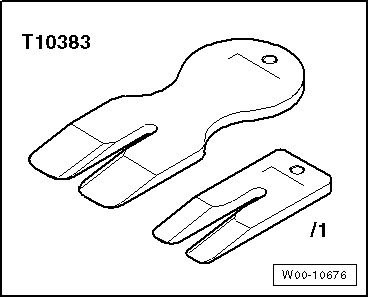
Required Special Tools, Test and Measuring Equipment and Auxiliary Items
- Wedges -T10383-

Note
Removal and installation is only performed for the right mirror glass. The left side is performed analogously.
Removing
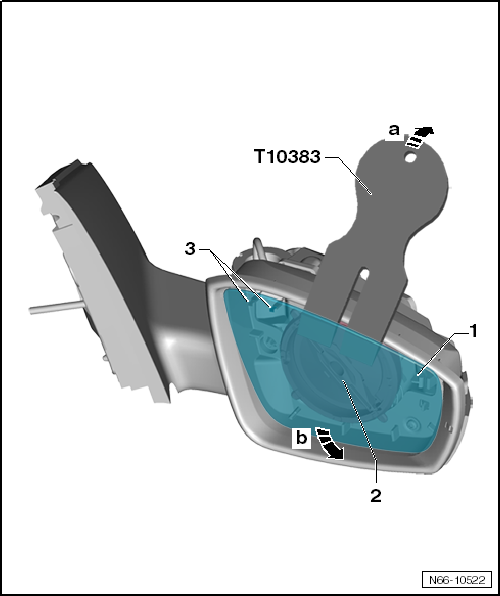
Carry out the following work:

WARNING!
Wear safety glasses and protective gloves when working!
- Protect housing edge -2- from paint damage, e.g. by masking with textile-reinforced adhesive tape.
- Press mirror glass -1- into mirror housing at the bottom.
- Press mirror glass -1- off adjustment unit -2- with wedge -T10383- -arrow a-.
- Swing mirror glass -1- to the side -arrow b- and disconnect existing plug contacts -3- for electric mirror heating on the back of mirror glass -1-.
Installing
Carry out the following work:
- Press existing plug contacts onto mirror glass.
- Press the mirror glass onto the adjustment unit in the housing, centred.
The mirror glass audibly engages.
- Carry out a function check.
Remove and install mirror housing
Remove and install mirror housing

Note
- Removal and installation applies only to the right mirror housing. The left side is carried out in the same way.
- The mirror housing cannot be removed without damage in all cases.
Removing
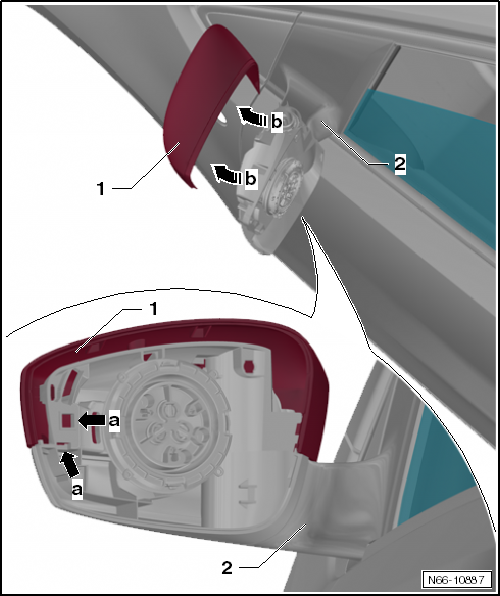
Carry out the following work:
- Remove mirror glass.
- Remove trim panel.
- Release the snap hooks -arrows a-.
- Then pull the mirror housing -1- off the mirror base -2- forwards in -direction of arrow b-.
- The remaining snap hooks release in the process.
Installing
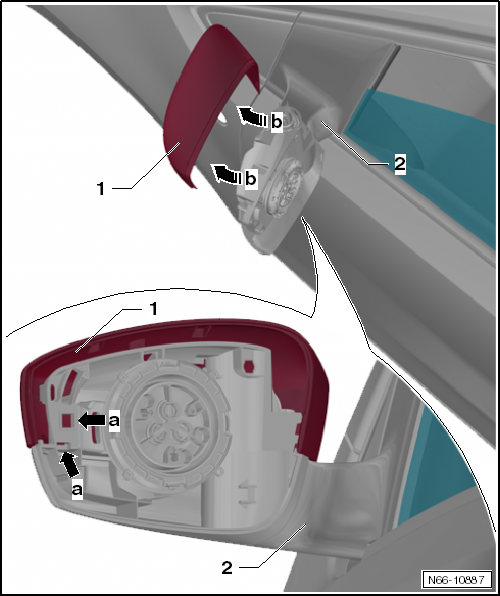
Carry out the following work:
- Place the mirror housing -1- on and press until the snap hooks audibly engage.
- Then carry out a function check.
- Install cover.
- Install mirror glass.
Remove and install cover

Note
- Removal and installation applies only to the right cover. The left side is carried out in the same way.
- The cover cannot be removed without damage in all cases.
Removing
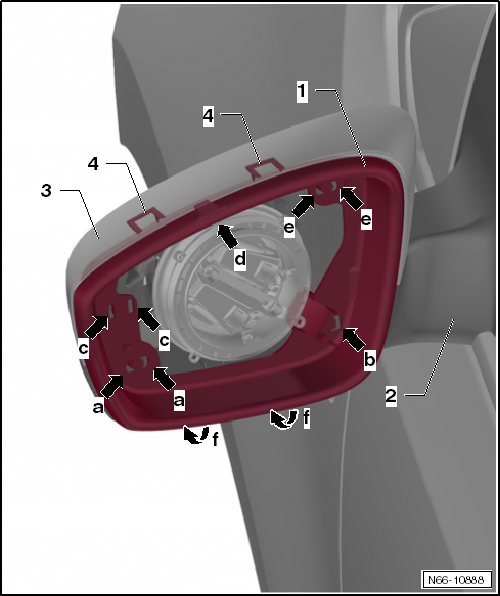
Carry out the following work:
- Remove mirror glass.
- Release the snap hooks -arrows a- and -arrows b-.
- Tilt the cover slightly upwards -arrows f-, so that the snap hooks stay released.
- Release the snap hooks -arrows c, d- and -arrows e-.
- Tilt the cover -1- further upwards -arrows f-.
- The cover comes out of the latches -4-.
Installing
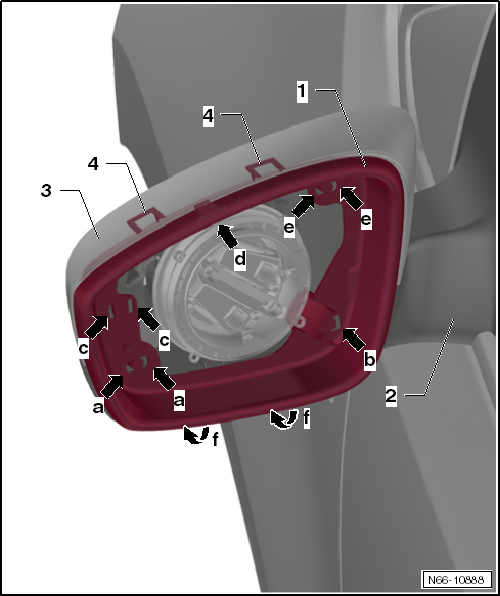
Carry out the following work:
- Press the cover -1- into all latches until they audibly engage.
- Then carry out a function check.
- Install mirror glass.
Remove and install mirror adjustment unit
Required Special Tools, Test and Measuring Equipment and Auxiliary Items
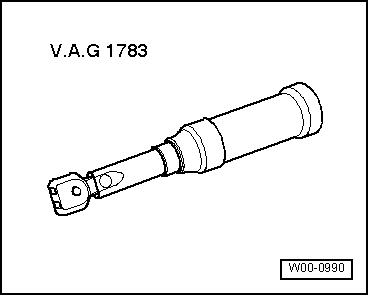
- Torque wrench -V.A.G 1783-

Note
Removal and installation applies only to the right adjustment unit with motor. The left side is carried out in the same way.
Removing
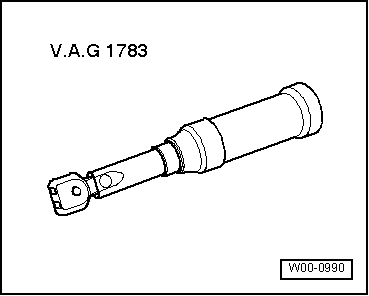
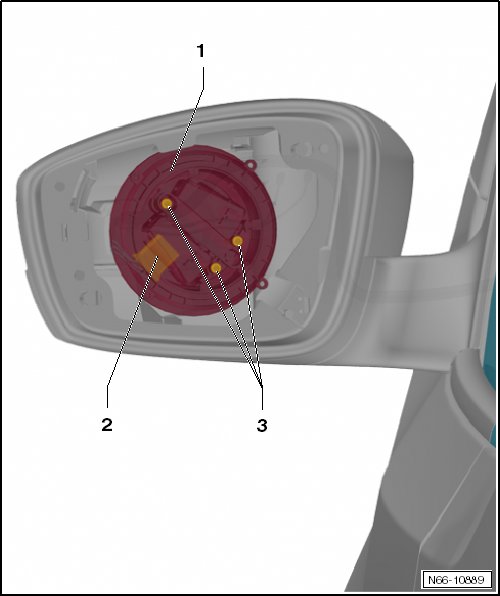
Carry out the following work:
- Remove mirror glass.
- Unscrew bolts -3- (3 pcs.) and remove adjustment unit -1- from the mirror base.
- Swing the adjustment unit with motor -1- to the side and disconnect connector -2-.
Installing
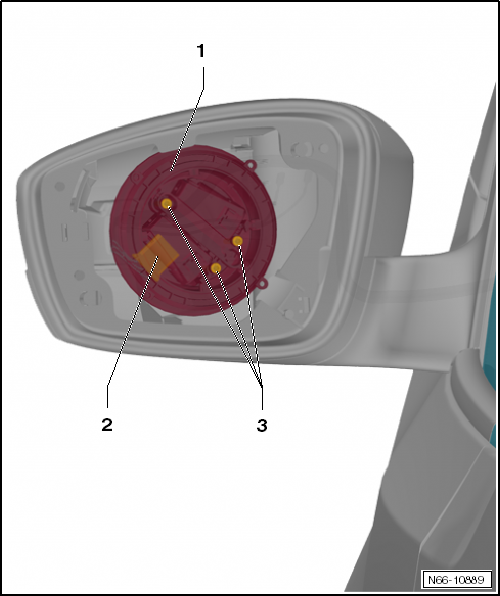
Carry out the following work:
- Plug connector -2- onto the adjustment unit -1-.
- Place adjustment unit -1- on the mirror base and secure with bolts -3- (3 pcs.).
Tightening torque bolts -2-: 2 N·m.
- Install mirror glass.
- Carry out a function check.
Remove and install exterior mirror
Remove and install exterior mirror with power adjustment
Required Special Tools, Test and Measuring Equipment and Auxiliary Items
- Torque wrench -V.A.G 1783-

Note
Removal and installation applies only to the right exterior mirror. The left side is carried out in the same way.
Removing
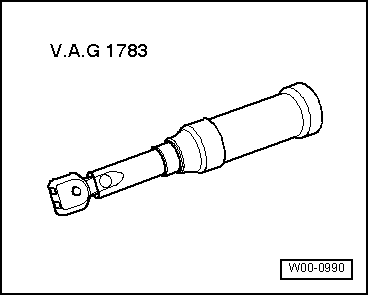
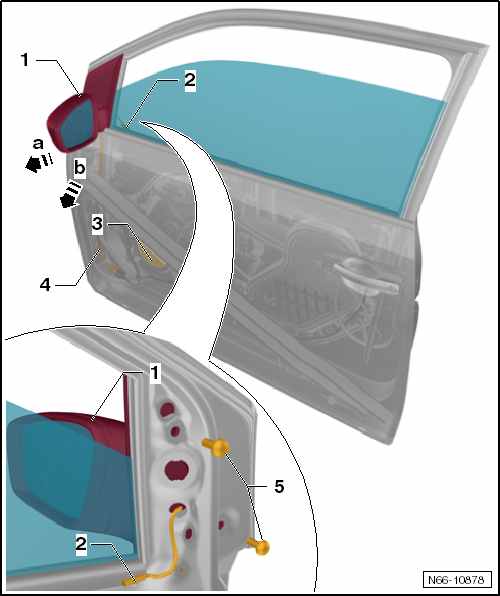
Carry out the following work:
- If equipped, remove window crank.
- Remove the front door trim panel → Body assembly work, interior.
- Remove front cover or speaker -3- → Communication.
- Disconnect connectors -2 and 4- for exterior mirror -1-.
- Unscrew bolts -5- for exterior mirror -1-.
- Swing exterior mirror -1- slightly away from the door in the lower area -arrow a- and pull it downwards out of the window guide -arrow b-.
- Guide the wiring through the opening in the door and remove exterior mirror -1-.
Installing
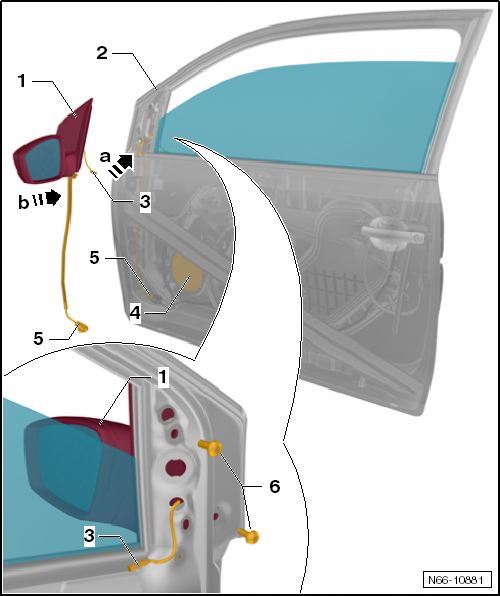
Carry out the following work:
- Check that the foam part -3- is correctly seated in the door.
- Guide wiring -3 and 5- for exterior mirror -1- through the opening in the door.
- Slide exterior mirror -1- from below into the window guide -2- -arrow a- and fold it against the door in the lower area -arrow b-.
- Screw in bolts -6- for exterior mirror -1- and tighten.
Tightening torque bolt -6-: 12 N·m.
- Connect connectors -3 and 5- for exterior mirror -1-.
- Install front cover or speaker -3- → Communication.
- Install front door trim → Body assembly work interior.
Remove and install exterior mirror with manual adjustment
Required Special Tools, Test and Measuring Equipment and Auxiliary Items
- Torque wrench -V.A.G 1783-

Note
Removal and installation applies only to the right exterior mirror. The left side is carried out in the same way.
Removing
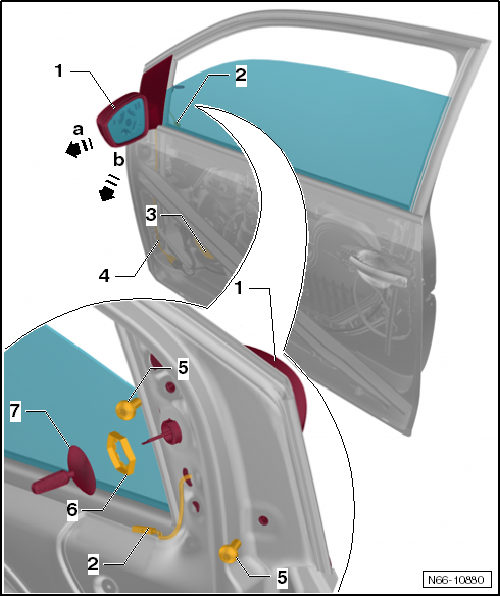
Carry out the following work:
- If equipped, remove window crank.
- Remove the front door trim panel → Body assembly work, interior.
- Remove front cover or speaker → Communication.
- Disconnect connector -3- for exterior mirror -1-.
- Pull off operating knob -7-.
- Unscrew hex nut -6-.
- Unscrew bolts -5- for exterior mirror -1-.
- Swing exterior mirror -1- slightly away from the door in the lower area -arrow a- and pull it downwards out of the window guide -arrow b-.
- If fitted, guide wiring -2 and 4- through the opening in the door.
Installing
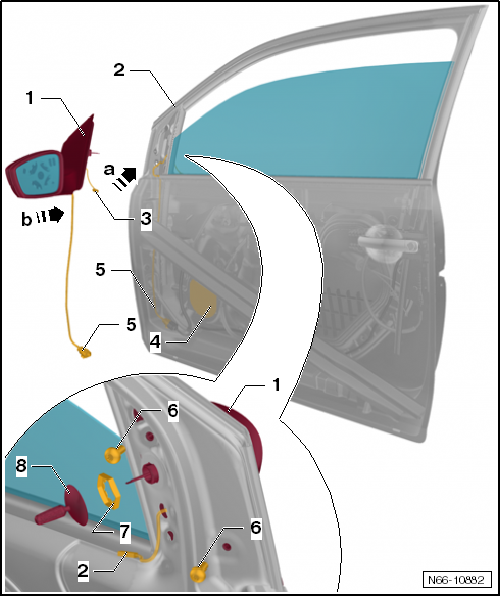
Carry out the following work:
- Check that the foam part in the door is correctly seated.
- Guide wiring -3 and 5- for exterior mirror -1- through the opening in the door.
- Slide exterior mirror -1- from below into the window guide -2- -arrow a- and fold it against the door in the lower area -arrow b-.
- Tighten bolts -5- for exterior mirror -1-.
Tightening torque bolt -5-: 12 N·m.
- Tighten hex nut -7- for exterior mirror -1-.
Tightening torque hex nut -7-: 1.5 N·m.
- If fitted, connect connectors -2 and 4- for exterior mirror -1-.
- Push on operating knob -8-.
- Install front door trim → Body assembly work interior.
- Install front cover or speaker -4- → Communication.