Wheel arch liner
Assembly overview - Wheel arch liner
Assembly overview - Front wheel arch liner

Note
- Depending on the model variant, minor differences must be taken into account for the front wheel arch liner.
- The illustration shows the left side. The right side is handled in the same way.

- Front wheel arch liner
- Material PP/EPDM
- Remove and install
- Bolt
- 11 pcs. per side
- Tightening torque: 2 N·m
- Expansion clip
- 1 piece per side
- Expansion nuts
- 9 pcs. per side
Assembly overview - Rear wheel arch liner
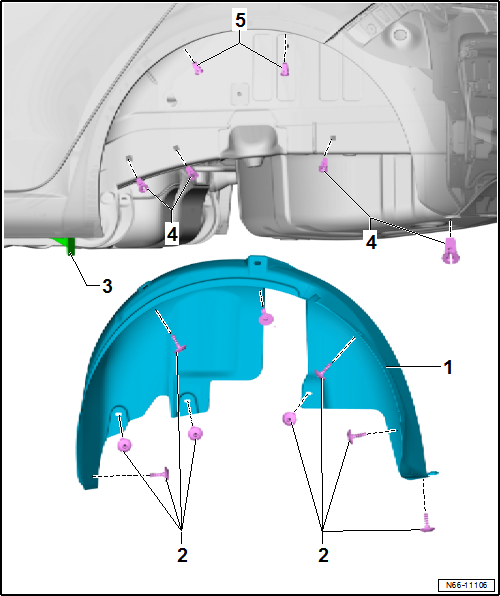
- Rear wheel arch liner
- Only fitted on certain models.
- Material PP/EPDM
- Remove and install
- Bolt
- 9 pcs. per side
- Tightening torque: 2 N·m
- Sill cover
- Expansion nuts
- 4 pcs per side
- Expansion nuts
- gas-tight
- 2 pieces per side

DANGER!
Check the gas-tight expansion nuts for damage and replace them if necessary.
The expansion nuts seal the interior against exhaust gases. They must be replaced if damaged.
Remove and install front wheel arch liner
Required Special Tools, Test and Measuring Equipment and Auxiliary Items
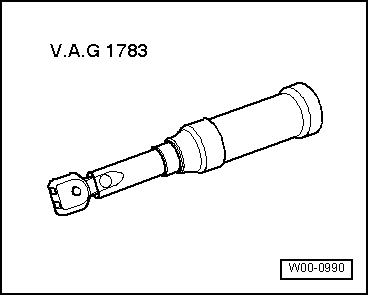
- Torque wrench -V.A.G 1783-

Note
- Removal and installation applies only to the left front wheel arch liner. The right side is carried out in the same way.
- Depending on the model variant, minor differences must be taken into account during removal and installation.
Removing

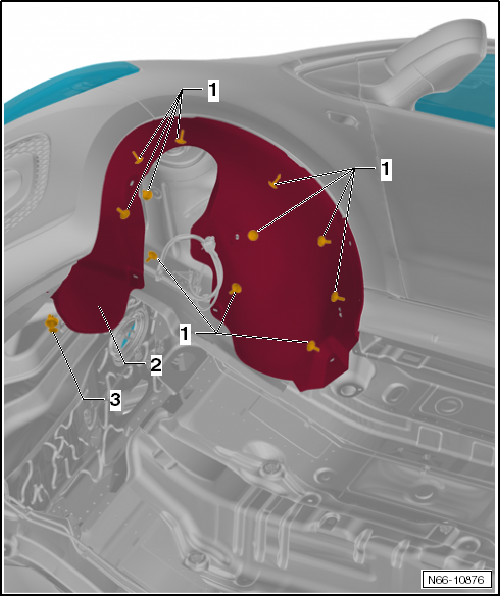
Carry out the following work:
- Remove wheel → Chassis, Axles, Steering.
- Pull out expanding rivet -3-.
- Unscrew bolts -1-.
- Pull wheel arch liner -2- out of front fender.
Installing
Carry out the following work:

Note
Check expanding nuts for damage and replace if necessary.
- Slide front wheel arch liner -1- into front fender.
- Align front wheel arch liner -1- with front bumper cover.
- Insert expanding rivet -3-.
- Fit all bolts and tighten them in the sequence described below.
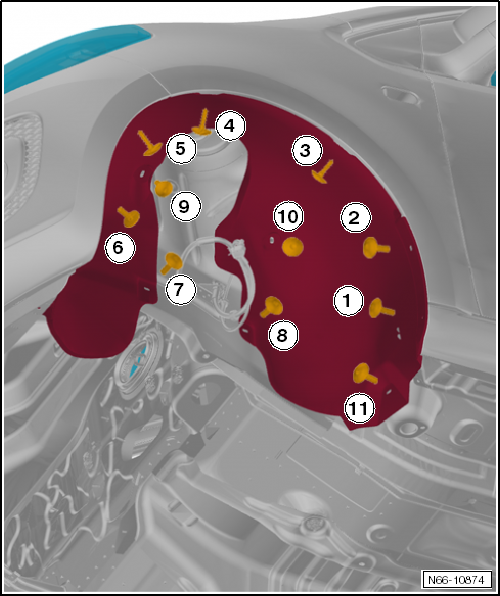
Tightening sequence
- Tighten wheel arch liner in the specified sequence from -1- to -11-, tightening torque: 2 N·m.
- Install wheel → Chassis, Axles, Steering.
Removing and installing rear wheel arch liner
Removing and installing rear wheel arch liner
Required Special Tools, Test and Measuring Equipment and Auxiliary Items
- Torque wrench -V.A.G 1783-


Note
- Removal and installation is described only for the left rear wheel arch liner. The right side is performed analogously.
- Depending on the model variant, minor differences must be taken into account during removal and installation.

Removing
- Remove wheel → Chassis, Axles, Steering.
- Unscrew bolts -2-.
- Pull rear wheel arch liner -1- out of wheel housing.
Removing and installing sill cover
Installing

DANGER!
Check gas-tight expanding nuts -5- for damage and replace if necessary.
The expanding nuts seal the interior against exhaust gases and must be replaced if damaged.
- Insert rear wheel arch liner -1- into wheel housing without kinking.
- Install wheel → Chassis, Axles, Steering.
Tightening torques
- Bolts "Assembly overview - rear wheel arch liner".
Removing and installing sill cover

Note
The illustration shows the left side. The right side is handled in the same way.
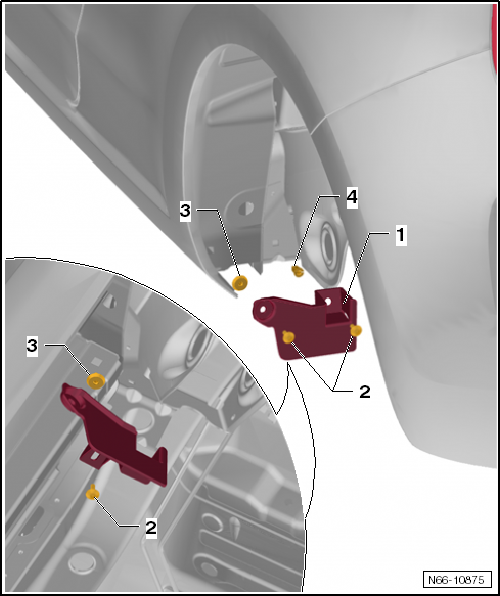
Carry out the following work:
Removing
- Unscrew bolts -2-.
- Remove sill cover -1- downward.
Installing

DANGER!
Check the 2 gas-tight expanding nuts -3- for damage and replace them if necessary.
The expansion nuts seal the interior against exhaust gases. They must be replaced if damaged.

Note
Check expanding nut -4- for damage and replace if necessary.
- Position sill cover.
- Tighten bolts -2-, tightening torque: 2 N·m.