Side windows
Installation overview - Rear side windows

- Side window
- Remove side window
- Retaining clip
- 2 pieces
- Are cut through with the cutting wire during removal.
- Gasket
- Is part of the side window.
- PUR sealing adhesive
- Bead cross-section: Height = 10 mm -Dimension a- Width = 6.5 mm -Dimension b- (including primer, residual material on glass and window flange)
- Minimum curing time
Removing and installing rear side window

Note
Removal of bonded windows is described with the bonded window cutting device -V.A.G 1474 A-. The corresponding tools from the bonded window cutting device -VAS 6452- can also be used.
Required special tools, testers and equipment, and auxiliary items
- Bonded window cutting device -V.A.G 1474 A- or bonded window cutting device -VAS 6452-
- Suction cup lifter -V.A.G 1344-
- Cutting tool -V.A.G 1351-
- Windshield removal set -V.A.G 1755-
- Hand pressure gun -V.A.G 1628-
- Cartridge heater -V.A.G 1939-
Remove undamaged window

Note
Removal and installation are described only for the left side window. Removal and installation of the right side window are performed analogously.

- Remove side trim: → Body installation work, interior.
Protect surrounding components from damage.
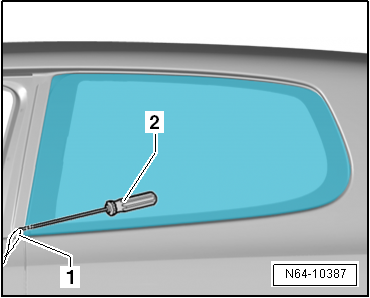
- Pull cutting wire -1- through the adhesive sealant at the point shown in the illustration using the awl -V.A.G 1474/2-.
- Press the seal aside so it is not damaged.
- Insert cutting wire -3- behind the seal into the window flange using tube -1-.

- Secure one wire end -3- to the pull handle -V.A.G 1351/1--2- to hold it in place.
- Also pull the other wire end -2- through the adhesive sealant.
- Attach the other wire end to the winding device -V.A.G 1654 A--3-.
- Cut the pane free by repositioning winder -V.A.G 1654 A--3- accordingly.
- While cutting free, press the cutting wire against the pane with the plastic wedge to create clearance at the pane flange.

- Winder -V.A.G 1654 A--3- can be used instead of winder -V.A.G 1654--3-.
- As shown in the illustration, a suction cup can be removed from winder -V.A.G 1654--3-. This allows the roller of winder -V.A.G 1654 A--3- to be guided closer to the pane flange.
Installing
Prepare undamaged rear window for glazing.
Prepare new windshield for glazing.
Prepare body flange for glazing.
Installation notes.
Minimum curing time.

Removing a damaged side window
Removing a damaged side window is carried out in the same way as removing a damaged rear window.