Window Guide and Trim
Removing and installing front window guide

Note
- Removal and installation only applies to the left window guide. Removal and installation of the right window guide is performed accordingly.
- Do not bend window guide when lifting off!
Removing

- Remove interior window channel trim.
- Remove exterior window channel trim.
- Depending on equipment, remove electrically or manually adjustable outside mirror.
- Pull out locking pin -2- -arrow a-.
- From inside, fold the sealing lip of window guide -1- back off door flange -3-.
- Pull window guide -1- out of the door mounts -arrows b, c and d-.
- Pull window guide -1- evenly off door flange -3- all the way around -arrows e-.
Installing

- To make installation easier, spray window guide with soapy water.
- Fit window guide -1- onto door flange -3- running forward -arrows a-.
- Push window guide -1- into the door mounts -arrows b, c and d-.
- From inside, fold the sealing lip of the window guide onto door flange -2-.
- Push in locking pin -2- -arrow e-.

Note
When installing window guide -1-, make sure it sits evenly (wind noise).
Installation is carried out in reverse order.
Guide rail
Removing and installing guide rail
Required Special Tools, Test and Measuring Equipment and Auxiliary Items
- Torque wrench -V.A.G 1783-

Note
Removal and installation only applies to the left guide rail. Removal and installation of the right guide rail is performed accordingly.
Removing

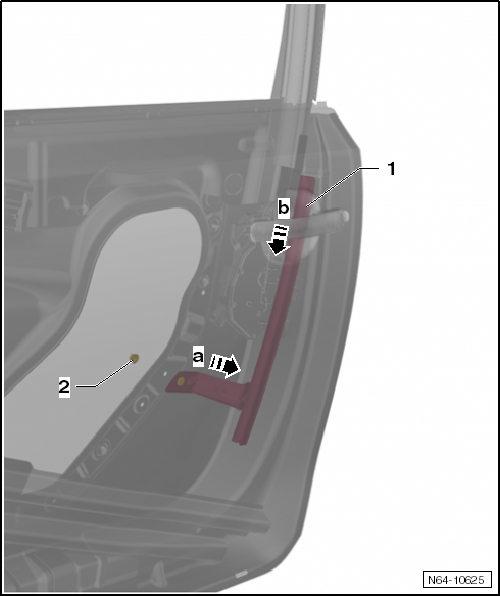
- If equipped, remove window regulator handle.
- Remove the front door trim panel → Body assembly work, interior.
- Remove cover
- Turn down hex nut -2-.
- Push guide rail -1- inward -arrow a-, then pull it down out of the window guide -arrow b-.
Installing
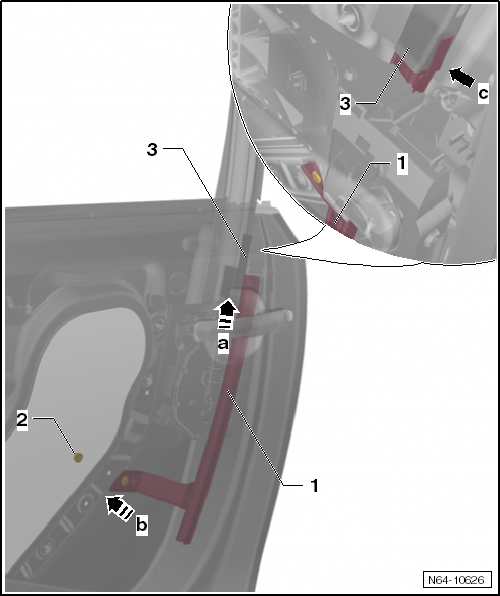
- Push guide rail -1- into window guide -3- -arrow a-.
- The clip of the guide rail must be pushed precisely onto the window guide -arrow c-.
- Push threaded stud of guide rail through the door -arrow b-.
- Tighten hex nut -2-, tightening torque: 8 N·m.
Removing and installing additional window guide

Note
Removal and installation only applies to the left interior window channel trim. Removal and installation of the right window guide is performed accordingly.
Removing
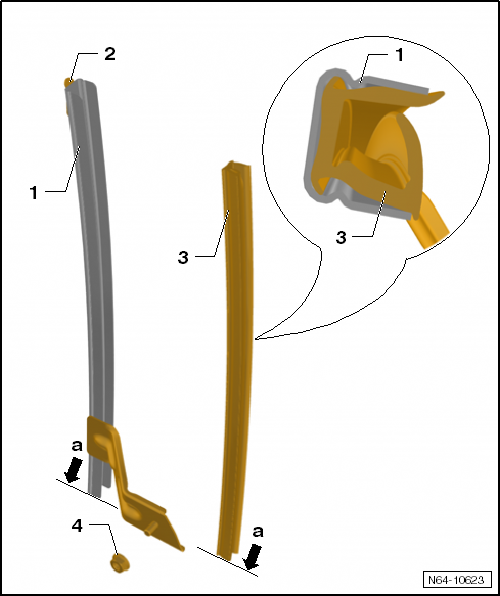
- If equipped, remove window crank.
- Remove the front door trim panel → Body assembly work, interior.
- Remove cover.
- Pull additional window guide -3- off guide rail -1-.
Installing
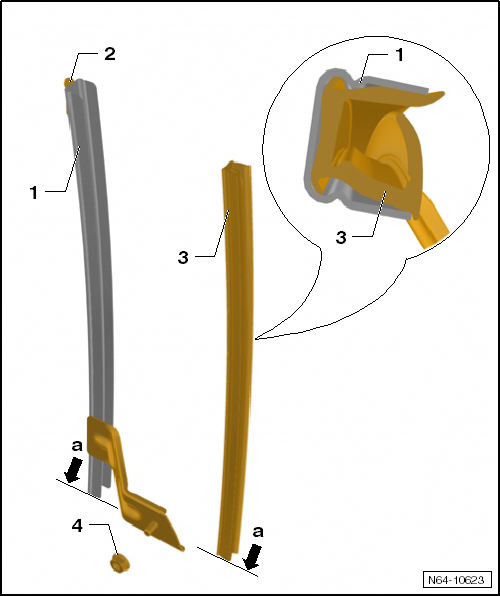
- Insert additional window guide -3- into guide rail -2-.
- Align additional window guide and guide rail with each other at the lower edge -arrows a-.
Removing and installing rear window guide

Removing
- Remove rear door glass.
- Pull window guide -3- off sheet metal flange -2-. Do not bend.
Installing
- Press window guide -3- onto sheet metal flange -2-.
- Install rear door glass.
Removing and installing front window channel trim
Removing and installing front interior window channel trim

Note
Removal and installation only applies to the left interior window channel trim. Removal and installation of the right interior window channel trim is performed accordingly.
Removing

- Unscrew interior window channel trim -1- from the detents in the window well -arrows a-.
- Lift interior window channel trim -1- slightly off flange -2- evenly in -arrows b- without bending it.
- Pull interior window channel trim -1- out from under cover -3- -arrow c-.
Installing

- Push interior window channel trim -1- under cover -3- -arrow c-.
- Align interior window channel trim -1- -arrows b- and press evenly by hand onto flange -2- of the front door -arrows c-.
- Interior window channel trim -1- must audibly engage with the flange.
Removing and installing front exterior window channel trim
Required Special Tools, Test and Measuring Equipment and Auxiliary Items
- Hook for Frontend -3370-
Removing

Note
- The core of the exterior window channel trim consists of a metal insert.
- If this is bent, the exterior window channel trim can no longer be straightened. It remains "wavy".
- The exterior window channel trim must therefore be pulled off and pressed on evenly, without bending it.
- Removal and installation only applies to the left exterior window channel trim. Removal and installation of the right window channel trim is performed accordingly.

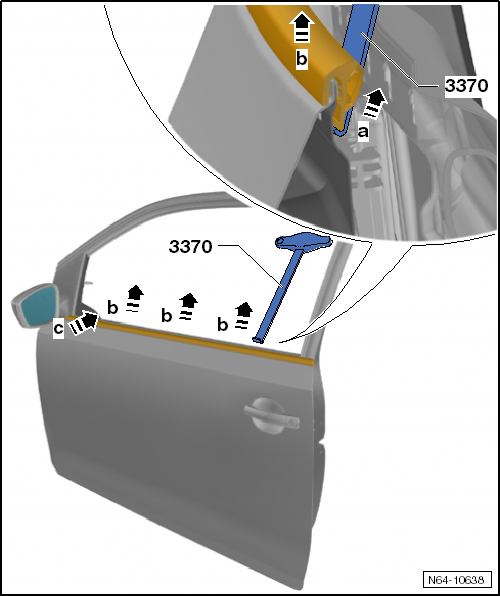
- Remove interior window channel trim.
- Pull exterior window channel trim out of the detents in the flange using the hook for Frontend -3370- -arrow a-.
- Pull exterior window channel trim evenly off the front door flange -arrows b- without bending the trim.
- Pull exterior window channel trim out from under the outside mirror -arrow c-.
Installing


Note
- Applying assembly aids is permitted.
- Installing the exterior window channel trim is done without impact tools.
- Push exterior window channel trim under the outside mirror -arrow c-.
- Align exterior window channel trim -1- at the B-pillar -arrows b- and press evenly by hand onto the front door flange -arrows c-.
- Install interior window channel trim.
Removing and installing rear window channel trim

Note
The window channel strip is glued to the door at the rear. Therefore, the window channel strip cannot be removed without damage.
Installation notes
- Heat the window channel strip with the hot air blower -V.A.G 1416- before removing it.
- When removing and installing a window channel strip, use only adhesive remover -D 002 000 10- to remove adhesive residue.
- If present, remove any adhesive residue from the adhesive tape with adhesive tape remover -VAS 6349-.
- Make sure the adhesive surfaces are free of dust and grease.
- Glue the window channel strip on immediately after cleaning.
- Remove the protective film only immediately before installation.
- The processing temperature is approx. 21 °C.
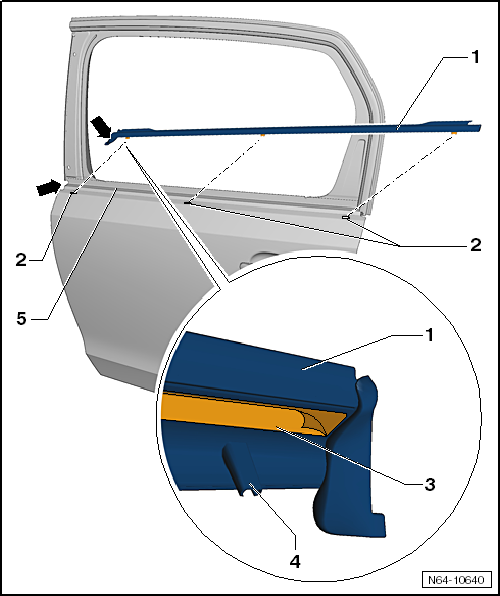
Removing
- Remove rear door glass.
- Heat window channel strip -1- with the hot air blower -V.A.G 1416-.
- Pull window channel strip -1- off door -5-.
Installing
- Remove adhesive residue and clean adhesive surface -5- with adhesive remover -D 002 000 10-.
- Align window channel strip -1- on door using centering pins -4-.
- Remove protective film -3- from adhesive tape.
- Press window channel strip -1- firmly onto door -5-.
Removing and installing window seal
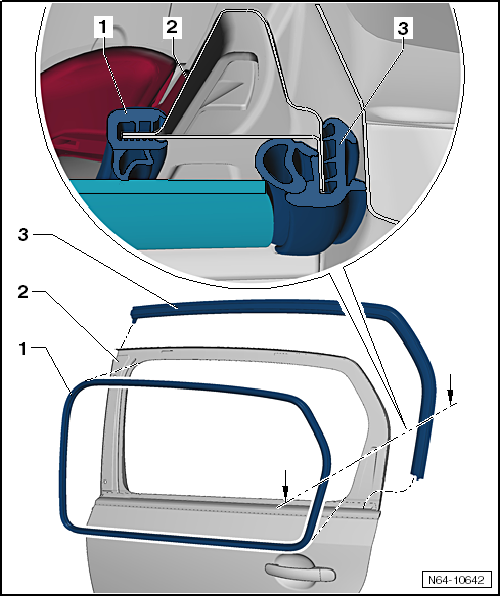
Removing
- Remove rear door glass.
- Pull seal -1- off sheet metal flange -2-.
Installing
- Press seal -1- onto sheet metal flange -2-.
- Install rear door glass.