Seat belts
Installation locations overview - seat belts and anchorage points

Note
Shown are the seat belts on a 2-door vehicle.
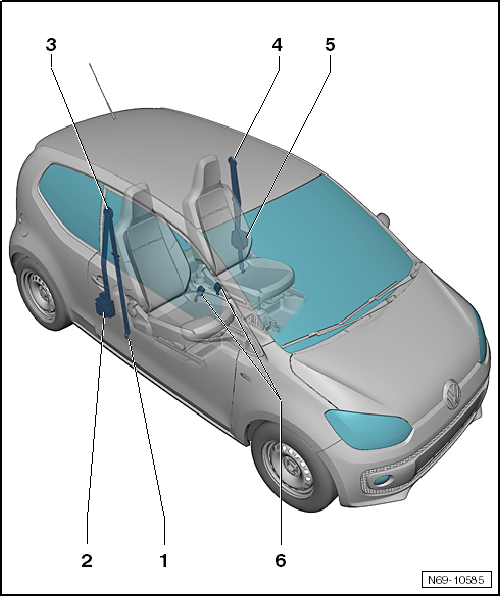
- Belt anchor
- Remove and install.
- Belt retractor with igniter 1 for belt tensioner, passenger side -N154-
- for front three-point seat belt
- Remove and install.
- Belt guide fitting
- Passenger side
- Belt guide fitting
- Driver side
- Belt retractor with igniter 1 for belt tensioner, driver side -N153-
- for front three-point seat belt
- Remove and install.
- Belt buckles
- Remove and install.
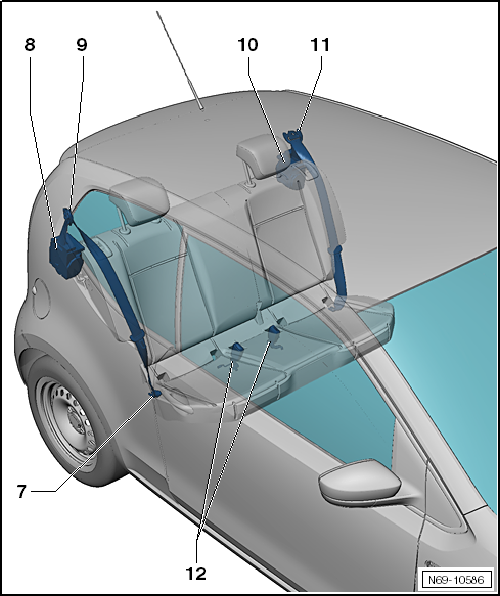
- Belt anchor
- Remove and install
- Belt retractor
- Remove and install
- Belt guide fitting
- Passenger side
- Belt retractor
- Remove and install
- Belt guide fitting
- Driver side
- Belt buckles
- Remove and install.
Remove and install front three-point seat belt
Required Special Tools, Test and Measuring Equipment and Auxiliary Items
- Torque Wrench -V.A.G 1331-

Remove and install front three-point seat belt, 2-door
Removing

WARNING!
- Observe the safety regulations for pyrotechnic components.
- Observe the disposal regulations for pyrotechnic components.

Note
The removal and installation are described for the left side of the vehicle. Removal and installation of the right side is performed accordingly.
- Disconnect the battery ground cable with ignition switched on → Electrical system.
- Remove rear seat bench.
- Remove rear seat backrest.
- Remove side trim panel.
- Unclip front sill trim in the area of the belt retractor.
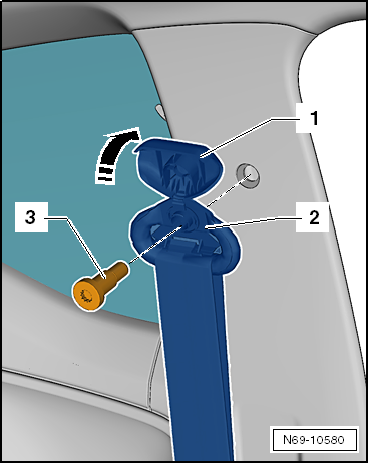
- Open cap -1- -arrow- and unscrew bolt -3- (40 N·m).
- Remove belt guide fitting -2- with belt webbing.
- Unclip C-pillar trim in the overlap area with the B-pillar trim.
- Remove B-pillar trim, 2-door.
- Remove front belt guide.
- Remove front belt anchor.
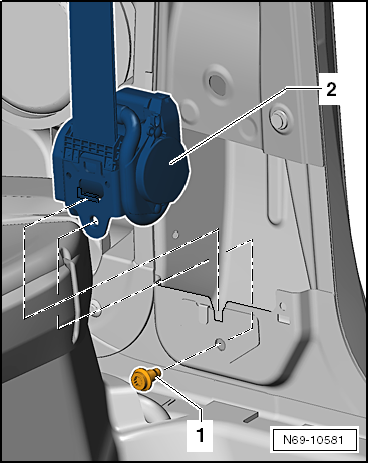
- Unscrew bolt -1- (40 N·m) and remove belt retractor -2- from the mount.
Installing
- Installation is performed in the reverse order.

WARNING!
Make sure no electrical cables are routed in the belt retraction area!
- Switch the ignition on.

WARNING!
The battery must be connected with the ignition switched on. Improper repair work on pyrotechnic components (for example airbags or belt tensioners) can cause unintended deployment after the battery is connected. No person may be inside the vehicle cabin when connecting the battery.
- Connect the battery ground cable with ignition switched on → Electrical system.
Remove and install front three-point seat belt, 4-door
Removing

WARNING!
- Observe the safety regulations for pyrotechnic components.
- Observe the disposal regulations for pyrotechnic components.

Note
The removal and installation are described for the left side of the vehicle. Removal and installation of the right side is performed accordingly.
- Disconnect the battery ground cable with ignition switched on → Electrical system.
- Remove B-pillar trim, 4-door.
- Remove front belt guide.
- Unscrew bolt -1- (40 N·m) and remove belt guide fitting with belt webbing.
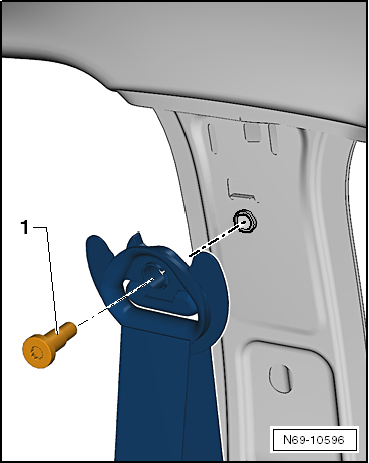
- Unscrew bolt -1- (40 N·m) and remove belt retractor -2- from the mount.
Installing
- Installation is performed in the reverse order.

WARNING!
Make sure no electrical cables are routed in the belt retraction area!
- Switch the ignition on.

WARNING!
The battery must be connected with the ignition switched on. Improper repair work on pyrotechnic components (for example airbags or belt tensioners) can cause unintended deployment after the battery is connected. No person may be inside the vehicle cabin when connecting the battery.
- Connect the battery ground cable with ignition switched on → Electrical system.

Remove and install front belt anchor
Required Special Tools, Test and Measuring Equipment and Auxiliary Items
- Torque Wrench -V.A.G 1331-
Removing

Note
The removal and installation are described for the left side of the vehicle. Removal and installation of the right side is performed accordingly.
- Fold floor covering inward in the area of the belt anchor.

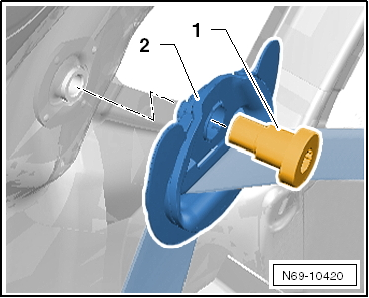
- Unscrew bolt -1- (40 N·m) and detach belt anchor -2- from the body.
Installing
- Installation is performed in the reverse order.

Remove and install front belt guide

Note
The removal and installation are described for the left side of the vehicle in each case. Removal and installation of the right side is performed accordingly.
Remove and install front belt guide, 2-door
Removing
- Remove rear seat bench.
- Remove rear seat backrest.
- Remove side trim panel.
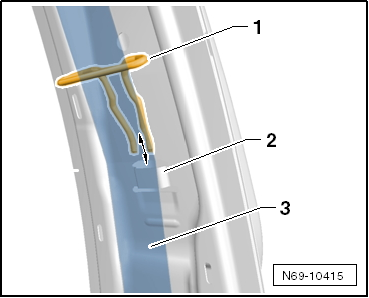
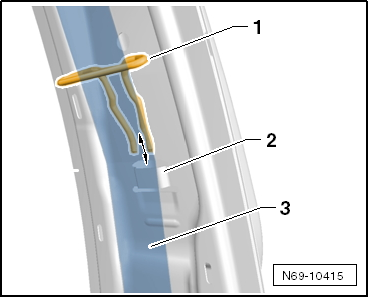
- Pull belt guide -1- out of tab -2-.
- Thread belt webbing -3- out of the belt guide.
Installing
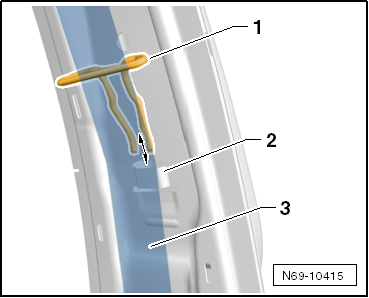
- Installation is performed in the reverse order.

WARNING!
When installing, the belt guide -1- must audibly engage in tab -2-!
Remove and install front belt guide, 4-door
Removing
- Remove B-pillar trim, 4-door.
- Pull belt guide -1- out of tab -2-.
- Thread belt webbing -3- out of the belt guide.
Installing
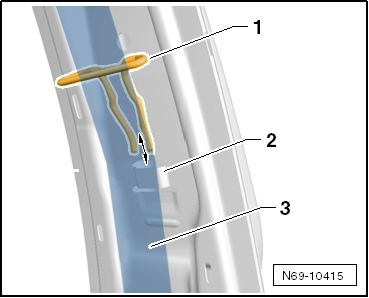
- Installation is performed in the reverse order.

WARNING!
When installing, the belt guide -1- must audibly engage in tab -2-!
Remove and install front belt buckle
Required Special Tools, Test and Measuring Equipment and Auxiliary Items
- Torque Wrench -V.A.G 1331-

Note
The removal and installation are described for the belt buckle on the left seat. Removal and installation of the belt buckle on the right seat is performed accordingly.
Removing
- Remove front seat.
- Unclip the wiring harness fasteners from the seat frame.
- Unscrew bolt -2- (40 N·m) -1- and remove the seat belt buckle from the seat frame.

Note
- The bolt is microencapsulated and must be replaced after each loosening.
- Before installing the new bolt, clean the thread of the corresponding nut.
Installing
- Installation is performed in the reverse order.

Removing and installing rear three-point seat belt
Required Special Tools, Test and Measuring Equipment and Auxiliary Items
- Torque Wrench -V.A.G 1331-
Removing

Note
Removal and installation are described for the left-hand side of the vehicle. Removal and installation for the right-hand side is performed in the same way.
- Remove rear seat bench.
- Remove rear seat backrest.
- Remove side trim panel.
- Remove luggage compartment side trim.
- Remove rear outer belt end fitting.
- Remove C-pillar trim.
- Unscrew bolt -1- (40 N·m) and detach belt guide fitting -2- from the body.
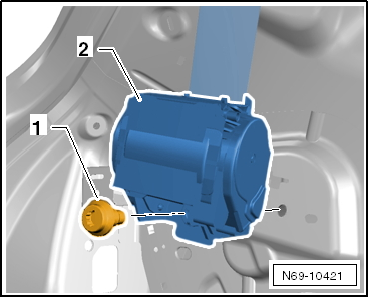
- Unscrew bolt -1- (40 N·m) and remove belt retractor -2- from the body mounting.
Installing
- Installation is performed in the reverse order.
Removing and installing rear outer belt end fitting
Required Special Tools, Test and Measuring Equipment and Auxiliary Items
- Torque Wrench -V.A.G 1331-
Removing

Note
Removal and installation are described for the right-hand side of the vehicle. Removal and installation for the left-hand side is performed in the same way.
- Remove rear seat bench.
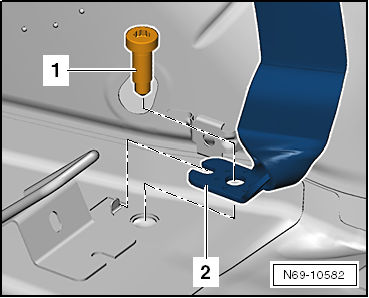
- Unscrew bolt -1- (40 N·m) and detach belt end fitting -2- from the body.
Installing
- Installation is performed in the reverse order.

Note
The bulge on the mounting surface of the belt end fitting must be positioned over the locating aid on the floor panel.
Removing and installing rear seat belt buckle
Required Special Tools, Test and Measuring Equipment and Auxiliary Items
- Torque Wrench -V.A.G 1331-

Note
The removal and installation are described for the left side of the vehicle. Removal and installation of the right side is performed accordingly.
Removing
- Remove rear seat bench.
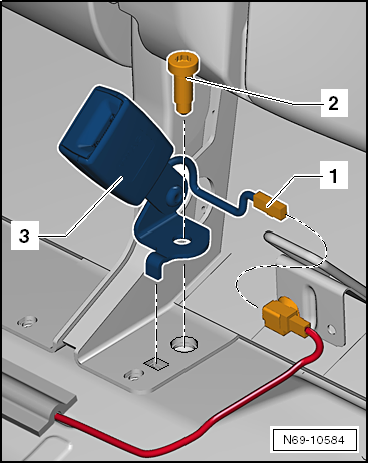
- Disconnect electrical connector -1- for belt switch.
- Unscrew bolt -2- (40 N·m) and remove belt buckle -1-.
Installing
- Installation is performed in the reverse order.
Airbag system
Installation location overview - Airbag system

Note
Shown are the installation locations on a 2-door vehicle.
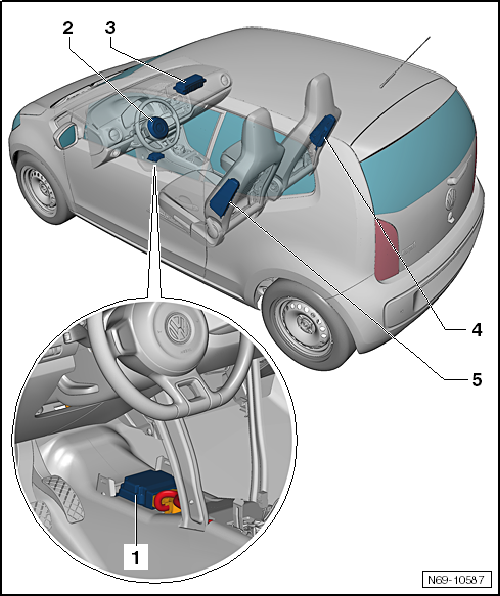
- Airbag control module -J234-
- Assembly Overview
- Remove and install
- Driver airbag with igniter for driver airbag -N95-
- Remove and install
- Passenger airbag with igniter 1 for passenger airbag -N131-
- Remove and install
- Deactivation of passenger airbag possible by locking and activating via key switch for passenger airbag deactivation -E224-
- Passenger side airbag with igniter for passenger side airbag -N200-
- Remove and install
- Driver side airbag with igniter for driver side airbag -N199-
- Remove and install