Adjusting valve timing
Adjusting valve timing, ► 22.2012

Note
From calendar week 22 of 2012, a modified tensioner pulley is installed, which simplifies setting the valve timing.
Required Special Tools, Test and Measuring Equipment and Auxiliary Items
- Engine support fixture -10-222 A-
- Adapter -10-222 A/31-2- (not illustrated)
- Support -10-222 A/31-3- (not illustrated)
- Adapter -10-222 A/31-5- (not illustrated)
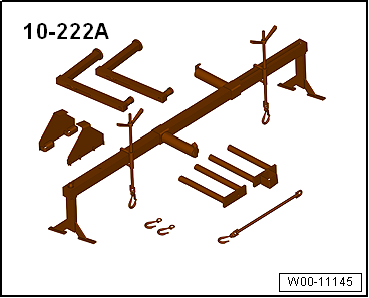
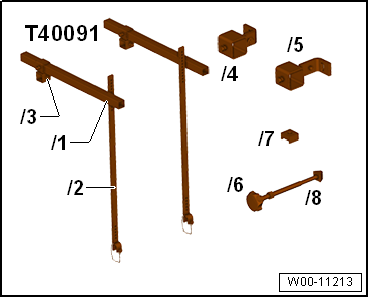
- Engine support fixture basic set -T40091-
- Square tube -T40091/1- (not illustrated)
- Connector -T40091/3- (not illustrated)
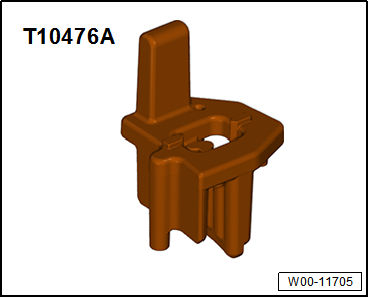
- Installation tool -T10476A-
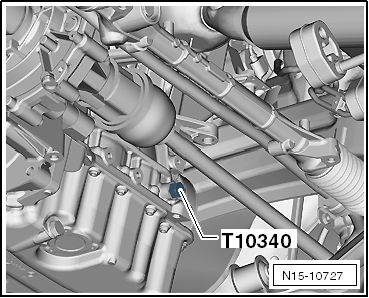
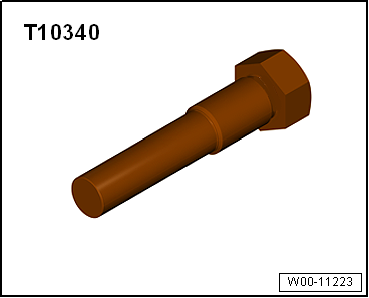
- Locking bolt -T10340-
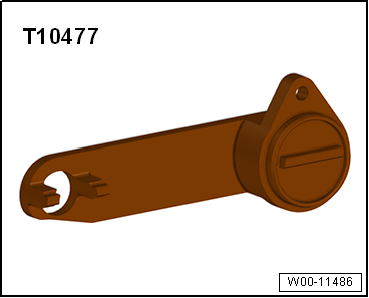
- Camshaft locking tool -T10477-
- Torque Wrench -V.A.G 1332-

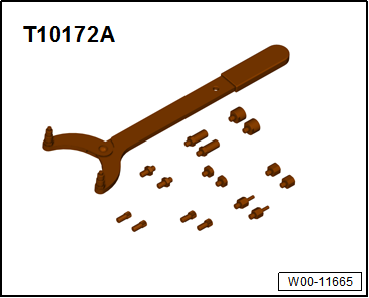
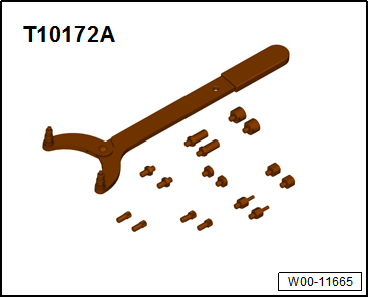
- Counterhold tool -T10172A-
Work sequence
- Remove air filter housing “Removing and installing air filter housing”.
- Unlock and disconnect fuel supply line -1- and vent line -2-.
- Open cable routing -3- and remove hoses.
- Plug lines so that no dirt can enter the fuel system.
- Unhook clips -arrow-.

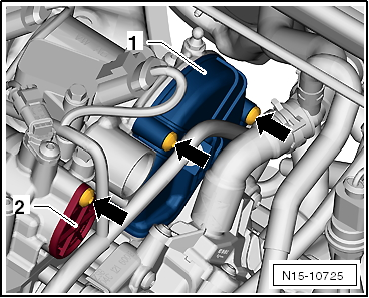
- Unscrew mounting bolt -1- and remove cover -2-.
- Unscrew mounting bolts -arrows-.
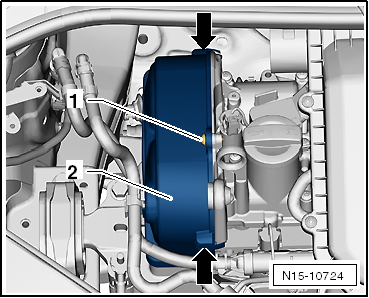
- Unclip line routing from cover.
- Remove cover -1- and cap -2-.
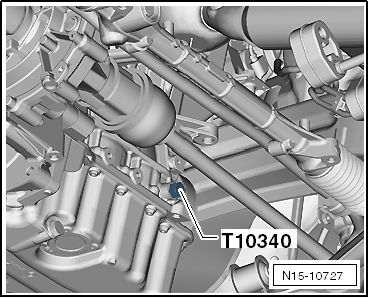
- Unscrew sealing plug -arrow- from crankcase.
- Lower lift platform fully.

Note
- The lift platform must be lowered fully so that locking bolt -T10340- can be screwed into the crankcase.
- With vehicle raised, the drive shaft is in front of the bore.

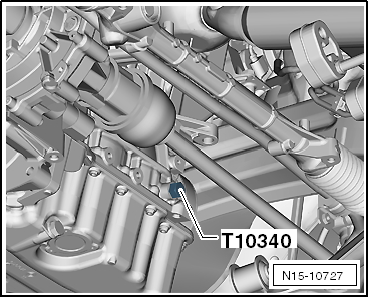
- Screw locking bolt -T10340- into crankcase from above as far as it will go.
- If locking bolt -T10340- cannot be screwed in as far as it will go, the crankshaft is not in the correct position!
- In this case, proceed as described below.
- Unscrew locking bolt.
- Turn crankshaft 90° in direction of engine rotation.
- Turn locking bolt -T10340- into crankcase as far as it will go.
- Tighten locking bolt -T10340- with 30 N·m.
- Turn crankshaft in direction of engine rotation as far as it will go.
The locking bolt -T10340- blocks the crankshaft in the direction of engine rotation.
- Remove serpentine belt “Removing and installing serpentine belt”.
- Remove windshield wiper arms, refer to Electrical System.
- Remove cowl panel cover, refer to Body Assembly Work Exterior.
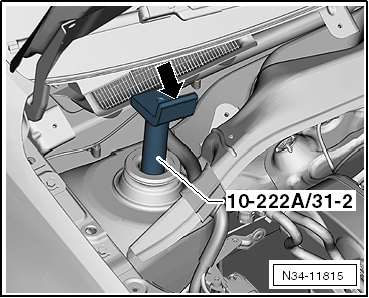
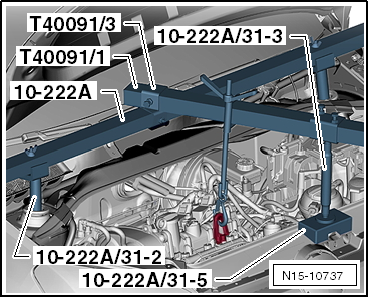
- Fit adapters -10-222A/31-2- onto the strut assemblies.
- Angle of adapter -arrow- points towards engine compartment.
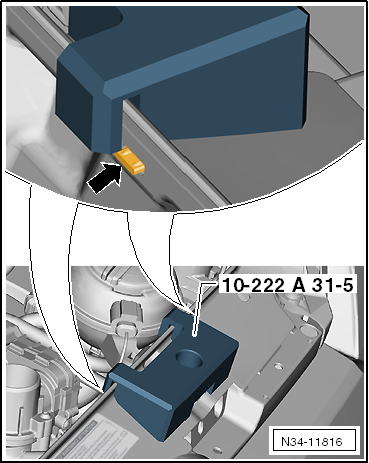
- Place the mount -10-222A/31-5- over the hood latch.
- The position is between 2 ribs -arrow-.
- Fit the safety device -10-222 A- and engine safety device basic -T40091- with the adapters as shown.
- Support engine at right eyelet and slightly relieve engine mount by turning spindle.
- Unscrew earth strap -1-.
Unscrew fastening bolts -arrows- and remove the engine-side unit mount.

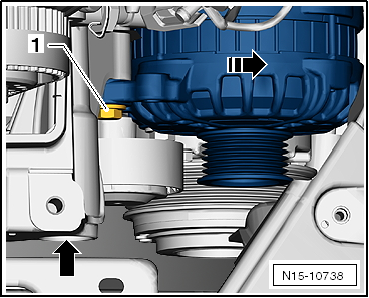
- Unscrew mounting bolt -1- and swing the alternator in the -arrow direction-.
- Raise the engine by turning the spindle far enough that the mounting bolt of the engine mount bracket can be unscrewed.
- Unscrew the mounting bolts -2- of the engine mount bracket and the 3 bolts -1- of the lower timing belt cover.
- Pull the engine mount bracket out upward.
Risk of damage to the camshaft. Camshaft locking tool -T10494- must not be used as a counterholder.
- Mark direction of rotation of timing belt with a pen.

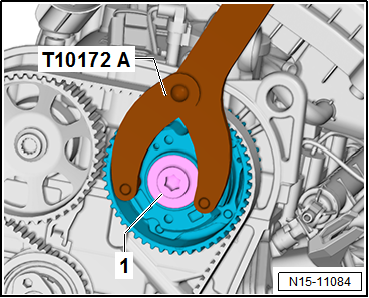
- Hold camshaft adjuster with counter-holder -T10172A- and unscrew sealing plug -1-.

Note
When adjusting the valve timing, both camshaft gears must be loose.
- Hold the camshaft adjuster and camshaft gear with counterhold -T10172A-.
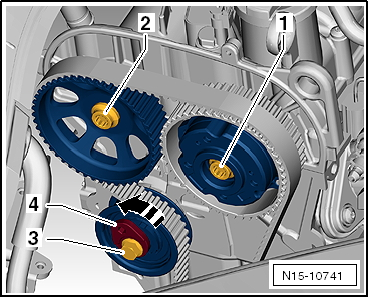
- Loosen mounting bolts -1- and -2-.
- Loosen fastening bolt -3- of tensioner roller -4- and release the tensioner roller in the -arrow direction-.
- Slide the timing belt off the camshaft gears.
Risk of damage to timing belt! The timing belt consists of glass fibre cord fabric. The diameter of the timing belt must therefore never be less than 50 mm (approx. Ø of the crankshaft gear). Falling below this value has a negative effect on the service life of the timing belt.

Note
- A small amount of oil may escape while removing the camshaft adjuster.
- To prevent engine oil from reaching the timing belt, place a rag underneath before removing the camshaft adjuster!
- Replace retaining bolts -1- and -2- with new retaining bolts and tighten by hand.
- Turn the camshafts at fastening bolts -1- and -2- into the positions described below.

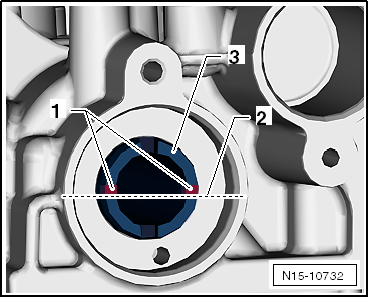
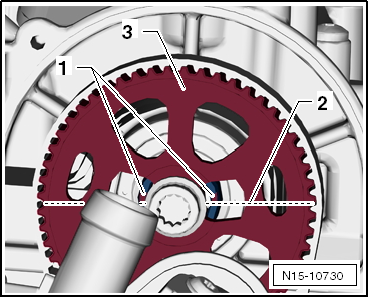
- The slots -1- of the intake camshaft -3- are above the camshaft centerline -2-.
- The slots -1- of the exhaust camshaft are above the camshaft centerline -2-.
- The cutouts of the gear -3- point slightly upward in the area of the slots.
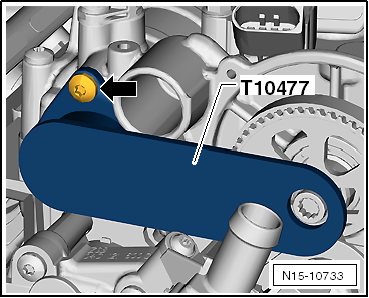
- The camshaft locking tool -T10477- must fit in easily.
- Do not use a impact tool to install the camshaft locking tool!
- Insert camshaft locking tool -T10477- into the camshafts as far as it will go and tighten the bolt -arrow- by hand.
- Loosen camshaft gear retaining bolts just enough so that the camshaft gears can be turned easily by hand.

Note
- The camshaft gears are not perfectly round.
- If one or both camshaft gears have been loosened, they must be positioned relative to each other again.
- The camshaft gears must still be able to rotate on the camshafts and must not tilt.
Turn the marked tooth gap -1- of the camshaft adjuster -3- so that it aligns with the lug -2- on the camshaft housing.

Turn the marked tooth -1- of the exhaust camshaft gear -3- so that it aligns with the lug -2- on the camshaft housing.

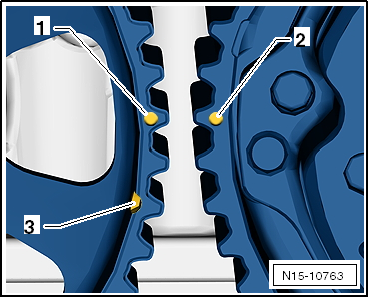
- The marks -1- and -2- on the camshaft gears are slightly offset from each other.
The exhaust camshaft gear has a slot -3- for locating tool -T10476A-.
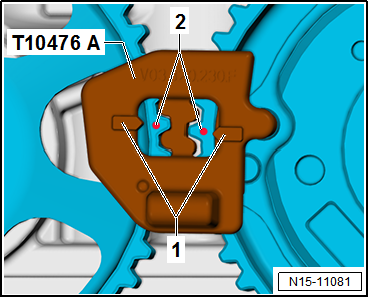
- Insert locating tool -T10476A- between the camshaft gears.
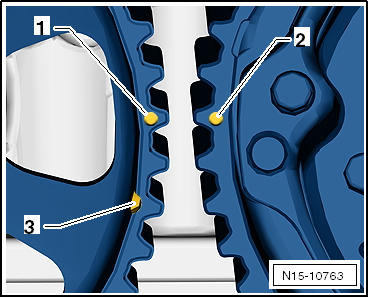
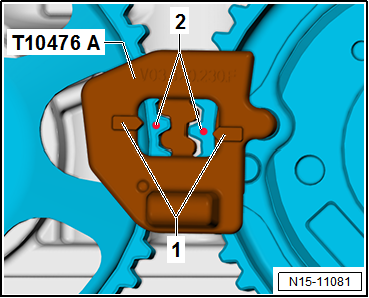
- The arrows -1- on the locating tool must align with the marks -2- on the camshaft gears.

Note
When locating tool -T10476A- is inserted, the marks -2- on the camshaft gears are slightly offset from each other.
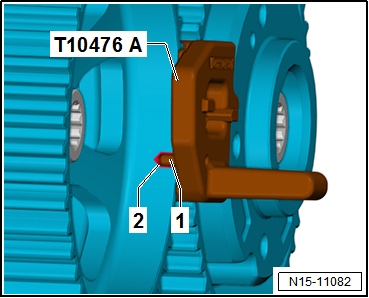
- The pin -1- of locating tool -T10476A- must engage in the slot -2- of the exhaust camshaft gear.
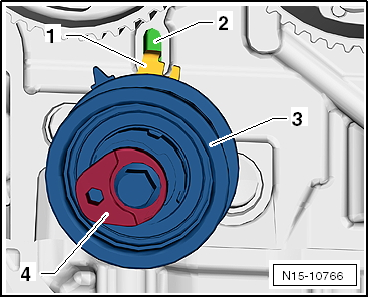
- Attach tensioner pulley -3- to cylinder head by hand.
- The hook -1- must sit in the recess -2-.
- The position of the tensioner pulley eccentric -4- must be as shown.

Note
- In this position the tensioner pulley is fully released.
- When fitting the timing belt, make sure that locating tool -T10476A- is inserted in the correct position between the camshaft gears.
- The timing belt must sit correctly on the crankshaft gear.
- Check whether the crankshaft is in cylinder 1 TDC position.
The crankshaft must rest against locking pin -T10340- in the direction of engine rotation.
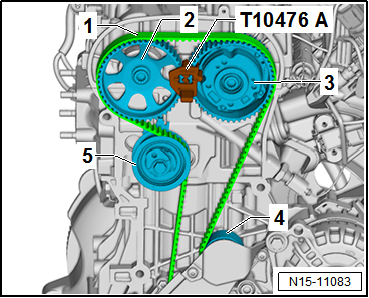
- Place timing belt -1- onto tensioner pulley -5- and camshaft gear -2-.
- Then place timing belt onto camshaft adjuster -3- and push it over idler pulley -4-.
- Remove locating tool -T10476A- from the camshaft gears.
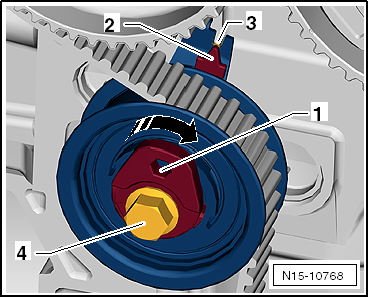
- First turn eccentric -1- in the -arrow direction- until pointer -2- is approx. 10 mm to the right of adjustment window -3-.
- Turn tensioner pulley eccentric back at hexagon socket -1- until pointer -2- is exactly within adjustment window -3-.
- Hold the eccentric at hexagon socket -1- in this position.
- Tighten retaining bolt -4- to 25 N·m.

Note
- After turning the engine further by hand or after engine operation, the position of the timing pointer -2- may deviate slightly from the timing window -3-.
- This has no relevant effect on the valve timing. Retensioning the timing belt is not required.
- Hold camshaft adjuster and exhaust camshaft gear with counter-holder -T10172A-.
- Tighten the mounting bolts -1- and -2- to 50 N·m.

Note
The mounting bolts are only turned a further 90º after checking the valve timing at the end of the procedure.
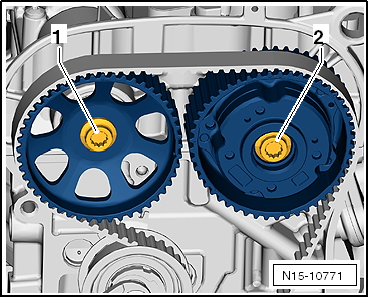
- With the vehicle lifted, remove locking bolt -T10340- from above.
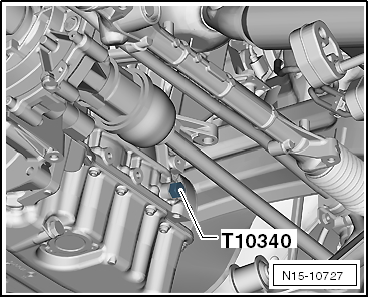
- Unscrew bolt -arrow- and remove camshaft locking tool -T10477-.
- Turn the crankshaft 2 revolutions in the direction of engine rotation.
- Turn locking bolt -T10340- into crankcase as far as it will go.
- The camshaft locking tool -T10477- must fit in easily.
- Do not use a impact tool to install the camshaft locking tool!
- Insert camshaft locking tool -T10477- into the camshafts as far as it will go and tighten the bolt hand-tight.
Valve timing is OK if camshaft locking tool -T10477- can be inserted.
If valve timing is not OK:
- Repeat the valve timing adjustment.
- Remove camshaft locking tool -T10477-.
- Hold camshaft adjuster and exhaust camshaft gear with counter-holder -T10172A-.
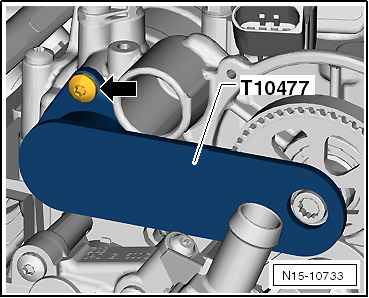
- Turn the mounting bolts -1- and -2- a further 90º.
- If damaged, replace the O-ring of the sealing bolt.
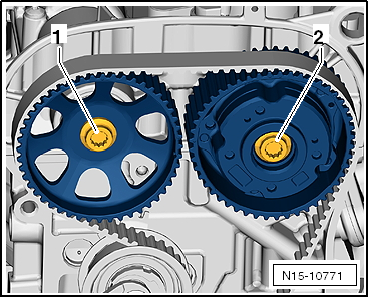
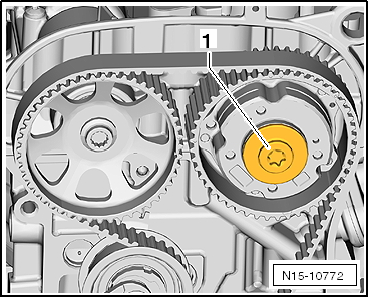
- Tighten the camshaft adjuster sealing bolt -1- to 20 N·m.
- With the vehicle lifted, remove locking bolt -T10340- from above.
- After completing the work, make sure that locking bolt -T10340- and camshaft locking tool -T10477- have been removed.
Reassembly is carried out in the reverse order of removal.
Tightening torques
Tightening torque, crankcase sealing plug: 30 N·m
Cylinder Block Pulley Side - Assembly Overview "Assembly Overview - Cylinder Block Pulley Side".
Engine mount - Assembly overview "Assembly overview - Engine mount".
Adjusting valve timing, 22.2012 ►

Note
From calendar week 22 of 2012, a modified tensioner pulley is installed, which simplifies setting the valve timing.

Required Special Tools, Test and Measuring Equipment and Auxiliary Items
- Key -T10499-
- Insert tool -T10500-
- Installation tool -T10476A-
- Locking bolt -T10340-
- Camshaft locking tool -T10477-
- Torque wrench -VAS 6583-
- Counterhold tool -T10172A-
Removing
- Remove air filter housing “Removing and installing air filter housing”.
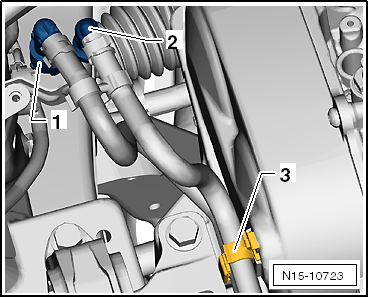
- Unlock and disconnect fuel supply line -1- and vent line -2-.
- Open cable routing -3- and remove hoses.
- Plug lines so that no dirt can enter the fuel system.
- Unhook clips -arrows-.
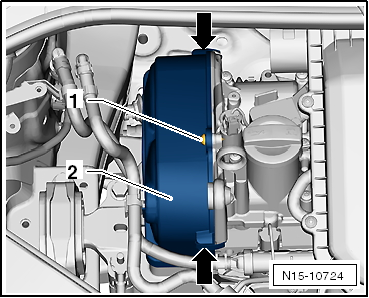
- Unscrew mounting bolt -1- and remove cover -2-.
- Unscrew mounting bolts -arrows-.
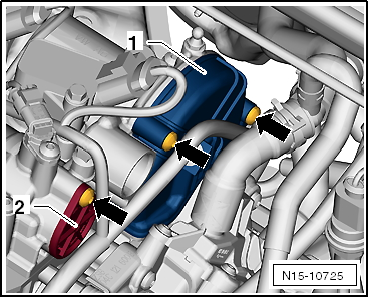
- Unclip line routing from cover.
- Remove cover -1- and cap -2-.
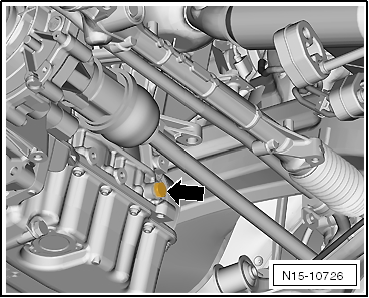
- Unscrew sealing plug -arrow- from crankcase.
- Lower lift platform fully.

Note
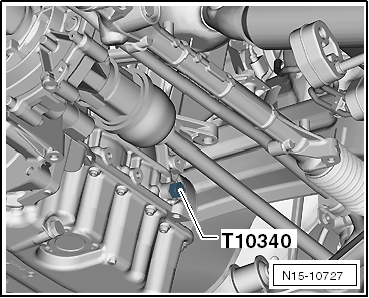
- The lift platform must be lowered fully so that locking bolt -T10340- can be screwed into the crankcase.
- With vehicle raised, the drive shaft is in front of the bore.
- Screw locking bolt -T10340- into crankcase from above as far as it will go.
- If locking bolt -T10340- cannot be screwed in as far as it will go, the crankshaft is not in the correct position!
- In this case, proceed as described below.
- Unscrew locking bolt.
- Turn crankshaft 90° in direction of engine rotation.
- Turn locking bolt -T10340- into crankcase as far as it will go.
- Tighten locking bolt -T10340- with 30 N·m.
- Turn crankshaft in direction of engine rotation as far as it will go.
The locking bolt -T10340- blocks the crankshaft in the direction of engine rotation.
Risk of damage to camshaft. When loosening and tightening the fastening bolts, the camshaft gears must be held with counterhold tool -T10172A-. Camshaft locking tool -T10477- must not be loaded when tightening the camshaft gears.
- Mark direction of rotation of timing belt with a pen.
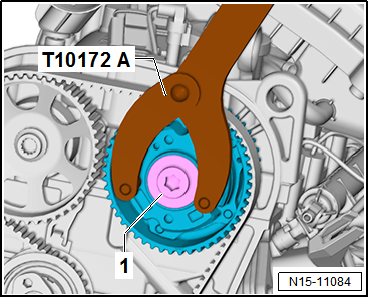
- Hold camshaft adjuster with counter-holder -T10172A- and unscrew sealing plug -1-.

Note
When adjusting the valve timing, both camshaft gears must be loose.
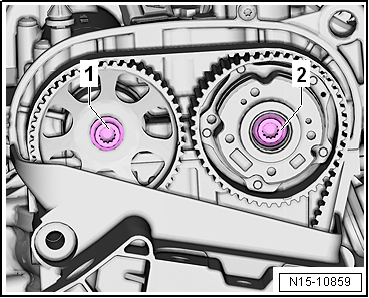
- Hold the camshaft adjuster and camshaft gear with counterhold -T10172A-.
- Loosen mounting bolts -1- and -2-.
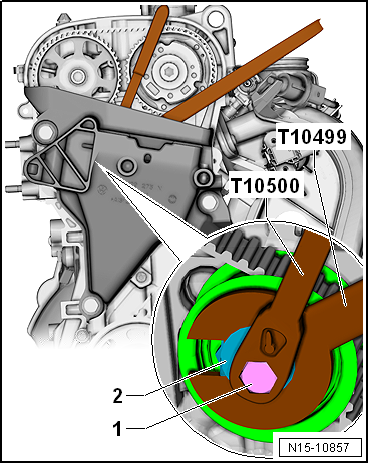
- Loosen bolt -1- using insert tool -T10500-.
- Release the tensioner roller at eccentric -2- using wrench -T10499-.
- Slide the timing belt off the camshaft gears.
Risk of damage to timing belt! The timing belt consists of glass fibre cord fabric. The diameter of the timing belt must therefore never be less than 50 mm (approx. Ø of the crankshaft gear). Falling below this value has a negative effect on the service life of the timing belt.

Note
- A small amount of oil may escape while removing the camshaft adjuster.
- To prevent engine oil from reaching the timing belt, place a rag underneath before removing the camshaft adjuster!
- Replace retaining bolts -1- and -2- with new retaining bolts and tighten by hand.
- Turn the camshafts at fastening bolts -1- and -2- into the positions described below.
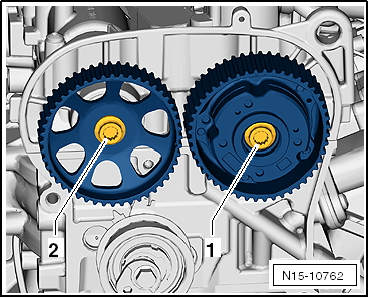
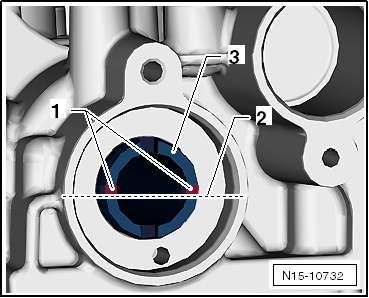
- The slots -1- of the intake camshaft -3- are above the camshaft centerline -2-.
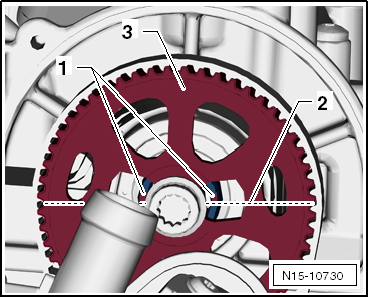
- The slots -1- of the exhaust camshaft are above the camshaft centerline -2-.
- The cutouts of the gear -3- point slightly upward in the area of the slots.
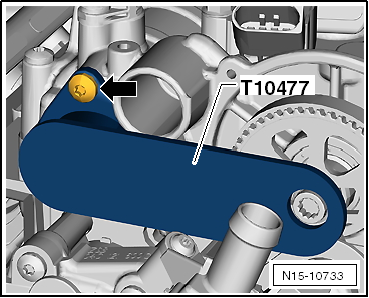
Risk of engine damage. Camshaft locking tool -T10477- must insert easily. Do not use an impact tool to insert the camshaft locking tool!
- Insert camshaft locking tool -T10477- into the camshafts as far as it will go and tighten the bolt -arrow- by hand.
- Loosen camshaft gear retaining bolts just enough so that the camshaft gears can be turned easily by hand.

Note
- The camshaft gears are not perfectly round.
- If one or both camshaft gears have been loosened, they must be positioned relative to each other again.
- The camshaft gears must still be able to rotate on the camshafts and must not tilt.
Turn the marked tooth gap -1- of the camshaft adjuster -3- so that it aligns with the lug -2- on the camshaft housing.

Turn the marked tooth -1- of the exhaust camshaft gear -3- so that it aligns with the lug -2- on the camshaft housing.
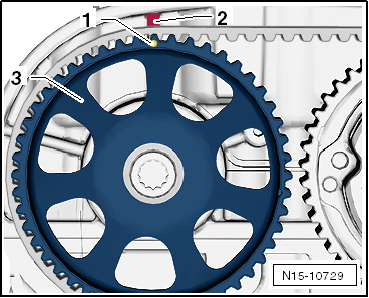
- The marks -1- and -2- on the camshaft gears are slightly offset from each other.
The exhaust camshaft gear has a slot -3- for locating tool -T10476A-.
- Insert locating tool -T10476A- between the camshaft gears.
- The arrows -1- on the locating tool must align with the marks -2- on the camshaft gears.

Note
When locating tool -T10476A- is inserted, the marks -2- on the camshaft gears are slightly offset from each other.
- The pin -1- of locating tool -T10476A- must engage in the slot -2- of the exhaust camshaft gear.
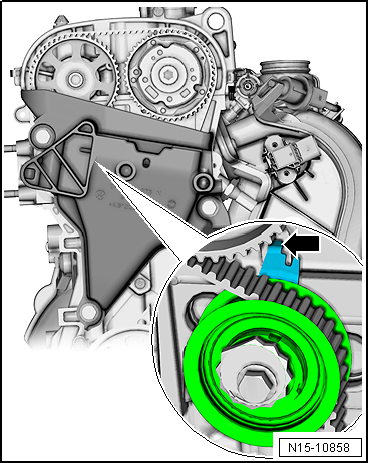
- Attach the tensioner roller to the cylinder head hand-tight.

The sheet metal tab -arrow- of the tensioner roller must engage in the cast recess of the cylinder head.

Note
When fitting the timing belt, make sure that locating tool -T10476A- is inserted in the correct position between the camshaft gears.
- The timing belt must sit correctly on the crankshaft gear.
- Check whether the crankshaft is in cylinder 1 TDC position.
The crankshaft must rest against locking pin -T10340- in the direction of engine rotation.
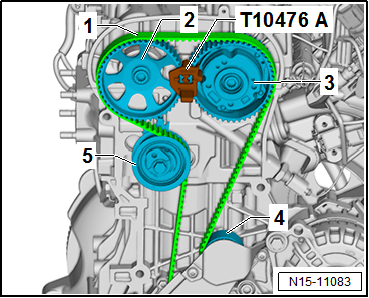
- Place timing belt -1- onto tensioner pulley -5- and camshaft gear -2-.
- Then place timing belt onto camshaft adjuster -3- and push it over idler pulley -4-.
- Remove locating tool -T10476A- from the camshaft gears.
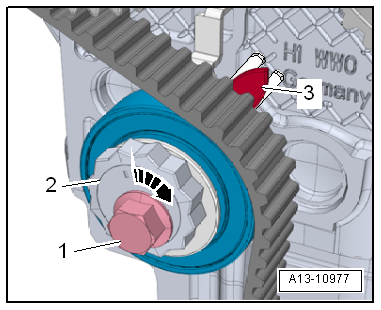
- Turn eccentric -2- of the tensioner roller with tensioning wrench -T10499- in the -arrow direction- until pointer -3- is approx. 10 mm to the right of the adjustment window.
- Turn the tensioner roller eccentric back at 12-point collar -2- until pointer -3- is exactly within the adjustment window.
- Hold the eccentric at 12-point collar -2- in this position.
Risk of engine damage due to incorrect tightening torque. Torque wrench -VAS 6583- must be used for tightening! When setting the tightening torque on torque wrench -VAS 6583-, enter the effective length specified on insert tool SW 13 -T10500- into the torque wrench.
- Tighten mounting bolt -1- to 25 N·m.

Note
- After turning the engine further by hand or after engine operation, the position of the timing pointer may deviate slightly from the timing window.
- This has no relevant effect on the valve timing. Retensioning the timing belt is not required.
- Hold camshaft adjuster and exhaust camshaft gear with counter-holder -T10172A-.

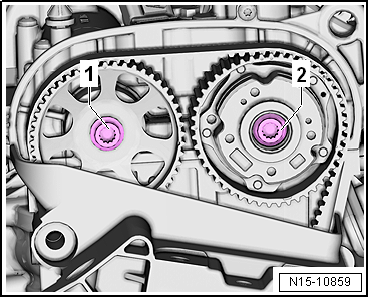
- Tighten the mounting bolts -1- and -2- to 50 N·m.

Note
The mounting bolts are only turned a further 90º after checking the valve timing at the end of the procedure.

- With the vehicle lifted, remove locking bolt -T10340- from above.

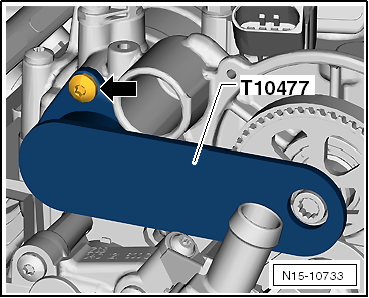
- Unscrew bolt -arrow- and remove camshaft locking tool -T10477-.
- Turn the crankshaft 2 revolutions in the direction of engine rotation.
- Turn locking bolt -T10340- into crankcase as far as it will go.
Risk of engine damage. Camshaft locking tool -T10477- must insert easily. Do not use an impact tool to insert the camshaft locking tool!
- Insert camshaft locking tool -T10477- into the camshafts as far as it will go and tighten the bolt hand-tight.
Valve timing is OK if camshaft locking tool -T10477- can be inserted.
If valve timing is not OK:
- Repeat the valve timing adjustment.
- Remove camshaft locking tool -T10477-.
- Hold camshaft adjuster and exhaust camshaft gear with counter-holder -T10172A-.
- Turn the mounting bolts -1- and -2- a further 90º.
- If damaged, replace the O-ring of the sealing bolt.
- Tighten the camshaft adjuster sealing bolt -1- to 20 N·m.

- With the vehicle lifted, remove locking bolt -T10340- from above.
Risk of engine damage. After completing the work, make sure that locking bolt -T10340- and camshaft locking tool -T10477- have been removed.
Reassembly is carried out in the reverse order of removal.
Tightening torques
Tightening torque, crankcase sealing plug: 30 N·m
Cylinder Block Pulley Side - Assembly Overview "Assembly Overview - Cylinder Block Pulley Side".