Verwendung des Reifendichtsystems
The temporary tire sealing system (TMK1) can be used to seal a puncture in a tire. Read through all instructions before use.
Übersicht
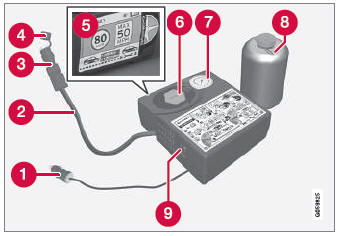
 Electrical cable
 Hose
 Air release valve
 Protective hose cover
 Speed limit sticker
 Bottle holder (orange cover)
 Air pressure gauge
 Sealing compound bottle
 Switch
Anschließen
- Die Dichtmittelflasche (Nr. 8 in der Abbildung) enthält 1) natürlichen Kautschuklatex und 2) Ethandiol. Diese Stoffe sind bei Verschlucken gesundheitsschädlich.
- The contents of this bottle may cause allergic skin reactions or otherwise be potentially harmful to the respiratory tract, the skin, the central nervous system, and the eyes.
Vorsichtsmaßnahmen:
- Außerhalb der Reichweite von Kindern aufbewahren.
- Den Inhalt nicht einnehmen.
- Längeren oder wiederholten Hautkontakt vermeiden. Kleidungsstücke, die mit dem Dichtmittel in Berührung gekommen sind, ausziehen.
- Nach der Anwendung gründlich waschen.
Erste Hilfe:
- Haut: Betroffene Hautstellen mit Seife und Wasser abwaschen. Bei auftretenden Symptomen ärztliche Hilfe suchen.
- Augen: Mindestens 15 Minuten lang mit reichlich Wasser spülen, dabei gelegentlich die oberen und unteren Augenlider anheben. Bei auftretenden Symptomen ärztliche Hilfe suchen.
- Einatmen: Die betroffene Person an die frische Luft bringen. Bei anhaltender Reizung ärztliche Hilfe suchen.
- Verschlucken: NICHT zum Erbrechen bringen, außer auf Anweisung von medizinischem Personal. Ärztliche Hilfe suchen.
- Disposal: Dispose of this material and its container at a hazardous or special waste collection point.
- Vorbereitungen
Turn on the vehicle's hazard warning flashers if the tire sealing system is to be used in an area with traffic.
Wenn die Panne durch einen Nagel oder einen ähnlichen Gegenstand verursacht wurde, entfernen Sie ihn nicht. Dies hilft, das Loch abzudichten.
- Entfernen Sie den Aufkleber mit der Geschwindigkeitsbegrenzung von der Seite des Kompressors. Kleben Sie den Aufkleber an eine gut sichtbare Stelle an der Windschutzscheibe, um den Fahrer daran zu erinnern, diese Geschwindigkeit nicht zu überschreiten. Fahren Sie nicht schneller als 80 km/h, solange ein mit dem Reifendichtsystem provisorisch reparierter Reifen verwendet wird.
- Make sure the switch is in the 0 (Off) position and take out the electric cable and the hose.
- Unscrew the orange cover on the compressor and unscrew the cap on the sealing compound bottle.
- Screw the bottle onto the bottle holder as far as possible.
The bottle and the bottle holder are equipped with catches to help prevent the sealing compound from leaking. Once the bottle is screwed into place into the bottle holder, it cannot be unscrewed. The bottle can only be removed by a workshop2.
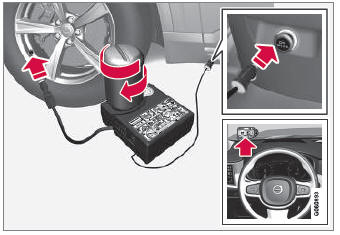
- Unscrew the tire's valve cap and screw the hose's valve connector as far as possible onto the valve.
Be sure the air release valve on the compressor's hose is completely closed.
- Verfahren zur Reifenabdichtung starten
Connect the electrical cable to the nearest 12 V outlet and start the vehicle.
- Start the compressor by moving the switch to the I (On) position.
Wenn der Kompressor startet, kann der Druck bis auf 6 bar (88 psi) ansteigen, fällt aber nach ca. 30 Sekunden wieder ab.
- Inflate the tire for 7 minutes.
- Switch off the compressor and check the inflation pressure using the air pressure gauge. The inflation pressure should be between 1.8 bar (22 psi) and 3.5 bar (51 psi). If the inflation pressure is too high, use the air release valve to release air.
- Schalten Sie den Kompressor aus und trennen Sie das elektrische Kabel.
- Unscrew the hose from the tire's valve and screw the valve cap back on.
- After inflating a tire, always replace the valve cap to help prevent valve damage caused by gravel, dirt, etc.
- Verwenden Sie nur Ventilkappen aus Kunststoff. Metallkappen können korrodieren und sich nur schwer entfernen lassen.
- Setzen Sie die Schutzhülle auf den Schlauch, um das Austreten von Dichtmittelresten zu verhindern. Legen Sie die Ausrüstung zurück in den Laderaum.
- Immediately drive the vehicle at least 3 km (2 miles) at a maximum speed of 80 km/h to allow the sealing compound to seal the tire, and then recheck the inflation pressure.
- Aufpumpdruck überprüfen
Connect the hose to the tire's valve and screw the hose connector onto the valve as far as possible. The compressor must be switched off.
- Check the inflation pressure on the air pressure gauge.
- Liegt der Druck unter 1,3 bar (19 psi), ist der Reifen nicht ausreichend abgedichtet. Das Fahrzeug darf nicht bewegt werden. Rufen Sie den Pannendienst an, um das Fahrzeug abschleppen zu lassen.
- If the inflation pressure is higher than 1.3 bar (19 psi), the tire must be inflated to the inflation pressure specified on the tire pressure decal on the driver's side door pillar (1 bar = 100 kPa = 14.5 psi). If the inflation pressure is too high, use the air release valve to release air.
Volvo empfiehlt, zur nächsten autorisierten Volvo-Werkstatt zu fahren, um den Reifen austauschen bzw. reparieren zu lassen. Informieren Sie die Werkstatt, dass der Reifen Dichtmittel enthält.
Die Dichtmittelflasche und der Schlauch müssen nach der Verwendung ersetzt werden. Volvo empfiehlt, zum Austausch eine autorisierte Volvo-Werkstatt zu kontaktieren.
1 Notrad-Mobilität
2 Eine autorisierte Volvo-Werkstatt wird empfohlen.
Testen Sie sich
Ein kurzes Quiz zum Volvo XC90: Zu jeder Antwort gibt es eine Erklärung und einen Link zur Handbuchseite.